Anaconda安装
ubuntu安装
先下载安装包,网页下载或者wget都可以。
1)打开terminal;
2)打开下载文件的位置:
cd Downloads/
3)运行 .sh 文件:
bash Anaconda3-5.2.0-Linux-x86_64.sh
4)进入注册信息页面,输入yes;
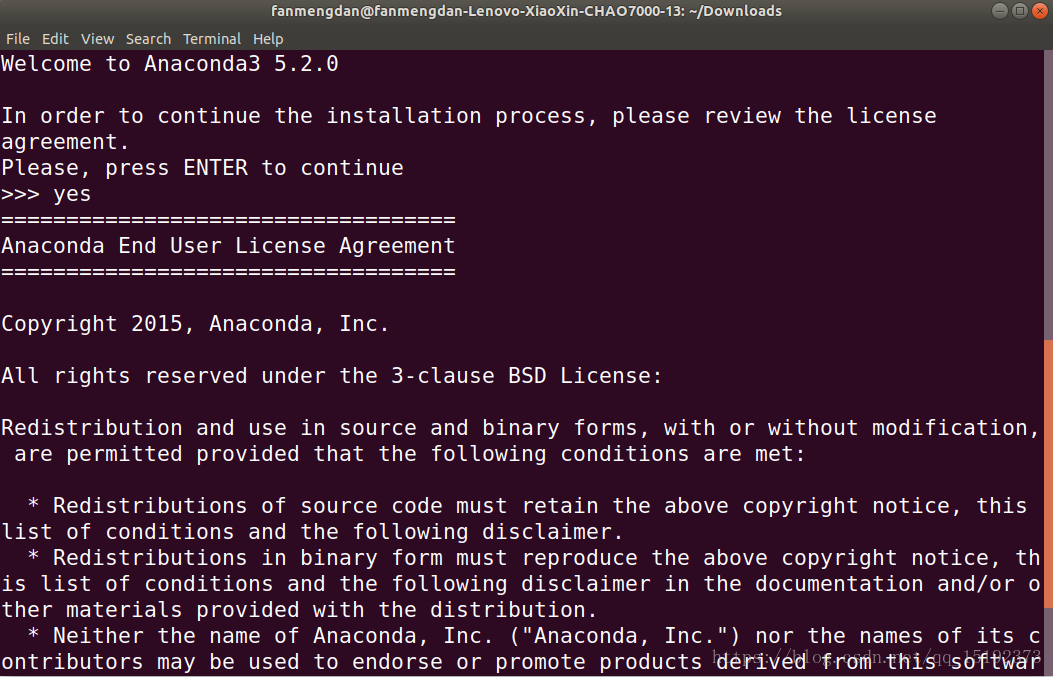
5)一路点Enter或者输入yes
如果卡在了unpacking payload… 就换2019-03的版本。
Anaconda清华镜像: https://mirrors.tuna.tsinghua.edu.cn/anaconda/archive/
更换conda源
1
vim ~/.condarc
1
2
3
4
5
channels:
  - https://mirrors.tuna.tsinghua.edu.cn/anaconda/pkgs/free/
  - https://mirrors.tuna.tsinghua.edu.cn/anaconda/pkgs/main/
  - https://mirrors.tuna.tsinghua.edu.cn/anaconda/cloud/pytorch/
show_channel_urls: true
换回默认源:
1
conda config --remove-key channels
更换pip源
修改 ~/.pip/pip.conf (没有就创建一个), 内容如下:
1
2
[global]
index-url = https://pypi.tuna.tsinghua.edu.cn/simple
换回国内源
注释掉上面的内容
Conda相关命令
配置环境变量
C:\Users\ShawnD\Anaconda3
和
C:\Users\ShawnD\Anaconda3\Scripts
创建虚拟环境
conda create -n Deeplearning python=3.6
列出当前环境
conda env list
激活环境
conda activate Deeplearning
Linux激活环境
source activate Deeplearning
退出环境
deactivate
Linux退出环境:
conda deactivate
删除环境
conda remove -n Deeplearning
把Deeplearning换成你的环境名称
在windows下:
conda env remove –name Deeplearning
查找包
conda search …
conda安装pytorch
conda install pytorch=1.3.0 torchvision=0.4.1 cudatoolkit=10.1 -c pytorch
注意对应的版本
中科大源
中科大源比清华源好用
1
2
pip install -i https://mirrors.ustc.edu.cn/pypi/web/simple package
Jupyter配置
安装jupyter notebook
conda install jupyter notebook
安装ipykernel
conda install ipykernel
jupytext安装
pip安装
pip install jupytext -upgrade
conda安装
conda install -c conda-forge jupytext
jytext可以使jupyter同时保存ipy文件和.py文件
运行jupyter notebook
jupyter notebook
然后在浏览器打开localhost:8888
设置jupyter打开的默认路径
(1) Windows用户在想要存放Jupyter Notebook文件的磁盘中新建文件夹并为该文件夹命名;双击进入该文件夹,然后复制地址栏中的路径。
(2) 配置文件路径
- 一个便捷获取配置文件所在路径的命令:
jupyter notebook –generate-config
(3)修改配置文件
- (a) 打开文件
- (b) 查找关键词, 进入配置文件后查找关键词“c.NotebookApp.notebook_dir”。
- (c) 编辑配置文件 取消注释, 将你想修改的路径填进去
- (d) 保存配置文件
设置默认密码
1
jupyter notebook --generate-config
进入 ipython
1
2
3
4
5
In [1]: from notebook.auth import passwd
In [2]: passwd()
Enter password:
Verify password:
Out[2]: 'sha1:ce23d945972f:34769685a7ccd3d08c84a18c63968a41f1140274'
exit()
接着在 ~/.jupyter/jupyter_notebook_config.py 文件中修改 c.NotebookApp.password
将其修改为上方输出的密码。
jupyter 后台运行
1
jupyter lab --allow-root > jupyter.log 2>&1 &
vscode
安装指定版本的vscode
规律:
- win64: https://vscode.cdn.azure.cn/stable/7c7da59c2333a1306c41e6e7b68d7f0caa7b3d45/VSCodeSetup-x64-1.23.0.exe
- win32: https://vscode.cdn.azure.cn/stable/7c7da59c2333a1306c41e6e7b68d7f0caa7b3d45/VSCodeSetup-ia32-1.23.0.exe
- user64: https://vscode.cdn.azure.cn/stable/7c7da59c2333a1306c41e6e7b68d7f0caa7b3d45/VSCodeUserSetup-x64-1.23.0.exe
- user32: https://vscode.cdn.azure.cn/stable/7c7da59c2333a1306c41e6e7b68d7f0caa7b3d45/VSCodeUserSetup-x641.23.0.exe
- mac: https://vscode.cdn.azure.cn/stable/7c7da59c2333a1306c41e6e7b68d7f0caa7b3d45/VSCode-darwin-stable.zip
结论
- 7c7da59c2333a1306c41e6e7b68d7f0caa7b3d45是commit id
- 1.23.0对应版本号
- commit id 和版本号如何寻找?
https://github.com/microsoft/vscode/releases
安装1.55版本:
https://code.visualstudio.com/updates/v1_55
vscode集成jupyter
发现一个优雅地使用jupyter的方式,使用vscode集成jupyter。
vscode的代码补全比jupyter好用很多,集成jupyter的强大功能,十分优雅。
报错:
“Timed out waiting to get a heartbeat from kernel process.”
安装:
1
conda install ipykernel
vscode集成latex
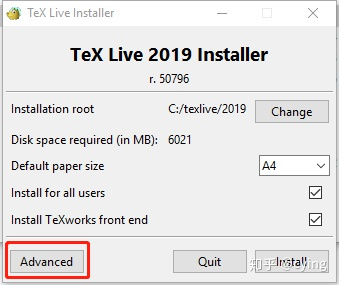
安装texlive
点击Advanced
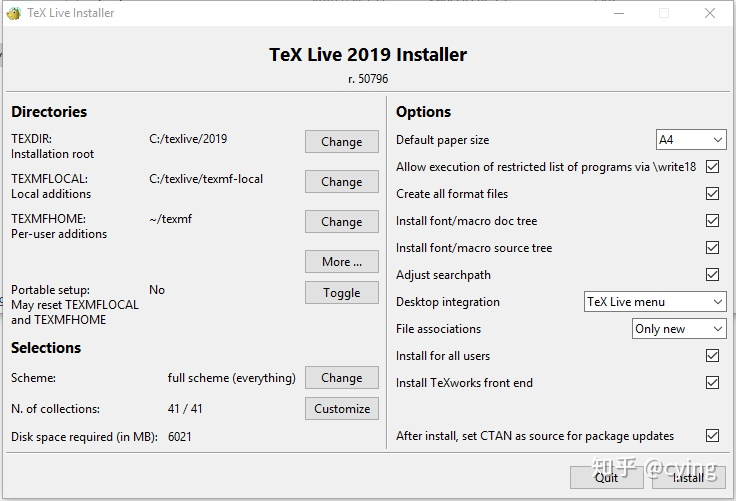
为了控制一下TeX Live占用的内存大小,我们可以选择修改N. of collections选项,并根据个人需要,去掉Texworks(比较老的编辑器,不推荐)以及部分我们日常不会使用的语言包,例如阿拉伯语、斯洛伐克语等等,设置如下:
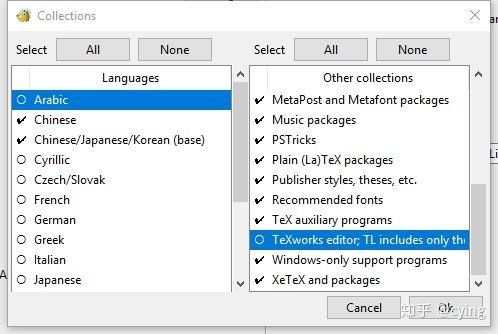
然后点击‘安装TeX Live’就可以啦~经过一段漫长的安装,TeX Live就安装好了。
在安装完之后,可以调用commond,分别输入
tex -v latex -v xelatex -v pdflatex -v
来获取安装的TeX的环境信息!如果看到的版本信息能够正常输出,那么TeX Live的安装就是成功的!
配置latex workshop
LaTeX Workshop 默认的编译工具是 latexmk, 修改为中文环境常用的 xelatex。(将 tools 中的 %DOC%替换成%DOCFILE%就可以支持编译中文路径下的文件)
1
2
3
4
5
6
7
8
9
10
11
12
13
14
15
16
17
18
19
20
21
22
23
24
25
26
27
28
29
30
31
"latex-workshop.latex.tools": [
    {
        // 编译工具和命令
        "name": "xelatex",
        "command": "xelatex",
        "args": [
            "-synctex=1",
            "-interaction=nonstopmode",
            "-file-line-error",
            "-pdf",
            "%DOCFILE%"
        ]
    },
    {
        "name": "pdflatex",
        "command": "pdflatex",
        "args": [
            "-synctex=1",
            "-interaction=nonstopmode",
            "-file-line-error",
            "%DOCFILE%"
        ]
    },
    {
        "name": "bibtex",
        "command": "bibtex",
        "args": [
            "%DOCFILE%"
        ]
    }
],
配置编译链,同样地放入设置区。第一个 recipe 为默认的编译工具
1
2
3
4
5
6
7
8
9
10
11
12
13
14
15
16
17
18
19
20
21
22
23
24
25
26
27
28
29
30
31
32
"latex-workshop.latex.recipes": [
    {
        "name": "xelatex",
        "tools": [
            "xelatex"
        ],
    },
    {
        "name": "pdflatex",
        "tools": [
            "pdflatex"
        ]
    },
    {
        "name": "xe->bib->xe->xe",
        "tools": [
            "xelatex",
            "bibtex",
            "xelatex",
            "xelatex"
        ]
    },
    {
        "name": "pdf->bib->pdf->pdf",
        "tools": [
            "pdflatex",
            "bibtex",
            "pdflatex",
            "pdflatex"
        ]
    }
],
如需要使用 bibtex, 可使用如下方法:
- 在编译时单击 VSCode 界面左下角的小勾,单击“Build LaTeX project”,选择带 bib 的 Recipe;
- 将带 bib 的 Recipe 放到第一位,就可以作为默认 Recipe 编译了,也可以但因为编译次数比较多,速度会比较慢。大家可以根据需要自行按照格式添加自己需要的编译链;
- 在文档的开头添加“%!BIB program = bibtex”就可以自动处理 bib 了。
使用 SumatraPDF 预览编译好的PDF文件,添加以下代码进入设置区。
1
2
3
4
5
6
7
8
9
10
11
12
"latex-workshop.view.pdf.viewer": "external",

"latex-workshop.view.pdf.external.viewer.command": "C:/.../SumatraPDF.exe",
"latex-workshop.view.pdf.external.viewer.args": [
    "-forward-search",
    "%TEX%",
    "%LINE%",
    "-reuse-instance",
    "-inverse-search",
    "\"C:/.../Microsoft VS Code/Code.exe\" \"C:/.../Microsoft VS Code/resources/app/out/cli.js\" -gr \"%f\":\"%l\"",
    "%PDF%"
],
viewer”选择使用外置阅读器,“viewer.command”和 “viewer.args”中有“…”的地方需要根据自己电脑上 SumatraPDF 和 VSCode 的安装位置进行修改。
配置正向和反向搜索
1
2
3
4
5
6
7
8
9
10
"latex-workshop.view.pdf.external.synctex.command": "C:/.../SumatraPDF.exe",
"latex-workshop.view.pdf.external.synctex.args": [
    "-forward-search",
    "%TEX%",
    "%LINE%",
    "-reuse-instance",
    "-inverse-search",
    "code \"C:/.../Microsoft VS Code/resources/app/out/cli.js\" -gr \"%f\":\"%l\"",
    "%PDF%",
],
添加代码进入设置区以配置正向搜索,和上面一样,里面“…”的部分结合自身情况修改(如果不加双引号,在文件路径有空格的情况下会导致无法反向搜索)
如果编译出错,插件会弹出两个很烦人的气泡,可以在设置中添加以下代码:
1
2
"latex-workshop.message.error.show": false,
"latex-workshop.message.warning.show": false,
ubuntu下配置latex
安装texlive
1
2
3
4
5
sudo apt-get install texlive-latex-base
sudo apt-get install latex-cjk-all
sudo apt-get install texlive-latex-extra
sudo apt-get install texlive-xetex
sudo apt-get install texlive-publishers
完整安装
1
sudo apt install texlive-full
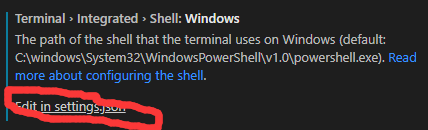
然后在设置里面,搜索latex-workshop.latex.recipes,点击 Edit in settings.json 将如下命令粘贴进去
1
2
3
4
5
6
7
8
9
10
11
12
13
14
15
16
17
18
19
20
21
22
23
24
25
26
27
28
29
30
31
32
33
34
35
36
37
38
39
40
41
42
43
44
45
46
47
48
49
50
51
52
53
54
55
56
57
58
59
60
61
62
63
64
65
66
67
68
69
70
71
72
73
74
75
76
77
78
79
80
81
82
83
84
85
86
87
88
89
90
91
92
93
94
95
96
97
98
99
100
101
102
103
"latex-workshop.latex.tools": [
        {
          "name": "latexmk",
          "command": "latexmk",
          "args": [
          "-synctex=1",
          "-interaction=nonstopmode",
          "-file-line-error",
          "-pdf",
          "%DOC%"
          ]
        },
        {
          "name": "xelatex",
          "command": "xelatex",
          "args": [
          "-synctex=1",
          "-interaction=nonstopmode",
          "-file-line-error",
          "%DOC%"
            ]
        },
        {
          "name": "pdflatex",
          "command": "pdflatex",
          "args": [
          "-synctex=1",
          "-interaction=nonstopmode",
          "-file-line-error",
          "%DOC%"
          ]
        },
        {
          "name": "bibtex",
          "command": "bibtex",
          "args": [
          "%DOCFILE%"
          ]
        }
    ],


    "latex-workshop.latex.recipes": [
        {
            "name": "pdflatex",
            "tools": [
                "pdflatex",
            ]
        },
        {
            "name": "pdflatex -> bibtex -> pdflatex*2",
            "tools": [
                "pdflatex",
                "bibtex",
                "pdflatex",
                "pdflatex"
            ]
        },
        {
            "name": "xelatex -> bibtex -> xelatex*2",
            "tools": [
                "xelatex",
                "bibtex",
                "xelatex",
                "xelatex"
            ]
        },
        {
            "name": "xelatex",
            "tools": [
                "xelatex"
            ]
        },
        {
            "name": "latexmk",
            "tools": [
                "latexmk"
            ]
        },
    ],

    "latex-workshop.view.pdf.viewer": "tab",
    "latex-workshop.latex.clean.fileTypes": [
    "*.aux",
    "*.bbl",
    "*.blg",
    "*.idx",
    "*.ind",
    "*.lof",
    "*.lot",
    "*.out",
    "*.toc",
    "*.acn",
    "*.acr",
    "*.alg",
    "*.glg",
    "*.glo",
    "*.gls",
    "*.ist",
    "*.fls",
    "*.log",
    "*.fdb_latexmk"
    ],
关闭右下角的错误或警告提示
settings -> Latex-workshop -> Error show
settings -> Latex-workshop -> Information show
settings -> Latex-workshop -> Warning show
全部关闭
vscode切换默认terminal
terminal默认为powershell, 我们切换成cmd
在设置中
搜索shell, 找到
编辑它为

vscode代码补全
在python Language Server中选择。
因为vscode中 workspace和python import 文件路径的冲突问题, 改用kite。
vscode 由于import路径和workspace路径冲突而产生的误报错波浪线
setting中修改python.analysis.disabled, 添加项unresolved-import。
在服务器上安装kite
bash -c “$(wget -q -O - https://linux.kite.com/dls/linux/current)”
使用TabNine作为代码补全工具
Tabnine比kite更香一些
直接在vscode插件安装即可,几乎零配置
tabnine::sem 启用语法填充
vscode代码提示路径包含问题
方案1:
需要解析多级目录下的自定义模块,只需设置 python.autoComplete.extraPaths 属性,在 .vscode/settings.json 中添加需要解析的目录 ./src :
1
2
3
{
    "python.autoComplete.extraPaths": ["./src"]
}
方案2:
给定以下示例目录结构:
1
2
3
4
5
6
workspaceRootFolder
  .vscode
  |...OtherFolders
  |codeFolder
      |-__init__.py
      |...OtherLibFiles
进入工作区文件夹创建一个 .env 文件,在此空 .env 文件中添加一行:
1
2
# 用您的文件夹名称替换codeFolder
PYTHONPATH = codeFolder
将 python.envFile 设置添加到 settings.json 中:
1
"python.envFile": "${workspaceFolder}/.env"
然后重启 VS Code,完成!
如果 PYTHONPATH 中希望添加多个路径, 只需修改 .env 文件,多个需要添加到 PYTHONPATH 的文件夹间用 os.pathsep 分隔,示例:
1
2
3
4
# Windows
PYTHONPATH = codeFolder1 ; codeFolder2
# Linux/macOS
PYTHONPATH = codeFolder1 : codeFolder2
python自动格式化
在Settings中搜索python.formatting.provider, 修改它的值。
若未安装工具,则右下角会弹出配置通知,选择喜欢的工具安装即可。
批量替换文本内容
1.先用鼠标选中你需替换的文字(任意一处);
2.按ctrl+shift+L,就可选中所有
3.输入你需要替换的内容,就完成了
vscode搭建C/C++环境
安装MinGW
设置完环境变量也许需要重新启动。
搭建环境
配置lauch.json
1
2
3
4
5
6
7
8
9
10
11
12
13
14
15
16
17
18
19
20
21
22
23
24
25
26
27
28
{
    // Use IntelliSense to learn about possible attributes.
    // Hover to view descriptions of existing attributes.
    // For more information, visit: https://go.microsoft.com/fwlink/?linkid=830387
    "version": "0.2.0",
    "configurations": [
        {
            "name": "g++.exe - 生成和调试活动文件",
            "type": "cppdbg",
            "request": "launch",
            "program": "${fileDirname}\\${fileBasenameNoExtension}.exe",
            "args": [],
            "cwd": "${workspaceFolder}",
            "environment": [],
            "externalConsole": true,
            "MIMode": "gdb",
            "miDebuggerPath": "C:\\MinGW\\bin\\gdb.exe",
            "setupCommands": [
                {
                    "description": "为 gdb 启用整齐打印",
                    "text": "-enable-pretty-printing",
                    "ignoreFailures": true
                }
            ],
            "preLaunchTask": "C/C++: g++.exe build active file"
        }
    ]
}
这里需要把miDebuggerPath改成自己的gdb的路径。
配置tasks.json。
1
2
3
4
5
6
7
8
9
10
11
12
13
14
15
16
17
18
19
20
21
22
23
24
25
26
{
    "tasks": [
        {
            "type": "shell",
            "label": "C/C++: g++.exe build active file",
            "command": "C:\\MinGW\\bin\\g++.exe",
            "args": [
                "-g",
                "${file}",
                "-o",
                "${fileDirname}\\${fileBasenameNoExtension}.exe"
            ],
            "options": {
                "cwd": "${workspaceFolder}"
            },
            "problemMatcher": [
                "$gcc"
            ],
            "group": {
                "kind": "build",
                "isDefault": true
            }
        }
    ],
    "version": "2.0.0"
}
C++文件的自定义代码补充
1
2
3
4
5
6
7
8
9
10
11
12
13
14
15
16
17
18
19
20
21
22
23
24
25
26
27
28
29
30
31
32
33
34
35
36
37
38
39
40
41
42
43
44
45
46
47
48
49
50
51
52
53
54
55
{
	// Place your snippets for cpp here. Each snippet is defined under a snippet name and has a prefix, body and
	// description. The prefix is what is used to trigger the snippet and the body will be expanded and inserted. Possible variables are:
	// $1, $2 for tab stops, $0 for the final cursor position, and ${1:label}, ${2:another} for placeholders. Placeholders with the
	// same ids are connected.
	// Example:
	"cppTemplate": {
		"prefix": "#Temp",
		"body": [
			"#include <iostream>",
			" ",
			"typedef long long ll;",
			" ",
			"using namespace std;",
			" ",
			"int main(){",
			"	${1:code}",
			"	",
			"	system("pause");",
			"	return 0;",
			"}"
		],
		"description": "cppTemplate"
	},
	"fori": {
		"prefix": "fori",
		"body": [
			"for(int i=0; i<${2:condition}; ++i){",
			"	${4:code}",
			"}"
		],
		"description": "fori"
	},
	"forj": {
		"prefix": "forj",
		"body": [
			"for(int j=0; j<${2:condition}; ++j){",
			"	${4:code}",
			"}"
		],
		"description": "forj"
	},
	"classS": {
		"prefix": "classS",
		"body": [
			"class Solution${1:num}{",
			"public:",
			"	void Problem${2:num}(){",
			"		${3:code}",
			"	}",
			"};"
		],
		"description": "classS"
	},
}
vscode远程连接到服务器
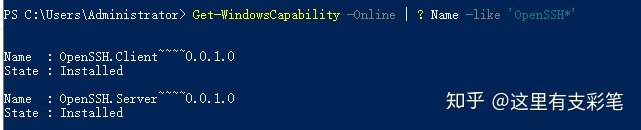
安装OpenSSH
该服务的作用是让你可以在终端使用ssh指令,Windows10通常自带OpenSSH不需要安装。
Windows10下检查是否已经安装OpenSSH的方法:
按下快捷键Win + X,选择Windows PoweShell(管理员),输入以下指令:
Get-WindowsCapability -Online | ? Name -like ‘OpenSSH*’
如果电脑未安装OpenSSH,则State会显示NotPresent:
如果未安装,则输入指令:
Add-WindowsCapability -Online -Name OpenSSH.Client~~~~0.0.1.0
安装完成后会出现以下输出

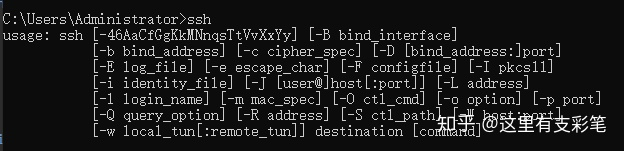
OpenSSH安装成功后,Win+R输入cmd进入终端,输入ssh命令应该得到如下结果:
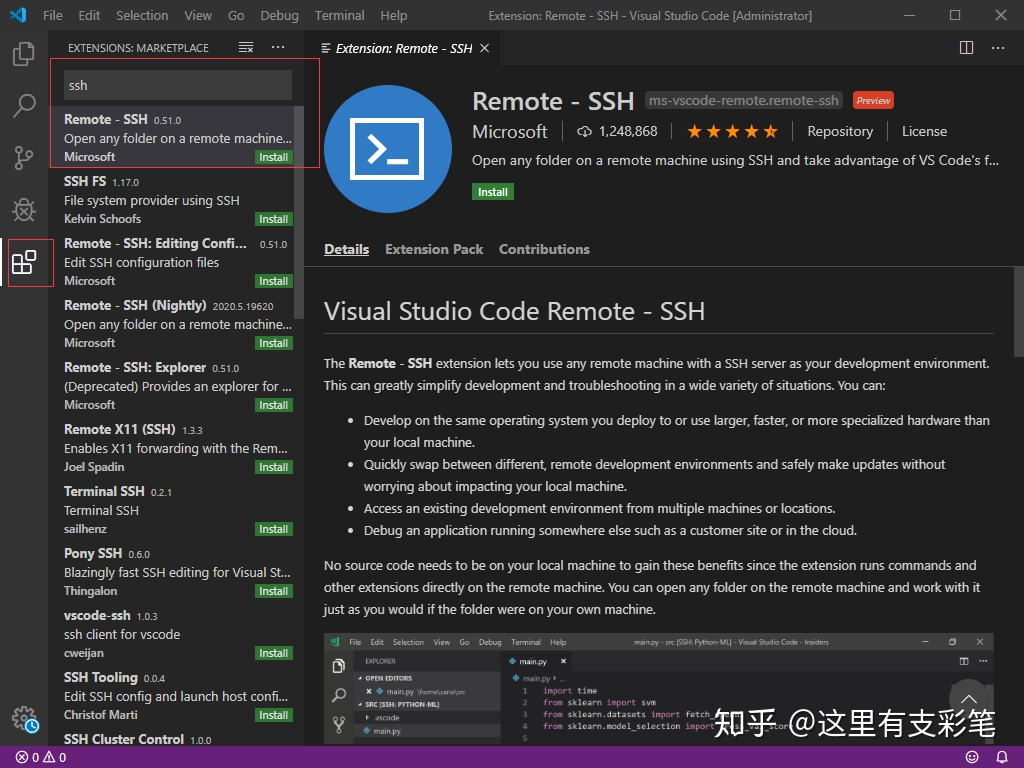
Remote-SSH
Remote-SSH是VScode的插件,安装完VScode以后,直接在插件中搜索ssh,即可找到Remote-SSH,点击install安装。
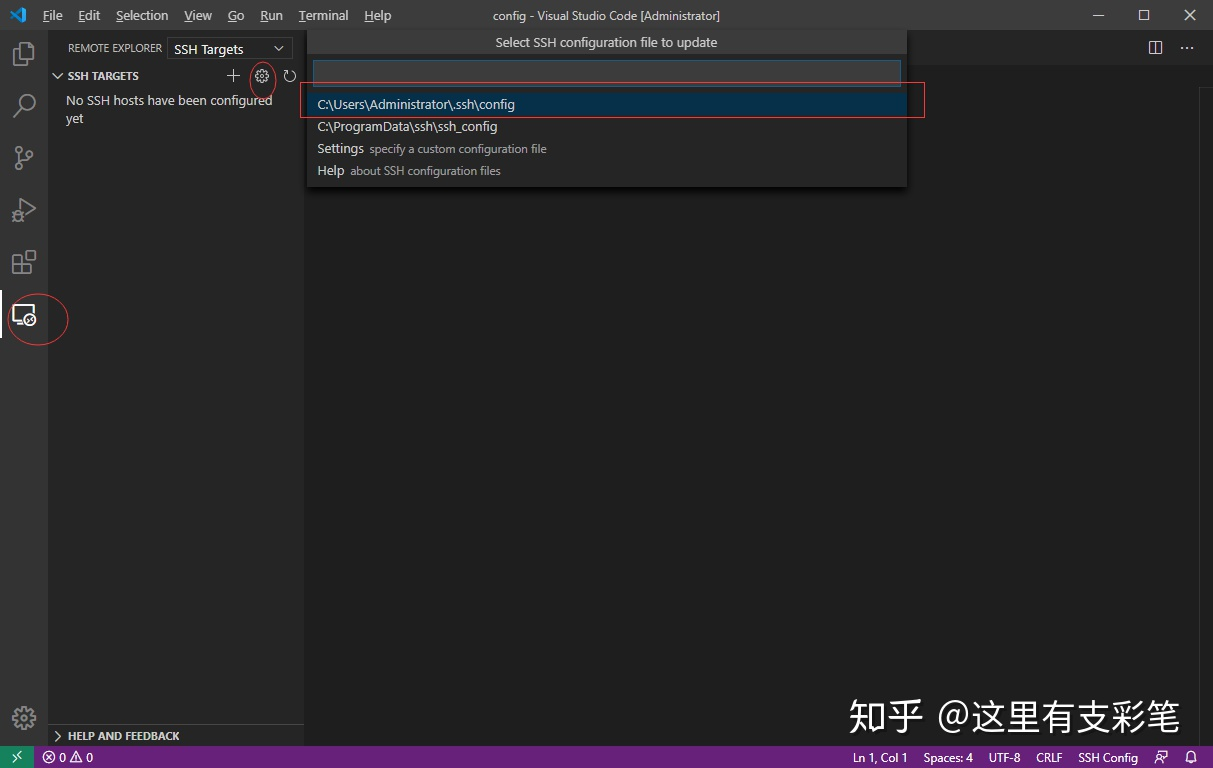
安装完Remote-SSH以后左侧会出现一个远程资源管理的图标,选择SSH Targets,进入config配置文件
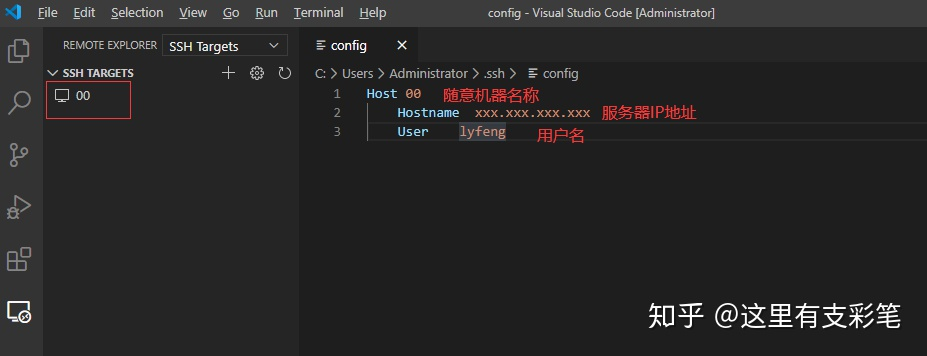
在配置文件中设置服务器信息,输入HostName和User,保存以后左侧会出现对应机器名称。
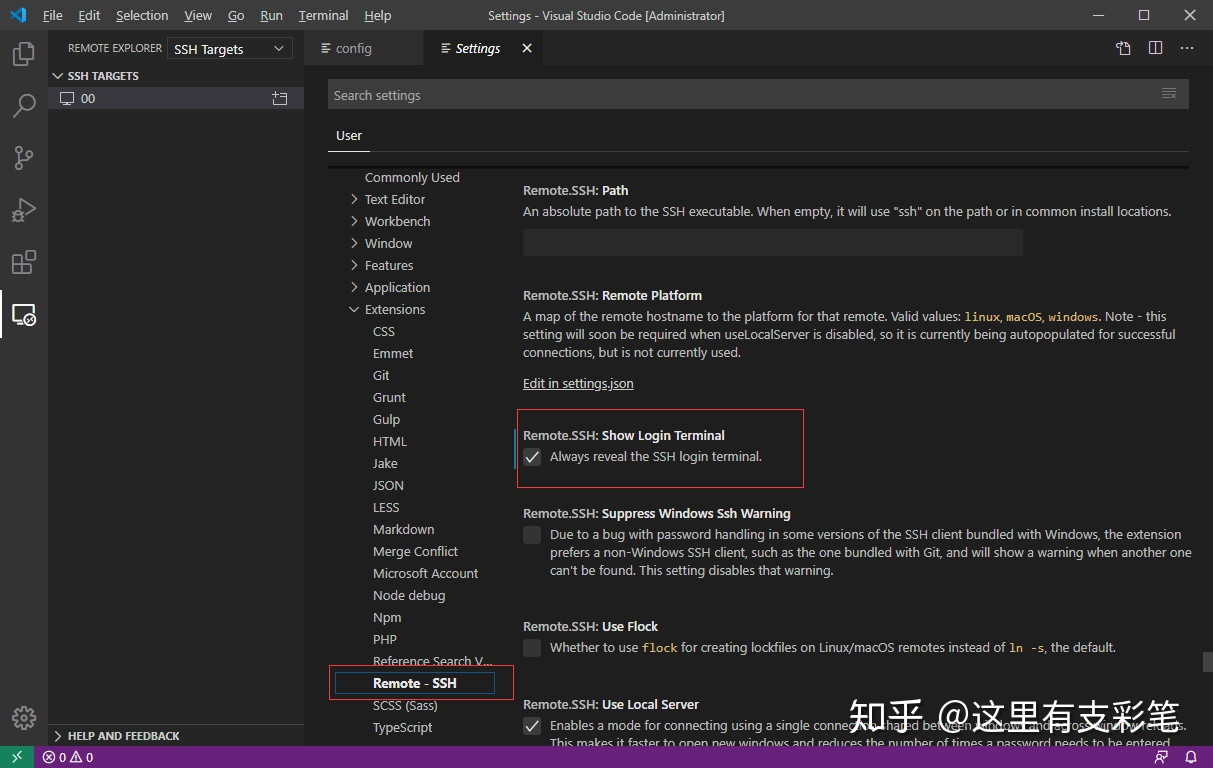
更改设置,File->Preferences->Settings->Extension->Remote-SSH,找到Show Login Terminal并勾选。
点击SSH TARGETS下的服务器旁边的按钮纽行连接,弹出让你输入密码:
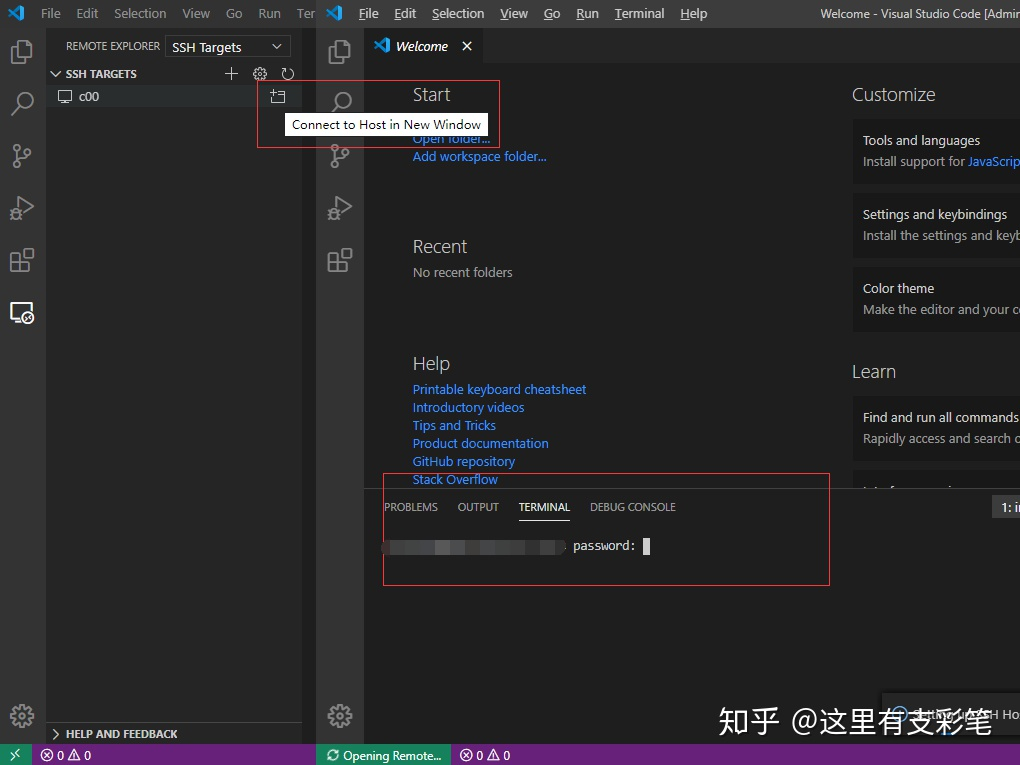
在这里可能会弹出让你选择服务器的平台,需要选择以后才会出现输入密码的步骤

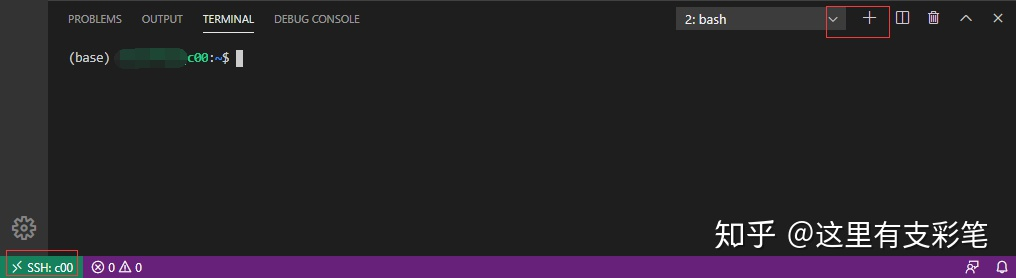
成功连上服务器,点击有右侧的+号创建服务器的终端窗口,可以正常使用了!
设置免密登录
在本地pc生成ssh公钥和私钥
ssh-keygen -t rsa
将本地的公钥文件上传到服务器上,然后在服务器需要免密登录的用户家目录下查看是否有 ~/.ssh/authorized_keys 这个文件, 如果没有手动创建一个:
touch ~/.ssh/authorized_keys
将公钥写入authorized_keys
设置文本自动换行
进入文件>首选项>设置,打开设置界面,在常用设置下找到Editor:Word Wrap选项,默认为off,设置为on即可。
设置背景颜色
settings中的这个选项
1
workbench.colorTheme
关闭vscode的C/C++代码错误提示
在设置中搜索,C_Cpp.errorSquiggles
vscode 打开 tensorboard
Python扩展的最新更新中,他们在VS Code中添加了对TensorBoard集成的支持。
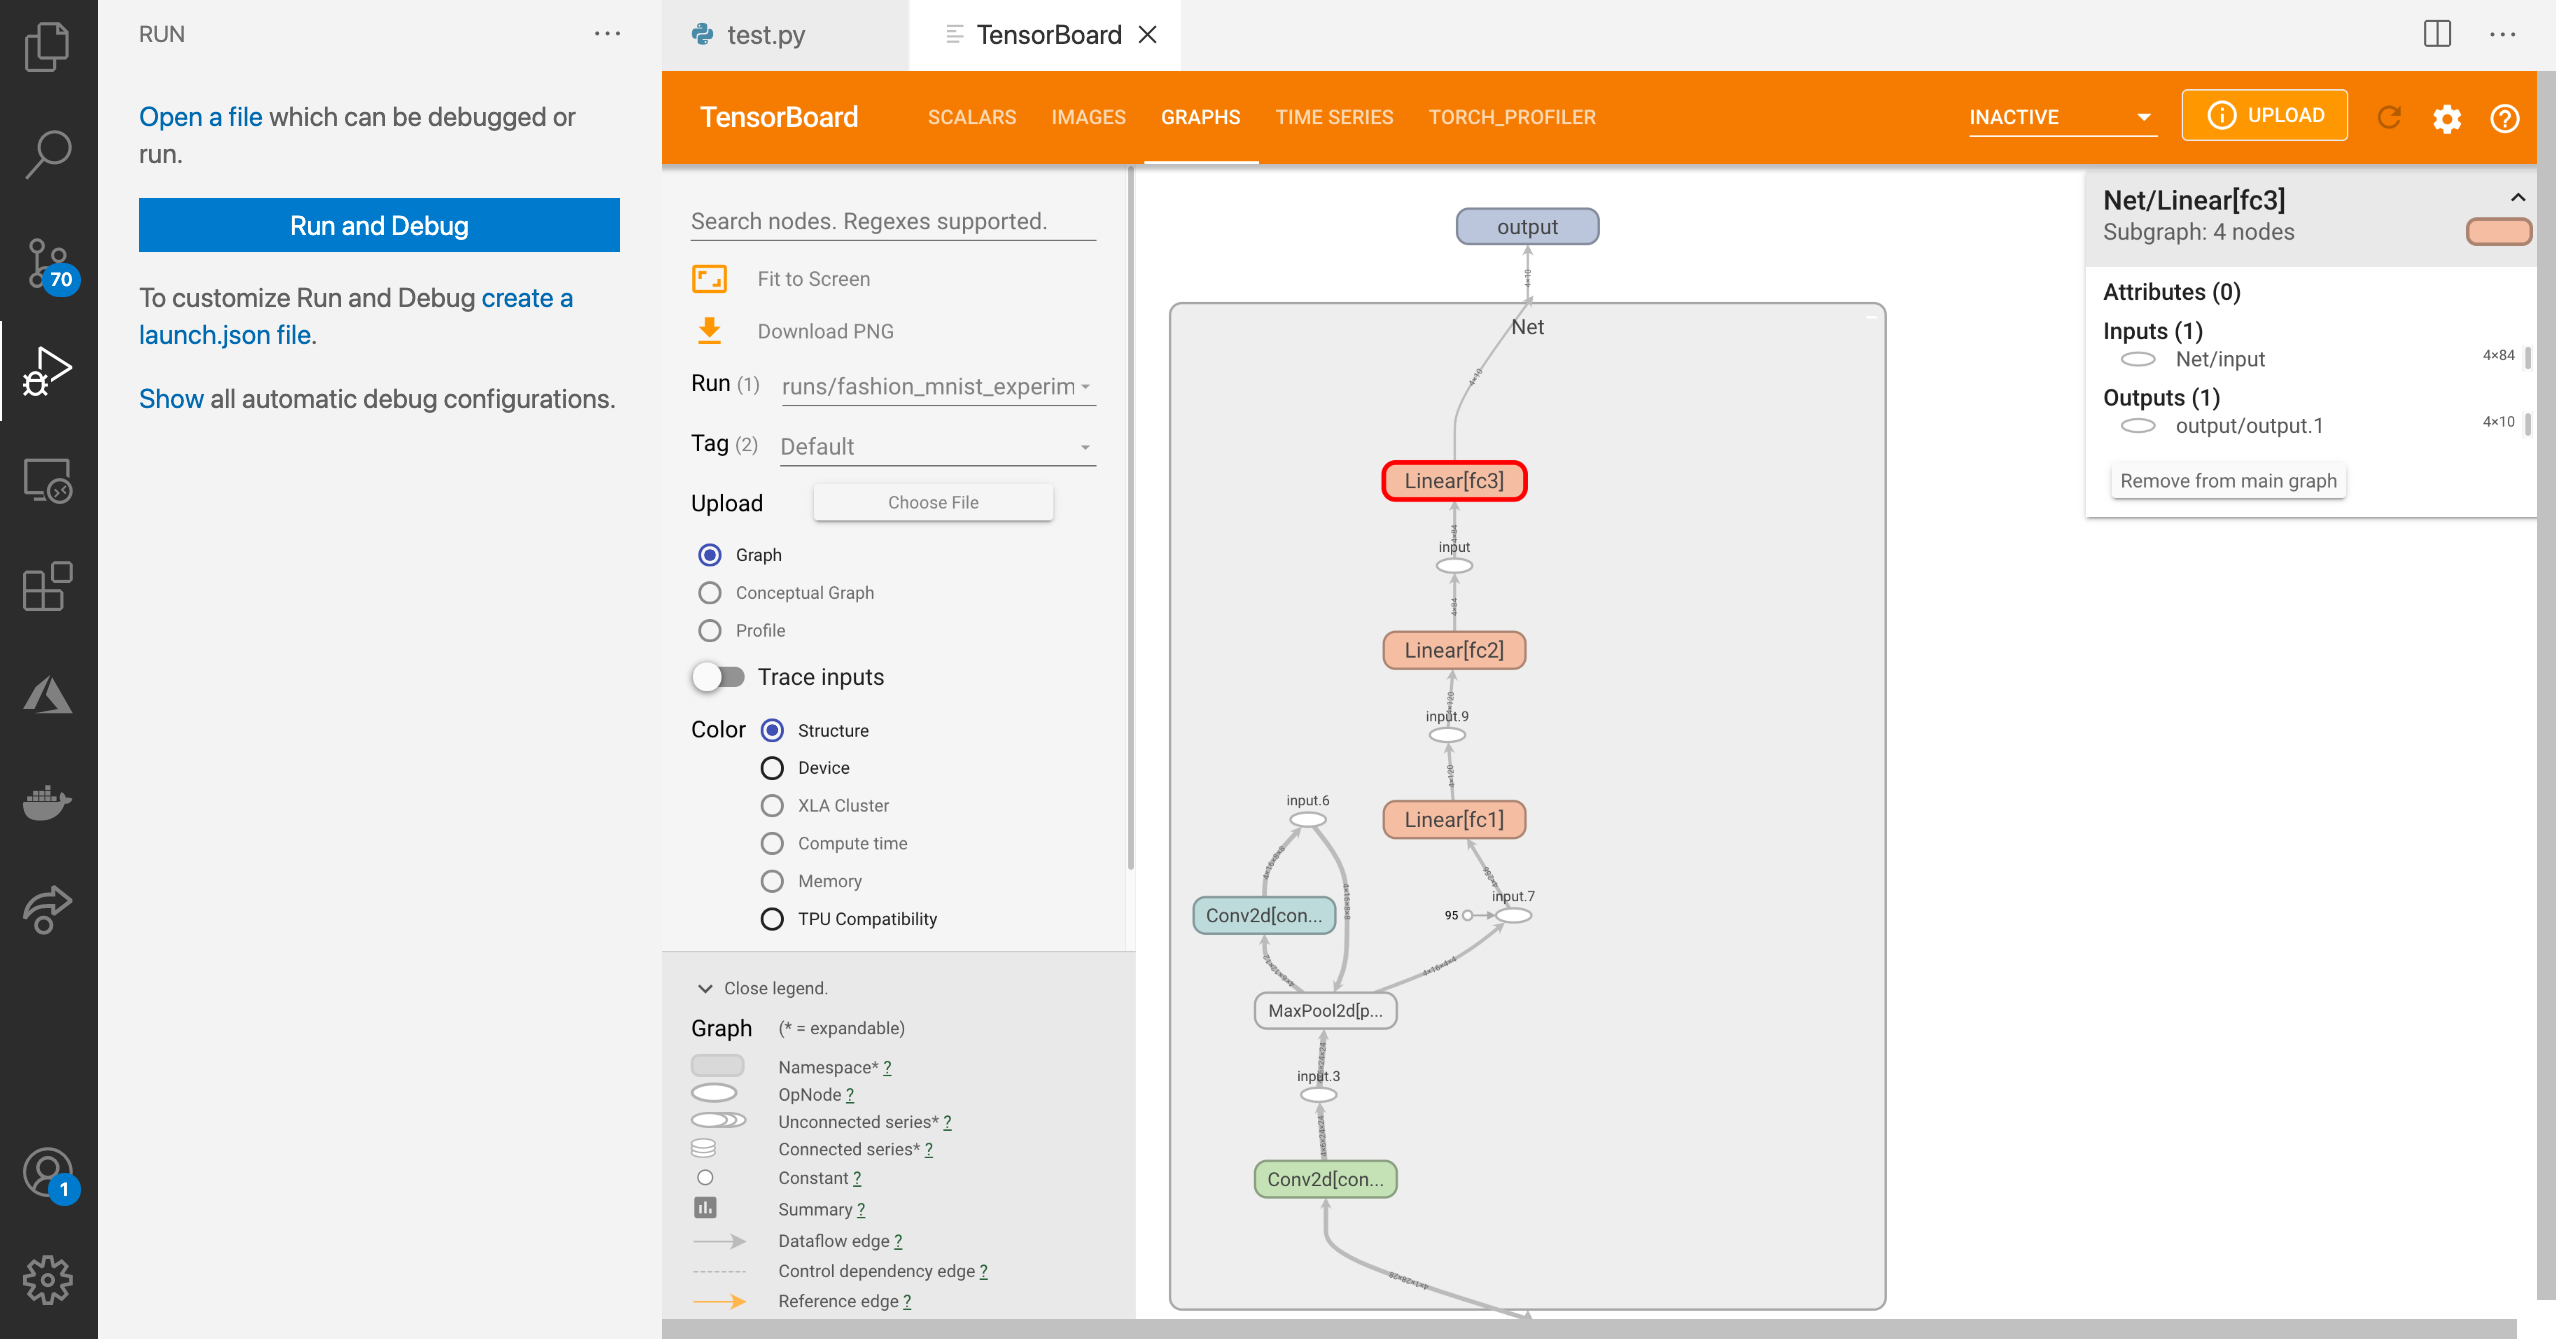
要运行tensorboard, 打开 vscode 的 command patte, 搜索命令 “Launch TensorBoard”

vscode remote + frp
FRP 参见 《翻墙工具及机场备份》
ssh 配置
1
2
3
HostName 1.1.1.1(服务器ip)
User Shawn(客户端用户名)
Port 6000(客户端 remote port)
SFTP
安装vscode sftp
按 ctrl + shift + p 在.vscode 下 创建一个 sftp.json 文件, 填入以下内容:
配置
1
2
3
4
5
6
7
8
9
10
11
12
13
14
15
16
17
18
19
20
21
22
23
24
25
{
    "host": "ip地址",
    "port": 22,
    "username": "登录名",
    "password": "登录密码",
    "protocol": "sftp",
    "agent": null,
    "privateKeyPath": null,
    "passphrase": null,
    "passive": false,
    "interactiveAuth": true,
    "remotePath": "需要连接的远程的文件夹地址",
    "uploadOnSave": true,
    "syncMode": "update",
    "ignore": [
        "**/.vscode/**",
        "**/.git/**",
        "**/.DS_Store"
    ],
    "watcher": {
        "files": "glob",
        "autoUpload": true,
        "autoDelete": true
    }
}
同步多个服务器
配置文件
1
2
3
4
5
6
7
8
9
10
11
12
13
14
15
16
17
18
19
20
21
22
23
24
25
26
27
28
29
30
31
32
33
{
    "name":"sftp",
    "protocol": "sftp",
    "ignore": [
        "**/.vscode/**",
        "**/.git/**",
        "**/.DS_Store",
        "**/dataset/**",
        "**/output/**"
    ],
    "watcher": {
        "files": "glob",
        "autoUpload": true,
        "autoDelete": true
    },
    "profiles": {
        "server1": {
        "host": "xxx.xxx.xxx.xxx",
        "port": 6000,
        "username": "username",
        "password": "password",
        "remotePath": "remotePath"
        },
        "server2":{
        "host": "xxx.xxx.xxx.xxx",
        "port": 6001,
        "username": "username",
        "password": "password",
        "remotePath": "remotePath"
        }
    },
    "defaultProfile": "server1"
}
Bug解决
pylint错误
执行脚本后,发现会出现莫名其妙的错误,但是程序会成功执行。

这是由于pylint中没有torch的信息,百度后,发现需要加载本地的pylint,不适用vscode中自带的pylint。需要在VSCode setting中搜索python.linting.pylintPath,将红框中的内容改成本地的pylint。

我的是改成:(Anaconda安装路径)\pkgs\pylint-1.8.4-py36_0\Scripts\pylint
重启后,执行不会报错。
Error: No such file (sftp liximomo extension)
1、Shutdown / Quit VS Code.
2、 Locate the following file:
Mac OS X:
~/.vscode/extensions/liximomo.sftp-1.12.9/node_modules/ssh2-streams/lib/sftp.js
Windows:
C:\Users\account_name.vscode\extensions\liximomo.sftp-1.12.9\node_modules\ssh2-streams\lib\sftp.js
3、 Make a backup copy of the file.
4、 Modify line 388, which should be:
if ( code === STATUS_CODE . OK ) { changing it to: if (code === STATUS_CODE.OK || code === STATUS_CODE.NO_SUCH_FILE) {
5、 Save the file.
6、 Relaunch VS Code; test by uploading or downloading from your sftp server. The error should not be present.
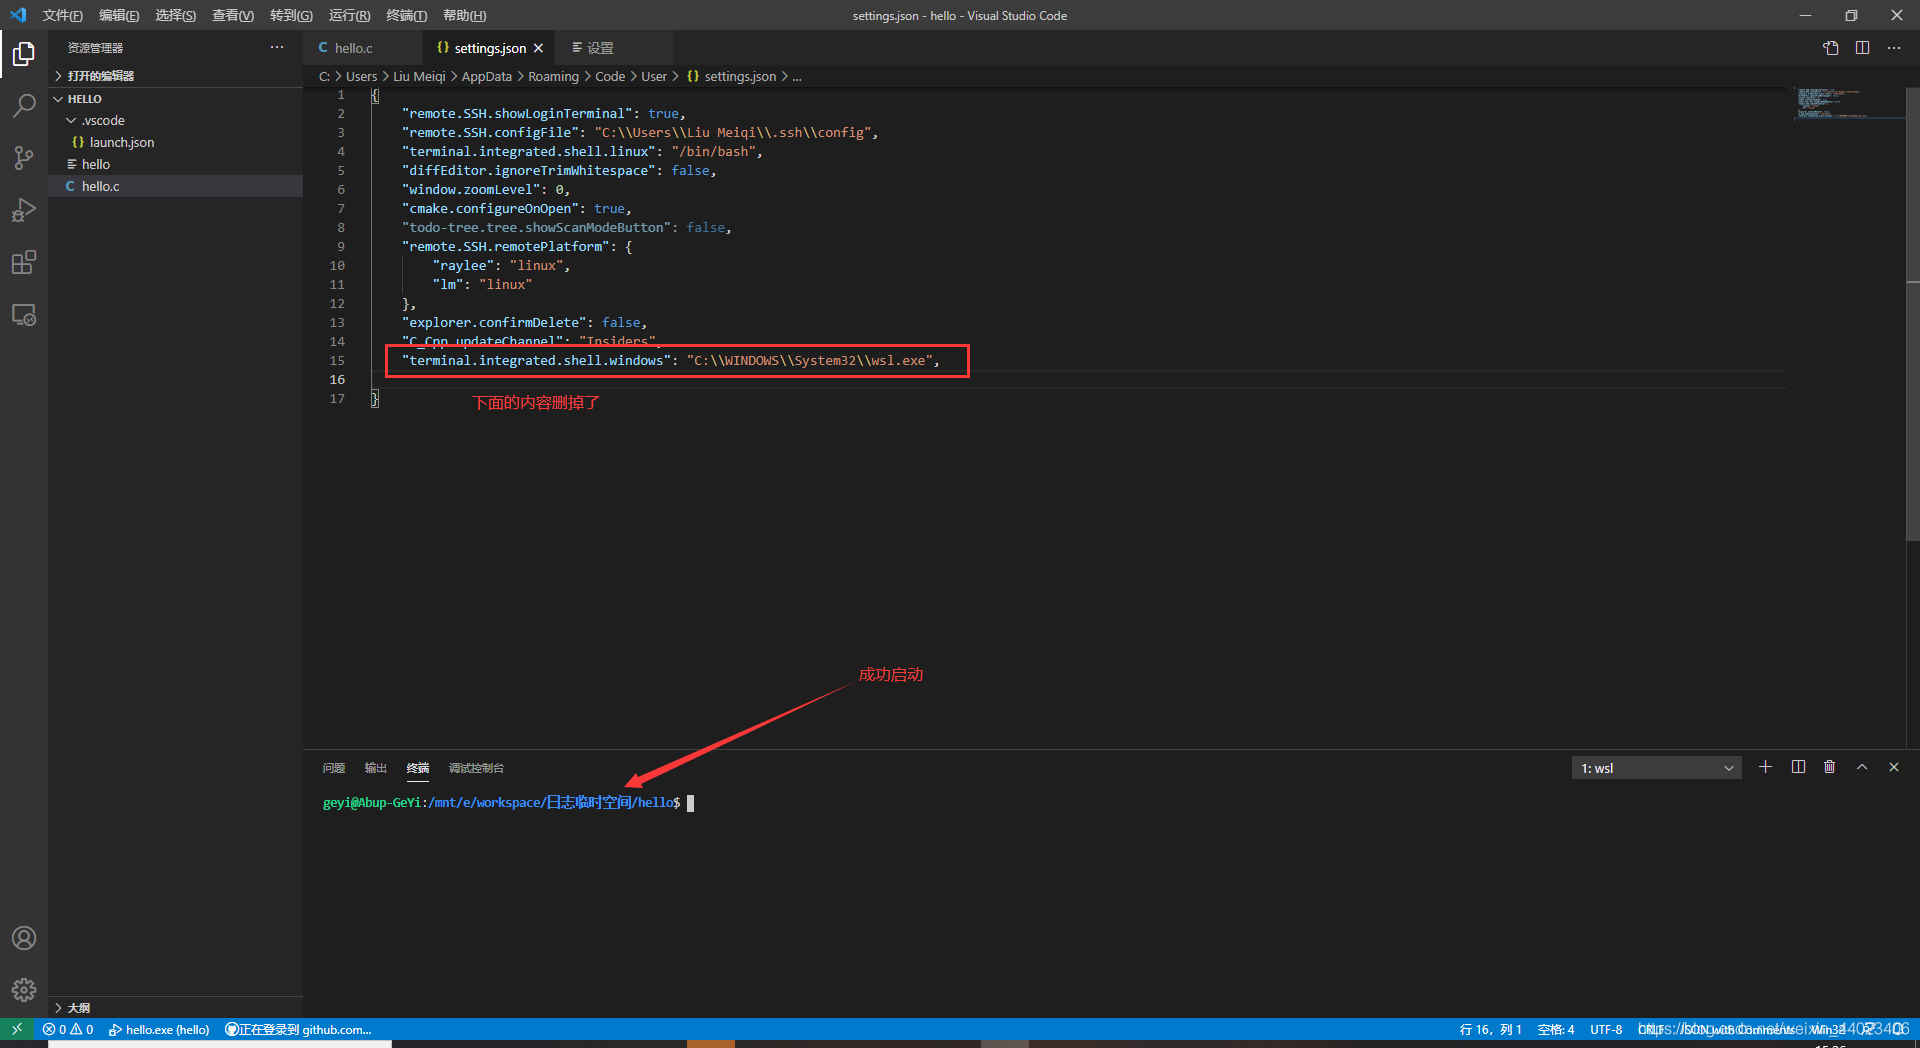
vscode中WSL启动失败
终端进程“C:\WINDOWS\System32\wsl.exe ‘-d’, ‘Ubuntu-16.04 (默认)’”启动失败(退出代码: 4294967295)。

打开setting.json删掉上图中内容
WSL2启动失败
1
2
3
Installing, this may take a few minutes...
WslRegisterDistribution failed with error: 0x80370102
Error: 0x80370102 ???????????????????
原因: 没有开启虚拟化
解决方案:
- 重启电脑,进入 BIOS 开启虚拟化技术
- 控制面板->程序和功能->启用或关闭windows功能, ,勾选 Hyper-V、适用于 Linux 的 Windows 子系统、虚拟机平台,勾选这三个选项。
- 重启电脑。
Vim
我为什么弃用 vscode
因为在本机安装包是会遇到各种依赖问题, 因此考虑使用docker解决这个问题。
然而使用 docker 会导致 docker 中安装的包宿主机里没有安装, 使用vscode编程时没有代码提示。
因此考虑直接在 terminal 里编程, 使用 vim 编码。
安装 neovim
1
sudo apt install neovim
因为只要 prerelease 才支持 copilot:
1
apt-get install software-properties-common
报错:
Unable to fetch some archives, maybe run apt-get update or try with –fix-missing?
解决方法:
1
2
3
sudo vim /etc/resolv.conf

添加nameserver 8.8.8.8
1
2
3
add-apt-repository ppa:neovim-ppa/unstable
apt-get update
apt-get install neovim
安装 copilot
1
2
git clone https://github.com/github/copilot.vim.git \
  ~/.config/nvim/pack/github/start/copilot.vim
终端输入 nvim, 输入 :Copilot setup 验证。
在 nvim 中 输入 :help copilot 查看帮助。
输入 :Copilot status 查看当前状态。
输入 :Copilot enbale 激活 copilot。
推荐:
使用 vim-plug 安装
1
2
3
4
5
6
7
8
9

" Plugins will be downloaded under the specified directory.
call plug#begin(has('nvim') ? stdpath('data') . '/plugged' : '~/.vim/plugged')

" Declare the list of plugins.
Plug 'github/copilot.vim'

" List ends here. Plugins become visible to Vim after this call.
call plug#end()
安装 vim-plug
1
2
3
# Neovim (~/.local/share/nvim/site/autoload)
curl -fLo ~/.local/share/nvim/site/autoload/plug.vim --create-dirs \
    https://raw.githubusercontent.com/junegunn/vim-plug/master/plug.vim
创建 ~/.config/nvim/init.vim 文件
输入以下内容
1
2
3
4
5
6
7
8
9
" Plugins will be downloaded under the specified directory.
call plug#begin(has('nvim') ? stdpath('data') . '/plugged' : '~/.vim/plugged')

" Declare the list of plugins.
Plug 'tpope/vim-sensible'
Plug 'junegunn/seoul256.vim'

" List ends here. Plugins become visible to Vim after this call.
call plug#end()
注意, 它必须以 call plug#begin(PLUGIN_DIRECTORY) 开头, call plug#end() 结尾。
安装 coc.nvim
安装依赖:
1
curl -sL install-node.now.sh | bash
1
curl --compressed -o- -L https://yarnpkg.com/install.sh | bash
在 init.vim 中加入:
1
Plug 'neoclide/coc.nvim', {'branch': 'release'}
在 nvim 中 :PlugInstall。
安装tabnine
在 nvim 中:
1
:CocInstall coc-tabnine
安装 Python 支持
1
:CocInstall coc-pyright
安装快速生成代码插件
1
:CocInstall coc-snippets
vim 换色
1
 Plug 'flazz/vim-colorschemes', {'branch': 'master'}
1
2
修改主题
colorscheme wombat
NERDTree
1
2
3
call plug#begin()
  Plug 'preservim/nerdtree'
call plug#end()
vim插件NERDTree基本配置
使用组合按键 Ctrl + w,可将光标自动在左右侧窗口进行切换
在 vim 启动的时候默认开启 NERDTree:
1
autocmd VimEnter * NERDTree
退出时自动关闭 NERDTree
1
autocmd bufenter * if (winnr("$") == 1 && exists("b:NERDTree") && b:NERDTree.isTabTree()) | q | endif
TagBar
vim 改变切换窗口的快捷键
1
2
3
4
map <c-j> <c-w>j "move up
map <c-k> <c-w>k "down
map <c-l> <c-w>l "right
map <c-h> <c-w>h "left
vim-airline

vim-colors-solarized
ctrlp.vim
这个插件也是比较有代表性的,叫做“Fuzzy file finder”,意思就是文件的模糊查询。当我们需要打开一个文件的时候,只需要按ctrl+p快捷键(当然可以定制),然后输入文件路径中的任意字符,ctrlp就会列出所有模糊匹配到的文件。如果找到了所需文件,直接回车即可打开。通常如果文件路径重名的情况比较多,则需要输入比较精确的名字,如果重名的情况少,则简单输入几个字符即可找到所需文件。这个应该是打开文件的最快方式之一了。
但是这里有个问题需要注意下,就是这个插件打开一次之后就会缓存当前项目的目录树。所以当你新增或删除了文件之后,需要清空它的缓存才能在下一次查找的时候更新查找结果。清空缓存的命令是:
1
:CtrlPClearAllCaches
terminal 中的文件管理器 ranger
使用 ranger 来查看图片, 修改 ~/.config/ranger/rc.conf
1
2
3
set preview_images true

set preview_images_method w3m
ranger默认情况下不会生成配置文件,需要手动生成(拷贝):
1
ranger --copy-config=all
将 ranger 的默认编辑器改为 neovim
打开 ~/.config/ranger/rifle.conf, 找到以下代码段:
1
2
3
4
5
6
7
8
#-------------------------------------------
# Misc
#-------------------------------------------
# Define the "editor" for text files as first action
mime ^text,  label editor = $EDITOR -- "$@"
mime ^text,  label pager  = "$PAGER" -- "$@"
!mime ^text, label editor, ext xml|json|csv|tex|py|pl|rb|js|sh|php = $EDITOR -- "$@"
!mime ^text, label pager,  ext xml|json|csv|tex|py|pl|rb|js|sh|php = "$PAGER" -- "$@"
将上面两个 $EDITOR 修改成 nvim , 如下:
1
2
3
4
5
6
7
8
#-------------------------------------------
# Misc
#-------------------------------------------
# Define the "editor" for text files as first action
mime ^text,  label editor = nvim -- "$@"
mime ^text,  label pager  = "$PAGER" -- "$@"
!mime ^text, label editor, ext xml|json|csv|tex|py|pl|rb|js|sh|php = nvim -- "$@"
!mime ^text, label pager,  ext xml|json|csv|tex|py|pl|rb|js|sh|php = "$PAGER" -- "$@"
安装 typora
1
2
3
4
5
6
7
8
# or run:
# sudo apt-key adv --keyserver keyserver.ubuntu.com --recv-keys BA300B7755AFCFAE
wget -qO - https://typora.io/linux/public-key.asc | sudo apt-key add -
# add Typora's repository
sudo add-apt-repository 'deb https://typora.io/linux ./'
sudo apt-get update
# install typora
sudo apt-get install typora
Mac 系统设置
安装 homebrew
1
/usr/bin/ruby -e "$(curl -fsSL https://raw.githubusercontent.com/Homebrew/install/master/install)"
添加到环境变量:
1
2
echo 'eval "$(/opt/homebrew/bin/brew shellenv)"' >> /Users/shawnd/.zprofile
eval "$(/opt/homebrew/bin/brew shellenv)"
安装oh-my-zsh
安装 wget
1
brew install wget
剩下的就和 ubuntu 安装一致
安装 typora
1
brew install typora
现在直接安装是收费版的, 下载最后一个免费版
https://download.typora.io/mac/Typora-0.11.18.dmg
安装 NetNewsWire
1
brew install NetNewsWire
Mac 软件
- PDF Expert
- Downie
- Final cut pro
- Drawio
- Gitmind
- The Unachiver
- Tuxera NTFS
- obs studio
- WebTorrent
安装 unrar
配置neovim
安装 vim-plug
1
2
3
# Neovim (~/.local/share/nvim/site/autoload)
curl -fLo ~/.local/share/nvim/site/autoload/plug.vim --create-dirs \
    https://raw.githubusercontent.com/junegunn/vim-plug/master/plug.vim
安装coc.vim
1
brew install node
1
brew install yarn
接下来和 ubuntu 一致。
安装 item2
terminal 分屏功能种草 iterm2, 直接使用鼠标切换窗口, 符合直觉
1
brew install iterm2
快速唤醒终端
在 Preperence → Profiles → Keys → HotKey Window 进行设置
选中 A hotkey opens a dedicated window with this profile,表示此 profile 可以通过快捷键快速打开快速关闭。
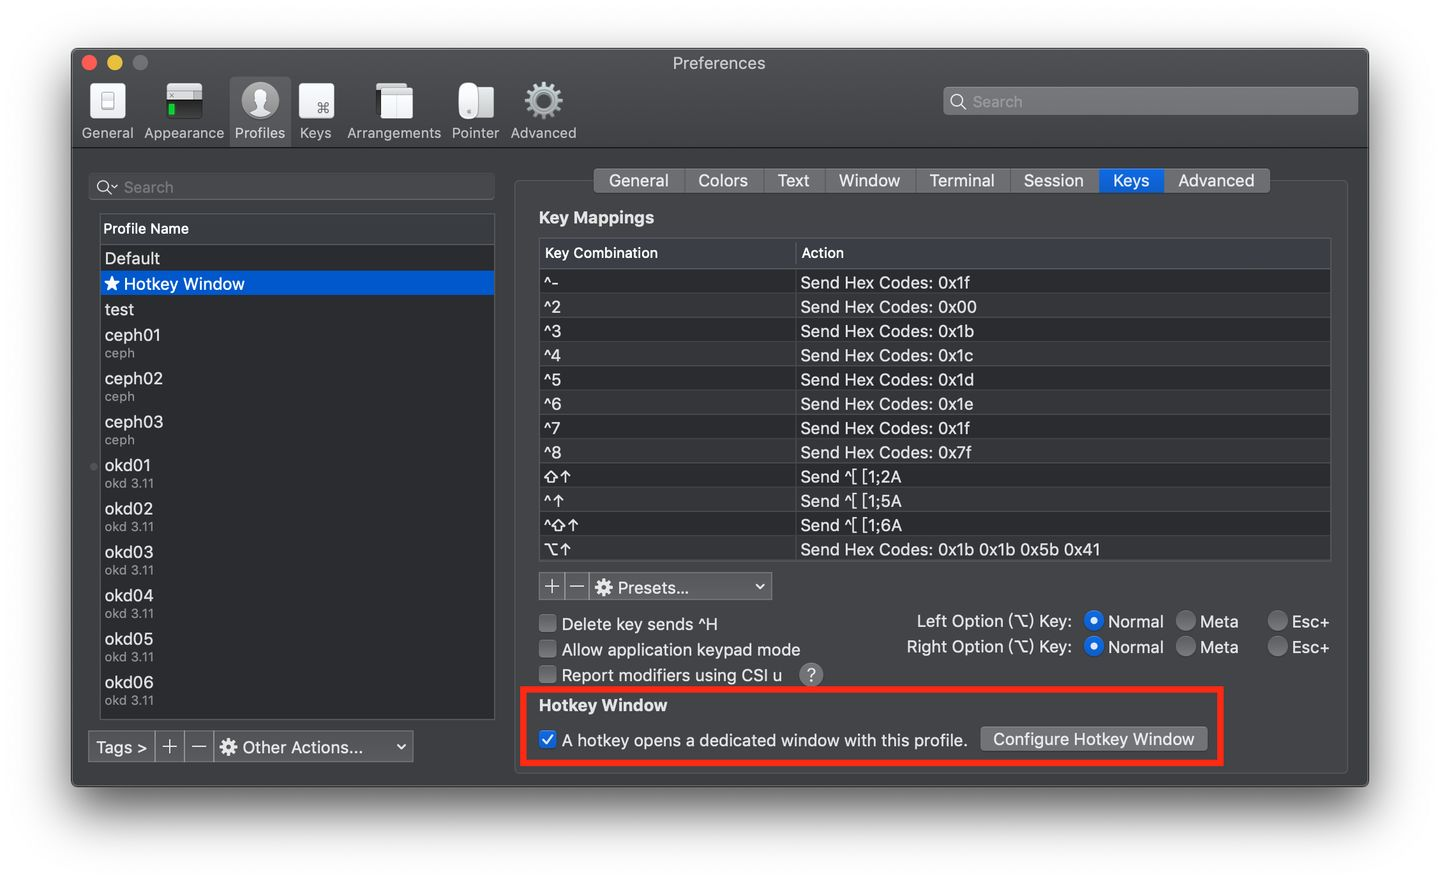
然后点击 Configure Hotkey Window,设置快捷键。
快速创建窗口
1
command + d
安装 latex
安装 mactex
1
brew install mactex
vscode 安装 markdown
- 安装 markdown all in one 插件
- 安装 image paste 插件
修改粘贴图片时的路径:
打开设置, 修改 image paste 中的 path 选项, 将其从 ${currentFileDir} 修改为 ${currentFileDir}/figure。
M1 安装 Keras
Step 1: Environment setup
下载并安装 Conda env
安装 tensorflow 依赖:
1
conda install -c apple tensorflow-deps==2.6.0
Step 2: Install base TensorFlow
1
python -m pip install tensorflow-macos
Install tensorflow-metal plugin
1
python -m pip install tensorflow-metal
bug
无法打开“XXXX”,因为Apple无法检查其是否包含恶意软件。
1
sudo spctl --master-disable
VSCode Markdown 文件中无法接受Copilot建议的问题
安装了插件 Markdown All In One (https://marketplace.visualstudio.com/items?itemName=markdown-all-in-one.markdown-all-in-one),快捷键有冲突。
打开快捷键设置:按 Ctrl+Shift+P / Cmd+Shift+P,打开命令面板,找到Preferences: Open Keyboard Shortcuts (JSON),打开它
在内容中添加如下设置项(整个设置项是一个数组,将以下2项添加到数组中,请特别注意结尾逗号,确保JSON合法)
1
2
3
4
5
6
7
8
9
10
{
   "key": "tab",
   "command": "markdown.extension.onTabKey",
   "when": "editorTextFocus && !inlineSuggestionVisible && !editorReadonly && !editorTabMovesFocus && !hasOtherSuggestions && !hasSnippetCompletions && !inSnippetMode && !suggestWidgetVisible && editorLangId == 'markdown'"
 },
 {
   "key": "tab",
   "command": "-markdown.extension.onTabKey",
   "when": "editorTextFocus && !editorReadonly && !editorTabMovesFocus && !hasOtherSuggestions && !hasSnippetCompletions && !inSnippetMode && !suggestWidgetVisible && editorLangId == 'markdown'"
 }
”翻译”目前不可用,请稍后再试。
这个是clashx在系统中忽略代理的文件,将其放到 ~/.config/clash/ 文件夹中
并修改文件内容
1
2
3
4
5
6
7
8
9
10
11
12
13
14
15
<?xml version="1.0" encoding="UTF-8"?>
<!DOCTYPE plist PUBLIC "-//Apple//DTD PLIST 1.0//EN" "http://www.apple.com/DTDs/PropertyList-1.0.dtd">
<plist version="1.0">
<array>
	<string>192.168.0.0/16</string>
	<string>10.0.0.0/8</string>
	<string>172.16.0.0/12</string>
	<string>127.0.0.1</string>
	<string>localhost</string>
	<string>*.local</string>
        <string>*.crashlytics.com</string>
        <!-- 上面的不要删除,然后在下面添加你要忽略代理的网址  -->
	<string>*.apple.com</string>
</array>
</plist>
然后重启代理,看到网络设置中有你配置的网址就成功了。
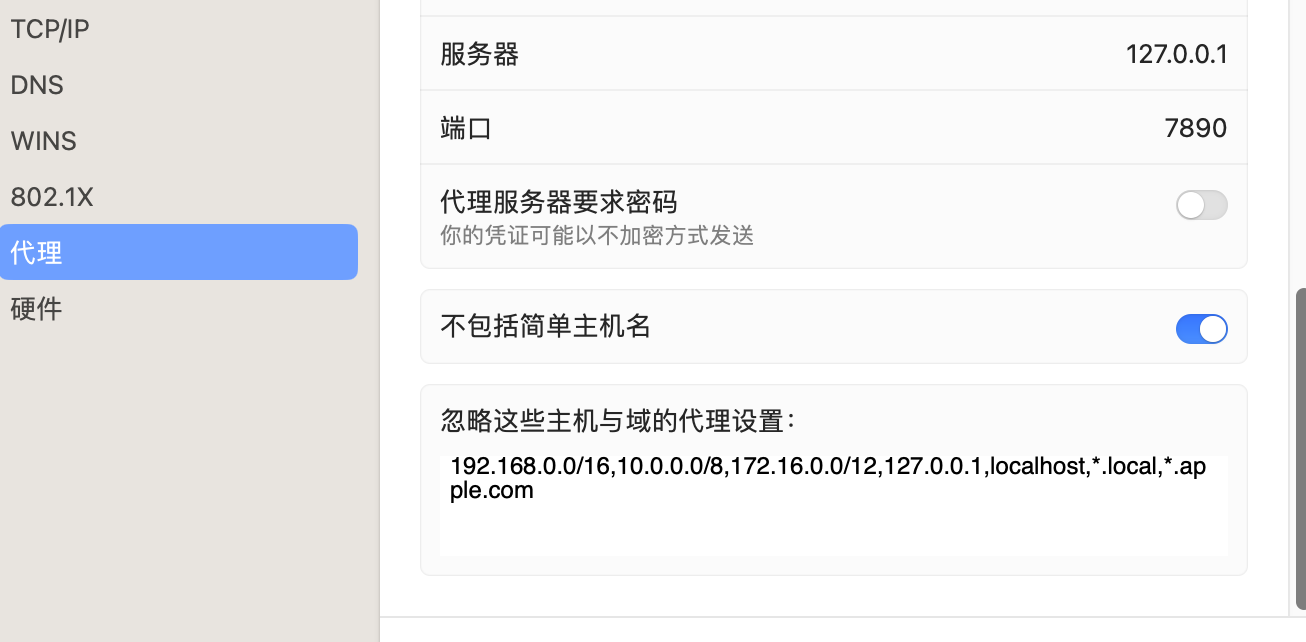
这样通过不代理 *.apple.com,翻译就可以正常使用了
Windows 系统设置
PowerShell 无法激活 conda
1
2
3
4
5
. : 无法加载文件 C:\Users\ShawnD\Documents\WindowsPowerShell\profile.ps1,因为在此系统上禁止运行脚本。有关详细信息,请  参阅 https:/go.microsoft.com/fwlink/?LinkID=135170 中的 about_Execution_Policies。                                      所在位置 行:1 字符: 3
+ . 'C:\Users\ShawnD\Documents\WindowsPowerShell\profile.ps1'
+   ~~~~~~~~~~~~~~~~~~~~~~~~~~~~~~~~~~~~~~~~~~~~~~~~~~~~~~~~~
    + CategoryInfo          : SecurityError: (:) [],PSSecurityException
    + FullyQualifiedErrorId : UnauthorizedAccess
使用管理员权限打开powershell
1
Set-ExecutionPolicy -ExecutionPolicy RemoteSigned
安装wslg
1
wsl -l -o
查看可安装的版本
1
wsl --install -d Ubuntu-18.04
安装
设置代理
1
2
3
#!/bin/bash
host_ip=$(cat /etc/resolv.conf |grep "nameserver" |cut -f 2 -d " ")
export ALL_PROXY="http://$host_ip:7890"
修改wslg为默认terminal
修改 settings.json 中的 defaultProfile 设置 修改为 wsl 对应的 guid。
CUDA On WSL
要在wsl上使用cuda, 要下载指定的驱动:
https://developer.nvidia.com/cuda/wsl/download
WSL2 出错
1
WslRegisterDistribution failed with error: 0x80370102
造成该问题的原因是WSL版本由原来的WSL1升级到WSL2后,内核没有升级,前往微软WSL官网下载安装适用于 x64 计算机的最新 WSL2 Linux 内核更新包即可
https://wslstorestorage.blob.core.windows.net/wslblob/wsl_update_x64.msi
配置 WSL2 访问 Windows 上的代理
有两个关键步骤: 1. WSL2 中配置的代理要指向 Windows 的 IP; 2. Windows 上的代理客户端需要允许来自本地局域网的请求;
由于 Linux 子系统也是通过 Windows 访问网络,所以 Linux 子系统中的网关指向的是 Windows,DNS 服务器指向的也是 Windows,基于这两个特性,我们可以将 Windows 的 IP 读取出来。
例如,在 Ubuntu 子系统中,通过 cat /etc/resolv.conf 查看 DNS 服务器 IP。
1
2
3
4
# This file was automatically generated by WSL. To stop automatic generation of this file, add the following entry to /etc/wsl.conf:
# [network]
# generateResolvConf = false
nameserver 172.27.32.1
可以看到 DNS 服务器是 172.27.32.1,通过环境变量 ALL_PROXY 配置代理:
1
export ALL_PROXY="http://172.19.80.1:7890"
7890 是 Windows 上运行的代理客户端的端口,记得要在 Windows 代理客户端上配置允许本地局域网请求。

一键配置脚本
将上面的过程写入一个 bash 脚本,可以轻松的实现一键配置代理:
1
2
3
#!/bin/bash
host_ip=$(cat /etc/resolv.conf |grep "nameserver" |cut -f 2 -d " ")
export ALL_PROXY="http://$host_ip:7890"
脚本通过 cat /etc/resolv.conf 来获取 DNS 服务器,也就是 Windows 的 IP,再将其中的 IP 部分截取出来,加上代理客户端的端口(我的是 7890,可以根据自己实际情况修改),使用 export 写入环境变量中。
wsl2 挂载硬盘
1、标识磁盘- 若要列出磁盘中的可用Windows,请运行:
1
GET-CimInstance -query "SELECT * from Win32_DiskDrive"
磁盘路径在”DeviceID”之后列出,通常采用 \.\PHYSICALDRIVE* 格式。
2、 列出并选择要装载到 WSL 2 中的分区 - 确定磁盘后,运行
1
wsl --mount <DiskPath> --p 1
这会使磁盘在 WSL 2 中可用。 (在我们的示例中, <DiskPath> 为 \.\PHYSICALDRIVE* 。
3、 更改权限
1
sudo chmod 777 -R /mnt/wsl/PHYSICALDRIVE*
ubuntu系统配置
搜狗输入法
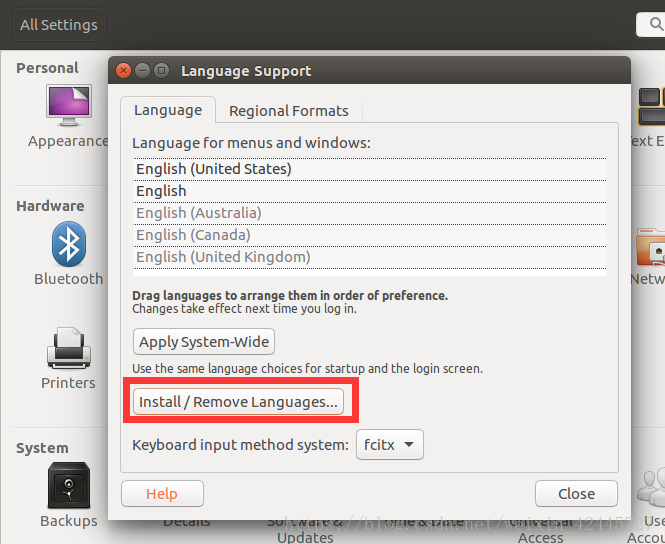
1) system settings->language support->install/remove languages,在弹出的菜单中选择Chinese(simplified),点击apply
选择的时候双击是删除。。。。往后拖才能看到安装的√。
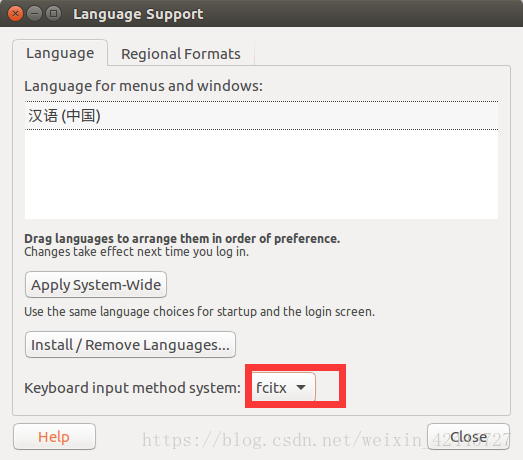
2) 搜狗输入法是建立在fcitx框架之上的,所以要将输入法框架选择为fictx
3) 去搜狗官网下载输入法for Linux
4)下载完成之后, 可以双击安装, 也可使用命令行安装
1
sudo dpkg -i 安装包名
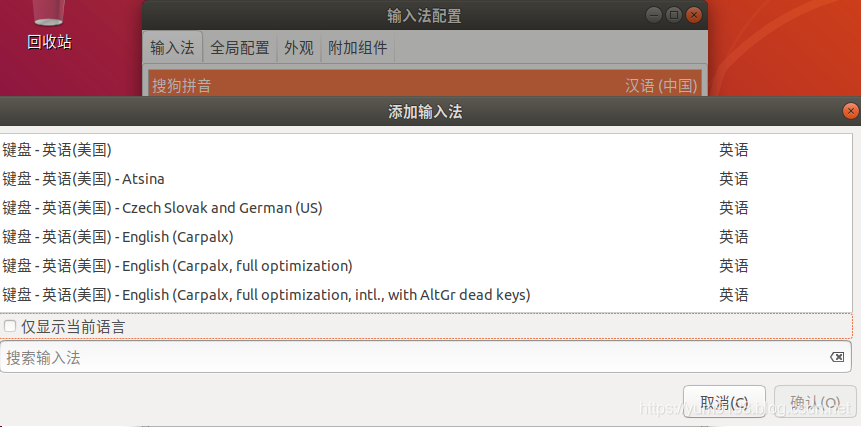
5) 在Ubuntu software中找到Fcitx configure,然后启动。仅显示当前语言一定要去掉那个勾,才可以找到搜狗输入法,然后添加就是
wine
安装tim
1) 添加仓库
首次使用时,你需要运行如下一条命令将移植仓库添加到系统中。
1
wget -O- https://deepin-wine.i-m.dev/setup.sh | sh
wine中文字体显示异常
1
sudo vim /opt/deepinwine/tools/run.sh
找到WINE_CMD
修改为:
1
WINE_CMD="LC_ALL=zh_CN.UTF-8 deepin-wine"
2)应用安装
自此以后,你可以像对待普通的软件包一样,使用apt-get系列命令进行各种应用安装、更新和卸载清理了。
比如安装微信只需要运行下面的命令,
1
sudo apt-get install deepin.com.wechat
将deepin.com.wechat替换为下列包名,可以继续安装其他应用:
| 应用 | 包名 |
|---|---|
| TIM | deepin.com.qq.office |
| 微信 | deepin.com.wechat |
| 百度网盘 | deepin.com.baidu.pan |
截屏
1
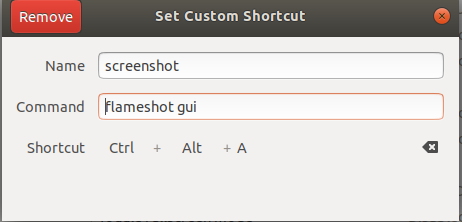
sudo apt-get install flameshot
设置>设备>键盘,设置一个自定义快捷键(拉到最下面)命令填写:flameshot gui
截完图后保存Ctrl+S,复制到剪贴板 Ctrl+C
zsh
安装zsh sudo apt install zsh
验证 zsh --version
1
zsh 5.4.2 (x86_64-ubuntu-linux-gnu)
切换为默认shell chsh -s $(which zsh)
logout 系统用户, 在重新登入
安装 oh-my-zsh
1
sh -c "$(wget -O- https://raw.githubusercontent.com/ohmyzsh/ohmyzsh/master/tools/install.sh)"
如果遇到报错
1
2
3
fatal: unable to access 'https://github.com/ohmyzsh/ohmyzsh.git/': gnutls_handshake() failed: The TLS connection was non-properly terminated.
/home/lthpc
Error: git clone of oh-my-zsh repo failed
设置 git 代理
1
2
git config --global http.https://github.com.proxy http://127.0.0.1:7890
git config --global https.https://github.com.proxy https://127.0.0.1:7890
安装语法提示插件
1
git clone https://github.com/zsh-users/zsh-autosuggestions $ZSH_CUSTOM/plugins/zsh-autosuggestions
编辑 ~/.zshrc vim ~/.zshrc
1
2
3
4
plugins=(
	git
	zsh-autosuggestions
)
安装语法高亮插件
1
git clone https://github.com/zsh-users/zsh-syntax-highlighting.git ${ZSH_CUSTOM:-~/.oh-my-zsh/custom}/plugins/zsh-syntax-highlighting
编辑 ~/.zshrc vim ~/.zshrc
1
2
3
4
5
plugins=(
	git
	zsh-autosuggestions
	zsh-syntax-highlighting
)
1080Ti 深度学习环境
- pytorch == 1.3
- torchvision == 0.4.1
- tensorflow == 1.10.1
RTX 3090安装深度学习环境
Ubuntu 18.04.5
安装驱动
添加ppa源
1
sudo add-apt-repository ppa:graphics-drivers/ppa
在终端输入:ubuntu-drivers devices,可以看到自己的显卡型号以及推荐的驱动版本。
sudo ubuntu-drivers autoinstall 就可以自动安装。
安装指定版本的驱动:
1
sudo apt-get install nvidia-driver-xxx
安装完成后重启系统,NVIDIA 显卡就可以正常工作了。
如果安装很慢, 更换阿里源
首先备份本地的源
1
cp /etc/apt/sources.list /etc/apt/sources.list.bak
编辑源文件
1
vim /etc/apt/sources.list
删除原有内容,添加下面内容
1
2
3
4
5
6
7
8
9
10
deb http://mirrors.aliyun.com/ubuntu/ bionic main restricted universe multiverse
deb http://mirrors.aliyun.com/ubuntu/ bionic-security main restricted universe multiverse
deb http://mirrors.aliyun.com/ubuntu/ bionic-updates main restricted universe multiverse
deb http://mirrors.aliyun.com/ubuntu/ bionic-proposed main restricted universe multiverse
deb http://mirrors.aliyun.com/ubuntu/ bionic-backports main restricted universe multiverse
deb-src http://mirrors.aliyun.com/ubuntu/ bionic main restricted universe multiverse
deb-src http://mirrors.aliyun.com/ubuntu/ bionic-security main restricted universe multiverse
deb-src http://mirrors.aliyun.com/ubuntu/ bionic-updates main restricted universe multiverse
deb-src http://mirrors.aliyun.com/ubuntu/ bionic-proposed main restricted universe multiverse
deb-src http://mirrors.aliyun.com/ubuntu/ bionic-backports main restricted universe multiverse
更新源
1
apt-get update
这样安装的驱动版本为455.23.05, CUDA版本CUDA11, 若安装CUDA11.0, 需要更换驱动版本。
卸载驱动
1
2
3
4
$ sudo apt-get --purge remove nvidia*

$ sudo apt autoremove
安装 NVCC(NVIDIA (R) Cuda compiler driver 11.1)
卸载其它版本的cuda
1
sudo dpkg -l |grep cuda
查看安装包, 使用
1
sudo dpkg -P cuda-xxx-xxx
一个一个对应删除
也可通过以下命令一次性删除:
1
sudo apt-get --purge remove "*cublas*" "cuda*"
删除CUDA-11.0目录:
1
sudo rm -r /usr/local/cuda-11.0
安装CUDA 11.1
1
wget https://developer.download.nvidia.com/compute/cuda/repos/ubuntu1804/x86_64/cuda-ubuntu1804.pin
1
sudo mv cuda-ubuntu1804.pin /etc/apt/preferences.d/cuda-repository-pin-600
1
wget https://developer.download.nvidia.com/compute/cuda/11.1.0/local_installers/cuda-repo-ubuntu1804-11-1-local_11.1.0-455.23.05-1_amd64.deb
上面需要最后一步梯子翻墙,否则较慢
1
sudo dpkg -i cuda-repo-ubuntu1804-11-1-local_11.1.0-455.23.05-1_amd64.deb
1
sudo apt-key add /var/cuda-repo-ubuntu1804-11-1-local/7fa2af80.pub
1
sudo apt-get update
1
sudo apt-get -y install cuda
如果安装失败, 那么缺少依赖, 用以下命令安装
1
sudo apt-get install aptitude
1
sudo aptitude install cuda
添加环境变量:
1
sudo vim ~/.bashrc
文件末尾添加:
1
2
3
export LD_LIBRARY_PATH=$LD_LIBRARY_PATH:/usr/local/cuda-11.1/lib64
export PATH=$PATH:/usr/local/cuda-11.1/bin
export CUDA_HOME=/usr/local/cuda-11.1
ps:如下这种环境变量的写法会导致 python setup.py develop 时 出现 ‘:/usr/local/cuda/bin/nvcc’ failed with exit status 1错误:
1
export CUDA_HOME=$CUDA_HOME:/usr/local/cuda-11.1
PATH=PATH:PATH:HOME/bin这个代码是设置PATH环境变量,就是设置环境变量用等号,首先:冒号是分割符。记得Windows上面也有PATH环境变量,Windows的路径之间的分隔符是;分号。
执行
1
source ~/.bashrc
安装pytorch
1
pip install torch==1.7.0+cu110 torchvision==0.8.1+cu110 torchaudio===0.7.0 -f https://download.pytorch.org/whl/torch_stable.html
需要梯子, 否则下载较慢
安装 cudnn (可选)
pytorch 自带 cudnn, 而paddlepaddle等需要自己安装cudnn。
- 在NVIDIA官网下载与cuda11.1版本对应的cudnn8.0.4,下载地址为:https://developer.nvidia.com/rdp/cudnn-archive。建议下载cuDNN Library for Linux (x86_64)安装包。
- 安装cudnn v8.0.4
1
2
3
4
5
tar -xzvf cudnn-11.1-linux-x64-v8.0.4.30.tgz
sudo cp cuda/include/* /usr/local/cuda/include/
sudo cp cuda/lib64/libcudnn* /usr/local/cuda/lib64/
sudo chmod a+r /usr/local/cuda/include/cudnn.h
sudo chmod a+r /usr/local/cuda/lib64/libcudnn*
注:此处必须使用sudo cp cuda/include/* /usr/local/cuda/include/,而不是sudo cp cuda/include/cudnn.h /usr/local/cuda/include/
安装NCCL
paddlepaddle单机多卡训练需要自己安装NCCL。
根据cuda的版本去选择对应版本的nccl,可以去nvidia的官网下载
https://developer.nvidia.com/nccl/nccl-legacy-downloads
1) 下载 nccl-local-repo-ubuntu1804-2.9.6-cuda11.0_1.0-1_amd64
2) 安装镜像库
1
sudo dpkg -i nccl-local-repo-ubuntu1804-2.9.6-cuda11.0_1.0-1_amd64
3) 更新源镜像
1
sudo apt update
4) 安装
1
sudo apt install libnccl2=2.9.6-1+cuda11.0 libnccl-dev=2.9.6-1+cuda11.0
将nccl添加到环境变量中
nccl默认的安装目录是/usr/lib/x86_64-linux-gnu,修改~/.bashrc文件,添加如下内容到文件中
1
2
3
4
#设置cuda库的目录
export LD_LIBRARY_PATH=/usr/local/cuda-11.1/lib64
#将nccl添加到LD_LIBRARY_PATH中
export LD_LIBRARY_PATH=$LD_LIBRARY_PATH:/usr/lib/x86_64-linux-gnu
添加好之后保存文件,使用source ~/.bashrc让文件的配置生效,在通过echo $LD_LIBRARY_PATH查看环境变量设置是否成功,配置成功之后输出的信息如下
1
/usr/local/cuda-11.1/lib64:/usr/lib/x86_64-linux-gnu
限制显卡功率
瞬时功率太高导致服务器重启,限制显卡功率:
1
sudo nvidia-smi -pl 250
-i 可以指定第几个显卡
1
sudo nvidia-smi -i 1 -pl 250
使用FRP搭建远程服务器的 jupyter 服务
配置 frps
1
2
3
[common]
bind_port = 7000
vhost_http_port = 8080
配置 frpc
1
2
3
4
[jupyter]
type = http
local_port = 8888
custom_domains = xxx.xxx.xxx.xxx(服务器IP)
Tensorflow
建议停在 tensorflow == 2.6
安装驱动 460.27.04
添加ppa源
1
sudo add-apt-repository ppa:graphics-drivers/ppa
在终端输入:ubuntu-drivers devices,可以看到自己的显卡型号以及推荐的驱动版本。
sudo ubuntu-drivers autoinstall 就可以自动安装。
安装指定版本的驱动:
1
sudo apt-get install nvidia-driver-460
安装完成后重启系统,NVIDIA 显卡就可以正常工作了。
安装 cuda11.2.0
1
2
3
4
5
6
7
8
9
10
11
12
13
wget https://developer.download.nvidia.com/compute/cuda/repos/ubuntu1804/x86_64/cuda-ubuntu1804.pin

sudo mv cuda-ubuntu1804.pin /etc/apt/preferences.d/cuda-repository-pin-600

wget https://developer.download.nvidia.com/compute/cuda/11.2.0/local_installers/cuda-repo-ubuntu1804-11-2-local_11.2.0-460.27.04-1_amd64.deb

sudo dpkg -i cuda-repo-ubuntu1804-11-2-local_11.2.0-460.27.04-1_amd64.deb

sudo apt-key add /var/cuda-repo-ubuntu1804-11-2-local/7fa2af80.pub

sudo apt-get update

sudo apt-get -y install cuda
安装 cudnn8.10.0
下载cudnn
https://developer.nvidia.com/rdp/cudnn-archive
推荐安装 cuDNN Library for Linux (x86_64)
1
2
3
4
5
tar -xzvf cudnn-11.2-linux-x64-v8.1.0.77.tgz
sudo cp cuda/include/* /usr/local/cuda/include/
sudo cp cuda/lib64/libcudnn* /usr/local/cuda/lib64/
sudo chmod a+r /usr/local/cuda/include/cudnn.h
sudo chmod a+r /usr/local/cuda/lib64/libcudnn*
注:此处必须使用sudo cp cuda/include/* /usr/local/cuda/include/,而不是sudo cp cuda/include/cudnn.h /usr/local/cuda/include/
Module ‘tensorflow.tools.docs.doc_controls’ has no attribute ‘inheritable_header’
Check your tensorflow-estimator version, it seems that version 2.7 from the 30 of October not compatible with some libraries.
try version 2.6:
1
pip install --upgrade tensorflow-estimator==2.6.0
lreadyExistsError: Another metric with the same name already exists
EDIT:- Also downgrade keras to version 2.6.0:
1
pip install --upgrade keras==2.6.0
命令行下载百度云数据集
安装 bypy
1
2
pip install requests -i https://pypi.doubanio.com/simple
pip install bypy -i https://pypi.doubanio.com/simple
授权
输入 bypy info
得到一个链接,复制到浏览器打开,
这时浏览器会打开一个网页,得到一个授权码,复制此授权码,粘贴到linux命令行
 此时,百度云盘的‘我的应用数据’文件夹中会多出一个“bypy文件夹”,将需要下载的数据放在“bypy”文件夹中。
下载
下载整个 bypy 文件夹
1
bypy downdir -v
下载指定文件夹
1
bypy downdir dirname -v
上传
1
bypy upload -v
Bugs
ImportError: libGL.so.1: cannot open shared object file: No such file or directory——docker容器内问题报错
1
apt install libgl1-mesa-glx
##
Reference
- Aanconda+虚拟环境+jupyter notebook配置
- 【环境配置】Jupytext详细安装及踩坑过程
- Jupyter Notebook介绍、安装及使用教程
- Is there an equivalent to hinterland notebook extensions in JupyterLab?
- 神器与神器:微软宣布VsCode支持Jupyter Notebook
- 修改 vscode 默认的终端
- Integrated Terminal
- 高效的python编程神器——kite
- windows下安装MinGW的配置
- VSCode配置C/C++环境
- Visual Studio Code第二弹:Vscode与Git的完美结合
- [vscode] snippets - 自定义代码补全
- VScode-python踩坑日记
- VS Code编辑器批量替换文本内容
- vscode写python时的代码错误提醒和自动格式化
- 在 VS Code 中设置多个 PYTHONPATH
- 为什么vscode写python代码不能正常import?
- 「效率」使用VScode连接远程服务器进行开发
- 使用vscode进行远程炼丹
- Linux下如何安装kite
- ‘conda’ 不是内部或外部命令,也不是可运行的程序 或批处理文件。
- 最新TeXLive 环境的安装与配置
- 使用VSCode编写LaTeX
- CondaValueError: no package names supplied, try “conda remove -h” for more details
- Ubuntu18.04 安装 Anaconda3
- Anaconda安装Unpacking payload step frozen
- Ubuntu anaconda 换源
- PIP 更换国内安装源
- conda换回默认源
- python jupyter ipynb vscode
- Ubuntu如何安装搜狗输入法
- Ubuntu18.04 截图工具推荐
- vscode中背景色和光标颜色的设置方法
- Ubuntu18.04 vscode下配置latex环境
- deepin wechat 中文乱码解决方案 Ubuntu18.04
- zq1997/deepin-wine
- 关闭vscode的C/C++代码错误提示
- CUDA 工具包 11.1 下载
- cuda : 依赖: cuda-10-1 (>= 10.1.105) 但是它将不会被安装 E: 无法修正错误,因为您要求某些软件包保持现状,就是它们破坏了软件包间的依赖关系
- Ubuntu18.04下卸载CUDA11.0
- CUDA Toolkit Archive
- Ubuntu18.04显卡驱动及CUDA卸载
- 安装 maskrcnn-benchmark: command ‘:/usr/local/cuda/bin/nvcc’ failed with exit status 1
- 修改Ubuntu的环境变量PATH
- TensorBoard Integration in VS Code
- cuda11.1 + cuDNN v8.0.4 for CUDA 11.1 配置流程
- You may need to install ‘nccl2‘ from NVIDIA official website
- vscode+sftp 开发模式环境的同步
- 开发环境搭建7. Vscode使用SFTP远程文件同步
- 如何下载历史版本的VSCode #15
- VScode中WSL启动失败
- powershell激活conda失败;无法加载文件 C:\Users\user\Documents\WindowsPowerShell\profile.ps1,因为在此系统上禁止运行脚本
- win10 WSL2问题解决WslRegisterDistribution failed with error: 0x800701bc
- WslRegisterDistribution failed with error: 0x80370102
- 为 WSL2 一键设置代理
- Error: No such file (sftp liximomo extension)
- 在 WSL 2(预览版)中装载磁盘
- https://vimawesome.com/
- 如何更改VIM切换窗口的默认键盘快捷键?
- Mac-Neovim-Coc配置和常用快捷键
- iTerm2 都不会用,还敢自称老司机?
- 解决 VSCode Markdown 文件中无法接受Copilot建议的问题
- Getting Started with tensorflow-metal PluggableDevice
- Module ‘tensorflow.tools.docs.doc_controls’ has no attribute ‘inheritable_header’
- ubuntu 永久 设置 降低N显卡功率 nvidia-smi
- macOS Ventura beta 6 Safari 浏览器自带翻译异常
- linux环境下使用命令行,从百度网盘上传、下载数据