On this page
Getting started
__version__ == 1.2.6
LIGHTNING IN 2 STEPS
导入下面的包:
import os
import torch
from torch import nn
import torch.nn.functional as F
from torchvision import transforms
from torchvision.datasets import MNIST
from torch.utils.data import DataLoader, random_split
import pytorch_lightning as pl
Step 1: Define LightningModule
class LitAutoEncoder(pl.LightningModule):

    def __init__(self):
        super().__init__()
        self.encoder = nn.Sequential(
            nn.Linear(28*28, 64),
            nn.ReLU(),
            nn.Linear(64, 3)
        )
        self.decoder = nn.Sequential(
            nn.Linear(3, 64),
            nn.ReLU(),
            nn.Linear(64, 28*28)
        )

    def forward(self, x):
        # in lightning, forward defines the prediction/inference actions
        embedding = self.encoder(x)
        return embedding

    def training_step(self, batch, batch_idx):
        # training_step defined the train loop.
        # It is independent of forward
        x, y = batch
        x = x.view(x.size(0), -1)
        z = self.encoder(x)
        x_hat = self.decoder(z)
        loss = F.mse_loss(x_hat, x)
        # Logging to TensorBoard by default
        self.log('train_loss', loss)
        return loss

    def configure_optimizers(self):
        optimizer = torch.optim.Adam(self.parameters(), lr=1e-3)
        return optimizer
SYSTEM VS MODEL
一个 lightning module 定义一个系统 而不是 一个 模型。

系统的例子有:
- Autoencoder、
- BERT
- DQN
- GAN
- Image classifier
- Seq2seq
- SimCLR
- VAE
在 hood下 LightningModule 仍然仅仅是一个 torch.nn.Module 。 将所有研究代码分组到单个文件中,使其包含:
- The Train loop
- The Validation loop
- The Test loop
- The Model or system of Models
- The Optimizer
您可以通过重写 Available Callback hooks 其中的20多个hooks来定制训练的任何部分(例如反向传播)
class LitAutoEncoder(LightningModule):

    def backward(self, loss, optimizer, optimizer_idx):
        loss.backward()
FORWARD vs TRAINING_STEP
在 Lightning 中,我们把训练与推理分开。训练步骤定义了完整的训练循环。我们鼓励用户使用forward来定义推理操作。
例如,在这种情况下,我们可以定义自编码器作为 embedding 提取器:
def forward(self, x):
    embeddings = self.encoder(x)
    return embeddings
当然,没有什么可以阻止你在 training_step 中使用forward。
def training_step(self, batch, batch_idx):
    ...
    z = self(x)
这取决于你的应用。但是,我们建议您将这两种意图分开。
- 使用 forward 用于推理 (预测)
- 使用 training_step 训练
Step 2: Fit with Lightning Trainer
首先,按照您想要的方式定义数据。Lightning 需要一个 DataLoader 用于划分 train/val/test。
dataset = MNIST(os.getcwd(), download=True, transform=transforms.ToTensor())
train_loader = DataLoader(dataset)
接下来, 初始化 lightning module 以及 PyTorch Lightning Trainer, 然后用 data 和 model 调用 fit。
# init model
autoencoder = LitAutoEncoder()

# most basic trainer, uses good defaults (auto-tensorboard, checkpoints, logs, and more)
# trainer = pl.Trainer(gpus=8) (if you have GPUs)
trainer = pl.Trainer()
trainer.fit(autoencoder, train_loader)
Trainer 自动化:
- Epoch and batch iteration
- Calling of optimizer.step(), backward, zero_grad()
- Calling of .eval(), enabling/disabling grads
- weights loading
- Tensorboard (see loggers options)
- Multi-GPU support
- TPU
- AMP support
TIP: 如果您喜欢手动管理优化器,您可以使用 Manual optimization 模式(比如: RL, GANs, etc…)
Basic features
Manual vs automatic optimization
Automatic optimization
使用Lightning,您不必担心何时启用/禁用grads、执行反向传播或更新优化器只要您从 training_step 返回一个带有graph的loss,Lightning就会自动进行优化。
def training_step(self, batch, batch_idx):
    loss = self.encoder(batch)
    return loss
Manual optimization
然而,对于某些研究,如GANs,强化学习,或有多个优化器或内部循环的东西,你可以关闭自动优化,完全控制自己的训练循环。
关闭自动优化,你就可以控制train loop !
def __init__(self):
    self.automatic_optimization = False

def training_step(self, batch, batch_idx):
    # access your optimizers with use_pl_optimizer=False. Default is True
    opt_a, opt_b = self.optimizers(use_pl_optimizer=True)

    loss_a = self.generator(batch)
    opt_a.zero_grad()
    # use `manual_backward()` instead of `loss.backward` to automate half precision, etc...
    self.manual_backward(loss_a)
    opt_a.step()

    loss_b = self.discriminator(batch)
    opt_b.zero_grad()
    self.manual_backward(loss_b)
    opt_b.step()
Predict or Deploy
当你完成训练,你有3个选择使用你的 LightningModule 预测。
Option 1: Sub-models
取出系统内的任何模型进行预测。
# ----------------------------------
# to use as embedding extractor
# ----------------------------------
autoencoder = LitAutoEncoder.load_from_checkpoint('path/to/checkpoint_file.ckpt')
encoder_model = autoencoder.encoder
encoder_model.eval()

# ----------------------------------
# to use as image generator
# ----------------------------------
decoder_model = autoencoder.decoder
decoder_model.eval()
Option 2: Forward
您还可以添加一个forward方法来进行预测。
# ----------------------------------
# using the AE to extract embeddings
# ----------------------------------
class LitAutoEncoder(LightningModule):
    def __init__(self):
        super().__init__()
        self.encoder = nn.Sequential()

    def forward(self, x):
        embedding = self.encoder(x)
        return embedding

autoencoder = LitAutoEncoder()
autoencoder = autoencoder(torch.rand(1, 28 * 28))
# ----------------------------------
# or using the AE to generate images
# ----------------------------------
class LitAutoEncoder(LightningModule):
    def __init__(self):
        super().__init__()
        self.decoder = nn.Sequential()

    def forward(self):
        z = torch.rand(1, 3)
        image = self.decoder(z)
        image = image.view(1, 1, 28, 28)
        return image

autoencoder = LitAutoEncoder()
image_sample = autoencoder()
Option 3: Production
对于生产系统,onnx或torchscript要快得多。确保您已经添加了一个 forward 方法,或者只跟踪您需要的子模型。
# ----------------------------------
# torchscript
# ----------------------------------
autoencoder = LitAutoEncoder()
torch.jit.save(autoencoder.to_torchscript(), "model.pt")
os.path.isfile("model.pt")
# ----------------------------------
# onnx
# ----------------------------------
with tempfile.NamedTemporaryFile(suffix='.onnx', delete=False) as tmpfile:
     autoencoder = LitAutoEncoder()
     input_sample = torch.randn((1, 28 * 28))
     autoencoder.to_onnx(tmpfile.name, input_sample, export_params=True)
     os.path.isfile(tmpfile.name)
Using CPUs/GPUs/TPUs
在 Lightning 中使用cpu、gpu或tpu是很简单的。不需要改变你的代码,只需要改变 Trainer 选项。
# train on CPU
trainer = Trainer()
# train on 8 CPUs
trainer = Trainer(num_processes=8)
# train on 1024 CPUs across 128 machines
trainer = pl.Trainer(
    num_processes=8,
    num_nodes=128
)
# train on 1 GPU
trainer = pl.Trainer(gpus=1)
# train on multiple GPUs across nodes (32 gpus here)
trainer = pl.Trainer(
    gpus=4,
    num_nodes=8
)
# train on gpu 1, 3, 5 (3 gpus total)
trainer = pl.Trainer(gpus=[1, 3, 5])
# Multi GPU with mixed precision
trainer = pl.Trainer(gpus=2, precision=16)
# Train on TPUs
trainer = pl.Trainer(tpu_cores=8)
不需要修改代码中的任何一行,您现在就可以使用上面的代码执行以下操作
# train on TPUs using 16 bit precision
# using only half the training data and checking validation every quarter of a training epoch
trainer = pl.Trainer(
    tpu_cores=8,
    precision=16,
    limit_train_batches=0.5,
    val_check_interval=0.25
)
Checkpoints
Lightning 会自动保存你的模型。一旦您完成了训练,您就可以按照以下方式加载 checkpoints:
model = LitModel.load_from_checkpoint(path)
上面的 checkpoints 包含了初始化模型和设置 state dict 所需的所有参数。 如果您更喜欢手动操作,以下是等效的方法
# load the ckpt
ckpt = torch.load('path/to/checkpoint.ckpt')

# equivalent to the above
model = LitModel()
model.load_state_dict(ckpt['state_dict'])
Data flow
每个循环(训练、验证、测试)都有三个可以实现的 hooks:
- x_step
- x_step_end
- x_epoch_end
为了说明数据是如何流动的,我们将使用training loop(即x=training)
outs = []
for batch in data:
    out = training_step(batch)
    outs.append(out)
training_epoch_end(outs)
Lightning中的等价是:
def training_step(self, batch, batch_idx):
    prediction = ...
    return prediction

def training_epoch_end(self, training_step_outputs):
    for prediction in predictions:
        # do something with these
如果你使用DP或DDP2分布式模式(例如:在gpu上 split a batch),使用 x_step_end 手动聚合(或者不要实现它 让lightning自动聚合)。
for batch in data:
    model_copies = copy_model_per_gpu(model, num_gpus)
    batch_split = split_batch_per_gpu(batch, num_gpus)

    gpu_outs = []
    for model, batch_part in zip(model_copies, batch_split):
        # LightningModule hook
        gpu_out = model.training_step(batch_part)
        gpu_outs.append(gpu_out)

    # LightningModule hook
    out = training_step_end(gpu_outs)
在 lightning 中 等价 是:
def training_step(self, batch, batch_idx):
    loss = ...
    return loss

def training_step_end(self, losses):
    gpu_0_loss = losses[0]
    gpu_1_loss = losses[1]
    return (gpu_0_loss + gpu_1_loss) * 1/2
TIP: validation 和 test loops 具有相同的结构。
Logging
要记录到tensorboard,您最喜欢的记录器和/或进度条,请使用log()方法,该方法可以从LightningModule中的任何方法调用。
def training_step(self, batch, batch_idx):
    self.log('my_metric', x)
log() 方法有一些设置:
- on_step (记录训练中该step的指标)
- on_epoch(在时间结束时自动累积并记录)
- prog_bar(记录到进度栏)
- logger(记录到像Tensorboard一样的logger)
根据从何处调用log,Lightning会自动为您确定正确的模式。 但是当然,您可以通过手动设置标志来覆盖默认行为
Note: 设置on_epoch = True将在整个训练epoch内累积您的记录值。
def training_step(self, batch, batch_idx):
    self.log('my_loss', loss, on_step=True, on_epoch=True, prog_bar=True, logger=True)
Note: 进度条中显示的损失值在最后一个值上进行了平滑(平均),因此它不同于训练/验证步骤中返回的实际损失。
您还可以直接使用logger的任何方法:
def training_step(self, batch, batch_idx):
    tensorboard = self.logger.experiment
    tensorboard.any_summary_writer_method_you_want())
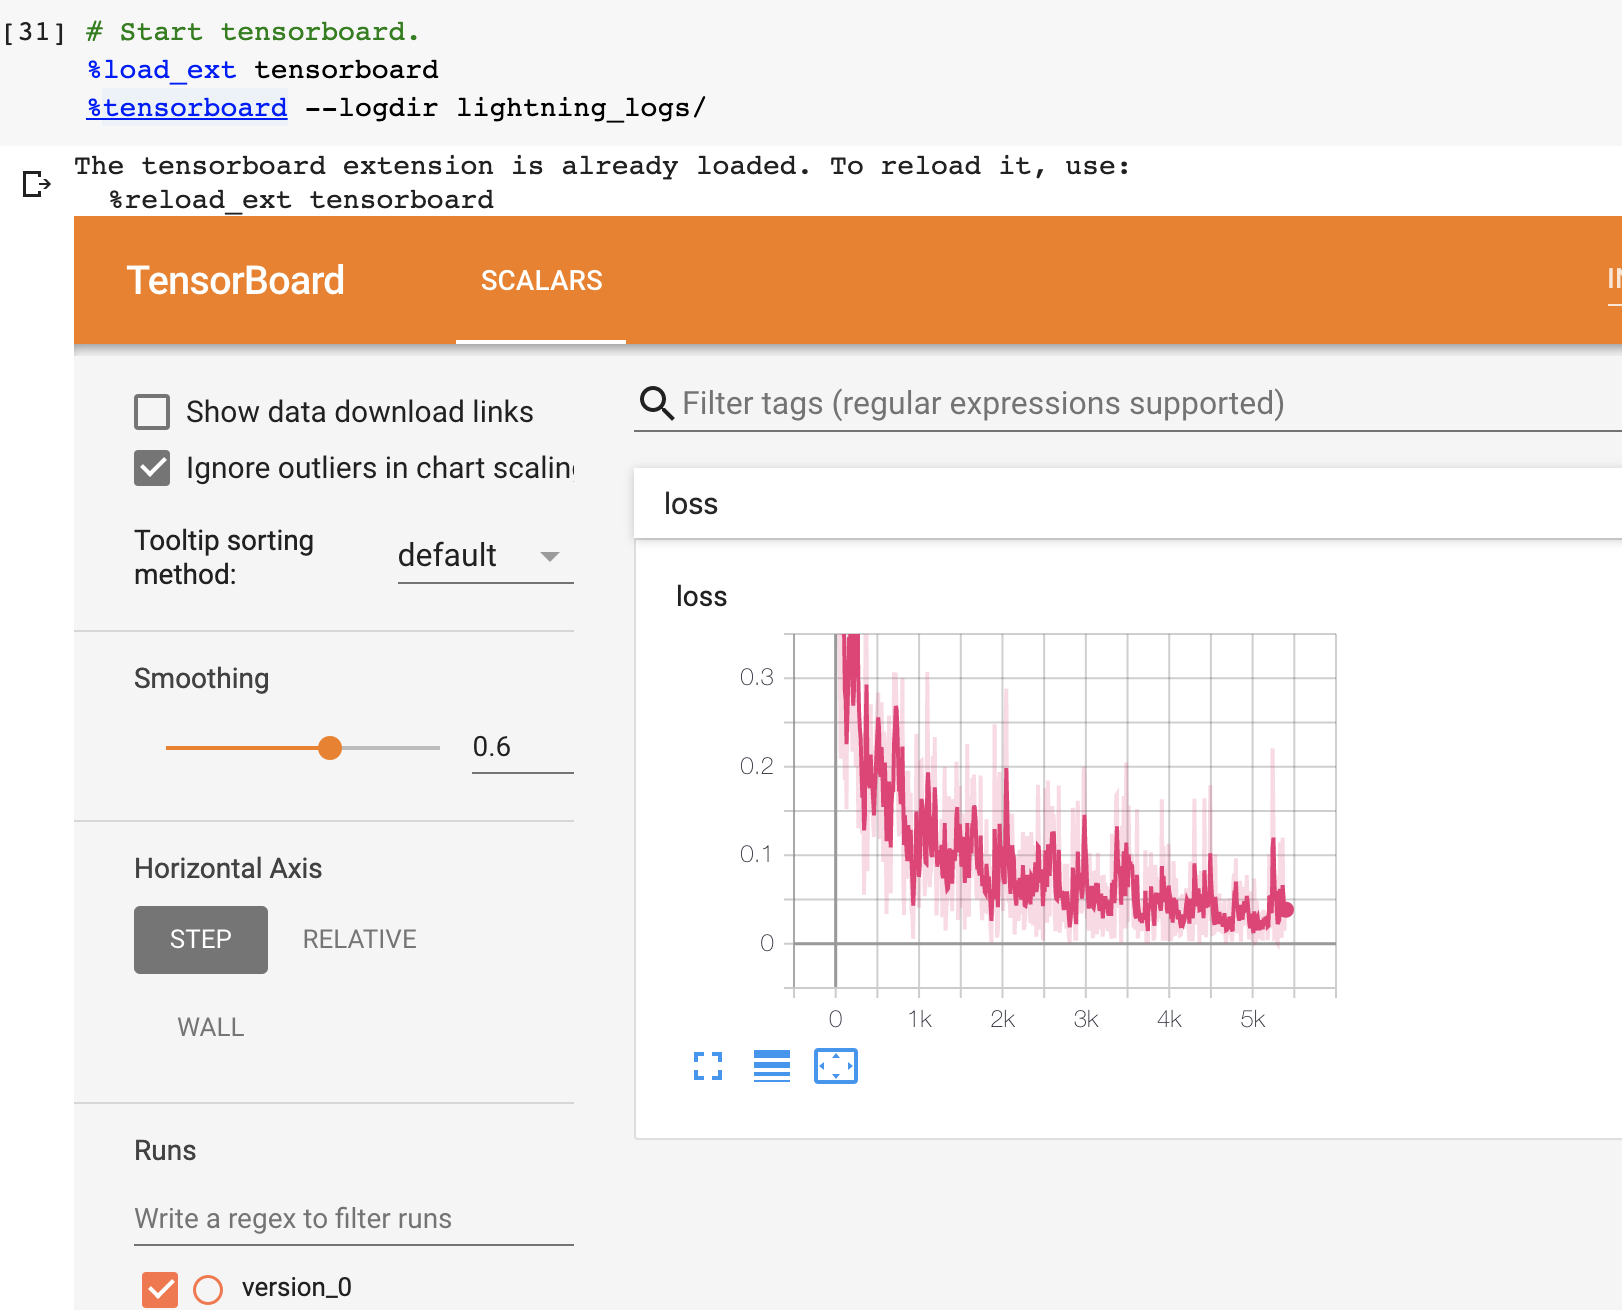
训练开始后,您可以使用您喜欢的logger或启动Tensorboard日志来查看日志:
tensorboard --logdir ./lightning_logs
Note: Lightning会自动在进度栏中显示从training_step返回的损失值。 因此,无需显式记录此类self.log(’loss’,loss,prog_bar = True)。
Optional extensions
Callbacks
callback是一个任意的独立程序,可以在训练循环的任意部分执行。
这是添加不太理想的学习率衰减规则的示例:
from pytorch_lightning.callbacks import Callback

class DecayLearningRate(Callback):

    def __init__(self):
        self.old_lrs = []

    def on_train_start(self, trainer, pl_module):
        # track the initial learning rates
        for opt_idx, optimizer in enumerate(trainer.optimizers):
            group = [param_group['lr'] for param_group in optimizer.param_groups]
            self.old_lrs.append(group)

    def on_train_epoch_end(self, trainer, pl_module, outputs):
        for opt_idx, optimizer in enumerate(trainer.optimizers):
            old_lr_group = self.old_lrs[opt_idx]
            new_lr_group = []
            for p_idx, param_group in enumerate(optimizer.param_groups):
                old_lr = old_lr_group[p_idx]
                new_lr = old_lr * 0.98
                new_lr_group.append(new_lr)
                param_group['lr'] = new_lr
            self.old_lrs[opt_idx] = new_lr_group

# And pass the callback to the Trainer
decay_callback = DecayLearningRate()
trainer = Trainer(callbacks=[decay_callback])
以下的事情你可以通过 callback 做到:
- Send emails at some point in training
- Grow the model
- Update learning rates
- Visualize gradients
- …
- You are only limited by your imagination
Learn more about custom callbacks.
LightningDataModules
DataLoader和数据处理代码往往最终散落在各处。 通过将其组织到LightningDataModule中,使数据代码可重用。
class MNISTDataModule(LightningDataModule):

      def __init__(self, batch_size=32):
          super().__init__()
          self.batch_size = batch_size

      # When doing distributed training, Datamodules have two optional arguments for
      # granular control over download/prepare/splitting data:

      # OPTIONAL, called only on 1 GPU/machine
      def prepare_data(self):
          MNIST(os.getcwd(), train=True, download=True)
          MNIST(os.getcwd(), train=False, download=True)

      # OPTIONAL, called for every GPU/machine (assigning state is OK)
      def setup(self, stage: Optional[str] = None):
          # transforms
          transform=transforms.Compose([
              transforms.ToTensor(),
              transforms.Normalize((0.1307,), (0.3081,))
          ])
          # split dataset
          if stage == 'fit':
              mnist_train = MNIST(os.getcwd(), train=True, transform=transform)
              self.mnist_train, self.mnist_val = random_split(mnist_train, [55000, 5000])
          if stage == 'test':
              self.mnist_test = MNIST(os.getcwd(), train=False, transform=transform)

      # return the dataloader for each split
      def train_dataloader(self):
          mnist_train = DataLoader(self.mnist_train, batch_size=self.batch_size)
          return mnist_train

      def val_dataloader(self):
          mnist_val = DataLoader(self.mnist_val, batch_size=self.batch_size)
          return mnist_val

      def test_dataloader(self):
          mnist_test = DataLoader(self.mnist_test, batch_size=self.batch_size)
          return mnist_test
LightningDataModule旨在支持在不同项目之间共享和重用数据 splits 和 transforms。 它封装了处理数据所需的所有步骤: downloading, tokenizing, processing etc。
你可以将 LightningDataModule 送入 Trainer:
# init model
model = LitModel()

# init data
dm = MNISTDataModule()

# train
trainer = pl.Trainer()
trainer.fit(model, dm)

# test
trainer.test(datamodule=dm)
DataModules对于基于数据构建模型特别有用。 阅读有关 datamodules 的更多信息。
Debugging
Lightning有许多调试工具。 以下是其中一些示例:
# use only 10 train batches and 3 val batches
trainer = Trainer(limit_train_batches=10, limit_val_batches=3)
# Automatically overfit the sane batch of your model for a sanity test
trainer = Trainer(overfit_batches=1)
# unit test all the code- hits every line of your code once to see if you have bugs,
# instead of waiting hours to crash on validation
trainer = Trainer(fast_dev_run=True)
# train only 20% of an epoch
trainer = Trainer(limit_train_batches=0.2)
# run validation every 25% of a training epoch
trainer = Trainer(val_check_interval=0.25)
# Profile your code to find speed/memory bottlenecks
Trainer(profiler="simple")
Other coool features
定义并训练了第一个Lightning模型后,您可能想尝试其他一些很棒的功能,例如:
- Automatic early stopping
- Automatic truncated-back-propagation-through-time
- Automatically scale your batch size
- Automatically find a good learning rate
- Load checkpoints directly from S3
- Scale to massive compute clusters
- Use multiple dataloaders per train/val/test loop
- Use multiple optimizers to do reinforcement learning or even GANs
Grid AI
Grid AI是我们的本地解决方案,可在您选择的云提供商上进行大规模训练和调整。
Best practices
Style guide
Lightning 的一个主要目标是提高可读性和再现性。 想象一下查看任何GitHub repo,找到一个 lightning 模块,并知道在哪里查找您关心的事情。
本 Style guide 的目标是鼓励Lightning代码采用类似的结构。
LightningModule
这些是构建LightningModule的最佳实践。
Systems vs models
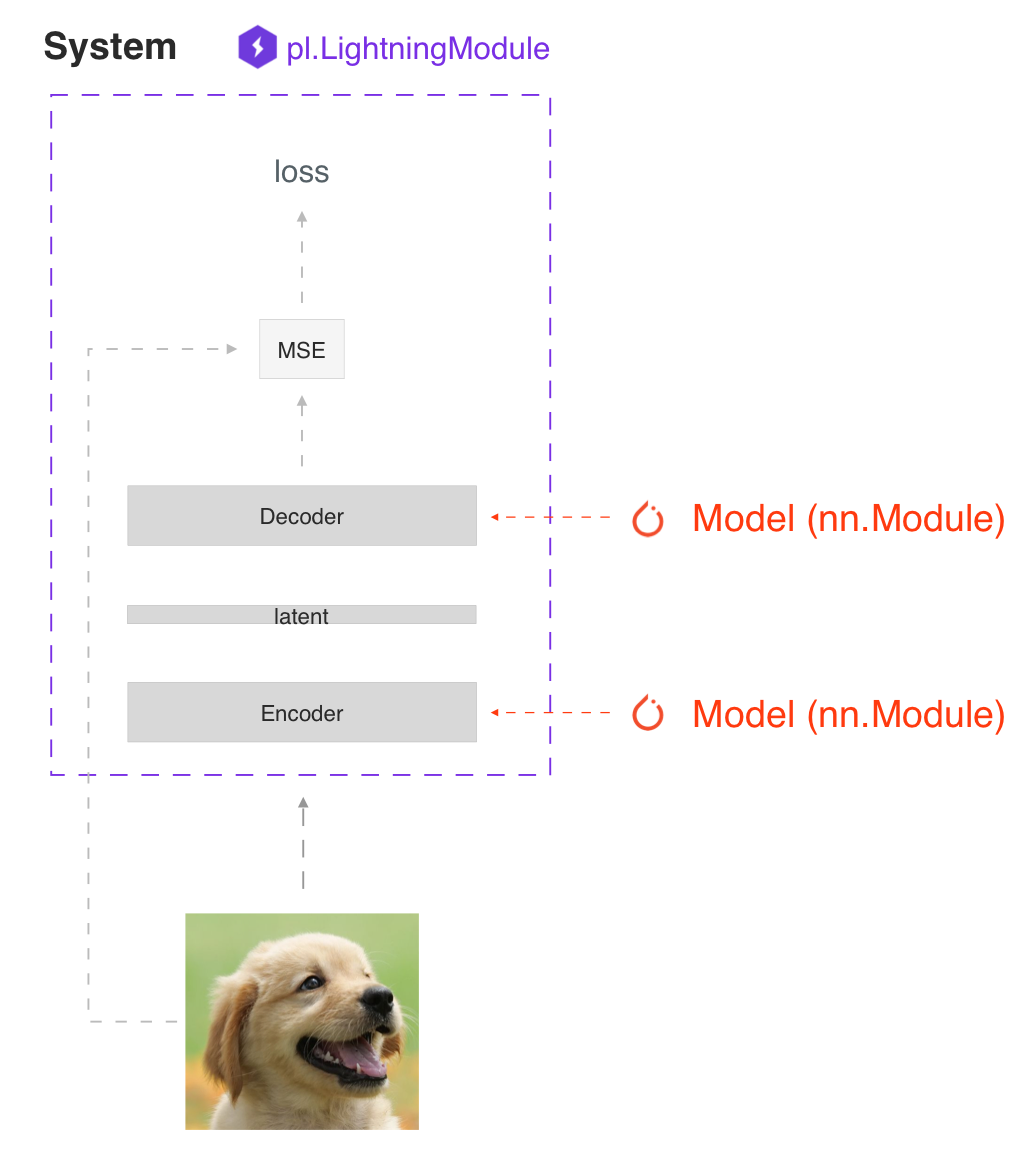
LightningModule 背后的主要原理是一个完整的系统应该是独立的。在 Lightning 中,我们区分了系统和模型。
模型类似于resnet18、RNN等。
系统定义了一组模型如何相互交互。例如:
- GANs
- Seq2Seq
- BERT
- etc
一个 LightningModule 可以定义一个系统和一个模型。
下面是定义了一个模型的 LightningModule:
class LitModel(LightningModule):
    def __init__(self, num_layers: int = 3):
        super().__init__()
        self.layer_1 = nn.Linear()
        self.layer_2 = nn.Linear()
        self.layer_3 = nn.Linear()
这是定义了一个系统的 LightningModule:
class LitModel(LightningModule):
    def __init__(self, encoder: nn.Module = None, decoder: nn.Module = None):
        super().__init__()
        self.encoder = encoder
        self.decoder = decoder
为了快速创建原型,在LightningModule中定义所有的计算通常是有用的。为了可重用性和可伸缩性,最好是传入相关的 backbones。
Self-contained
Lightning module 应该是独立的。要了解模型的 self-contained 程度,一个很好的测试方法是 问自己这个问题:
“有人可以在不知道任何内部信息的情况下把这个文件放到 Trainer 那里吗? “
例如,我们将优化器与模型结合在一起,因为大多数模型需要一个特定的优化器和一个特定的学习率调度器来正常工作。
Init
LightningModules可能停止自 self-contained 的第一个地方是init。尝试在init中定义所有相关的合理默认值,这样用户就不必猜测了。
下面是一个例子,用户将不得不遍历文件来找出如何初始化这个LightningModule。
class LitModel(LightningModule):
    def __init__(self, params):
        self.lr = params.lr
        self.coef_x = params.coef_x
这样定义的模型给您留下了许多问题; coef_x 是多少? 它是一个字符串吗? 一个浮点数? 范围是什么? 等…
相反,在init中要显式
class LitModel(LightningModule):
    def __init__(self, encoder: nn.Module, coeff_x: float = 0.2, lr: float = 1e-3):
        ...
现在用户不需要猜了。进而,它们知道值的类型,并且模型有一个合理的默认值,用户可以立即看到值。
Method order
LightningModule中唯一需要的方法是:
- init
- training_step
- configure_optimizers
但是,如果您决定实现其余的可选方法,那么推荐的顺序是
- model/system definition (init)
- if doing inference, define forward
- training hooks
- validation hooks
- test hooks
- configure_optimizers
- any other hooks
在实践中,这段代码如下:
class LitModel(pl.LightningModule):

    def __init__(...):

    def forward(...):

    def training_step(...)

    def training_step_end(...)

    def training_epoch_end(...)

    def validation_step(...)

    def validation_step_end(...)

    def validation_epoch_end(...)

    def test_step(...)

    def test_step_end(...)

    def test_epoch_end(...)

    def configure_optimizers(...)

    def any_extra_hook(...)
Forward vs training_step
我们建议使用 forward 进行 inference/predictions 并保持 training_step 独立
def forward(...):
    embeddings = self.encoder(x)

def training_step(...):
    x, y = ...
    z = self.encoder(x)
    pred = self.decoder(z)
    ...
然而,当使用DataParallel时,您将需要手动调用forward
def training_step(...):
    x, y = ...
    z = self(x)  # < ---------- instead of self.encoder(x)
    pred = self.decoder(z)
    ...
Data
这些是处理数据的最佳实践。
Dataloaders
Lightning使用 dataloaders 来处理通过系统的所有数据流。在构建 dataloaders 时,请确保调整 number of workers 的数量以获得最大效率。
Warning: 确保不要使用ddp spawn与num workers > 0一起使用,否则你的代码会出现瓶颈。
DataModules
Lightning 引入了 datamodules。dataloaders 的问题是,共享完整的数据集通常仍然具有挑战性,因为所有这些问题都需要回答:
- What splits were used?
- How many samples does this dataset have?
- What transforms were used?
- etc…
正是因为这个原因,我们建议您使用datamomodules。这在协作时特别重要,因为它也会为您的团队节省大量时间。
他们所需要做的就是将一个 datamodule 放入 lightning trainer 中,而不必担心对数据做了什么。
在学术和公司环境中都是如此,data cleaning 和 ad-hoc instructions 会减慢迭代想法的进度。
Optional extensions
LightningDataModule
Why do I need a DataModule?
在一般的 PyTorch 代码中, 数据 清洗/预处理 通常分散在许多文件中。这使得在项目之间共享和重用精确的分割和转换是不可能的。
如果你曾经问过这些问题,Datamodules是为你准备的:
- 你曾用过什么splits?
- 你曾用过什么 transforms?
- 你曾用过什么 normalization?
- 你是如何 prepare/tokenize 这些数据的?
What is a DataModule
DataModule只是train_dataloader,val_dataloader,test_dataloader以及所需的matching transforms和数据 processing/downloads 步骤的集合。
这里是一个 PyTorch 的例子:
# regular PyTorch
test_data = MNIST(my_path, train=False, download=True)
train_data = MNIST(my_path, train=True, download=True)
train_data, val_data = random_split(train_data, [55000, 5000])

train_loader = DataLoader(train_data, batch_size=32)
val_loader = DataLoader(val_data, batch_size=32)
test_loader = DataLoader(test_data, batch_size=32)
等效的DataModule只是组织完全相同的代码,但使其可跨项目重用。
class MNISTDataModule(pl.LightningDataModule):

    def __init__(self, data_dir: str = "path/to/dir", batch_size: int = 32):
        super().__init__()
        self.data_dir = data_dir
        self.batch_size = batch_size

    def setup(self, stage: Optional[str] = None):
        self.mnist_test = MNIST(self.data_dir, train=False)
        mnist_full = MNIST(self.data_dir, train=True)
        self.mnist_train, self.mnist_val = random_split(mnist_full, [55000, 5000])

    def train_dataloader(self):
        return DataLoader(self.mnist_train, batch_size=self.batch_size)

    def val_dataloader(self):
        return DataLoader(self.mnist_val, batch_size=self.batch_size)

    def test_dataloader(self):
        return DataLoader(self.mnist_test, batch_size=self.batch_size)

    def teardown(self, stage: Optional[str] = None):
        # Used to clean-up when the run is finished
        ...
但是现在,随着你的处理复杂性的增长(transforms,多gpu训练),你可以让Lightning处理这些细节,同时使这个数据集可重用,这样你就可以与同事分享或在不同的项目中使用。
mnist = MNISTDataModule(my_path)
model = LitClassifier()

trainer = Trainer()
trainer.fit(model, mnist)
下面是一个更现实、更复杂的数据模块,它显示了该数据模块的可重用性。
import pytorch_lightning as pl
from torch.utils.data import random_split, DataLoader

# Note - you must have torchvision installed for this example
from torchvision.datasets import MNIST
from torchvision import transforms


class MNISTDataModule(pl.LightningDataModule):

    def __init__(self, data_dir: str = './'):
        super().__init__()
        self.data_dir = data_dir
        self.transform = transforms.Compose([
            transforms.ToTensor(),
            transforms.Normalize((0.1307,), (0.3081,))
        ])

        # self.dims is returned when you call dm.size()
        # Setting default dims here because we know them.
        # Could optionally be assigned dynamically in dm.setup()
        self.dims = (1, 28, 28)

    def prepare_data(self):
        # download
        MNIST(self.data_dir, train=True, download=True)
        MNIST(self.data_dir, train=False, download=True)

    def setup(self, stage: Optional[str] = None):

        # Assign train/val datasets for use in dataloaders
        if stage == 'fit' or stage is None:
            mnist_full = MNIST(self.data_dir, train=True, transform=self.transform)
            self.mnist_train, self.mnist_val = random_split(mnist_full, [55000, 5000])

            # Optionally...
            # self.dims = tuple(self.mnist_train[0][0].shape)

        # Assign test dataset for use in dataloader(s)
        if stage == 'test' or stage is None:
            self.mnist_test = MNIST(self.data_dir, train=False, transform=self.transform)

            # Optionally...
            # self.dims = tuple(self.mnist_test[0][0].shape)

    def train_dataloader(self):
        return DataLoader(self.mnist_train, batch_size=32)

    def val_dataloader(self):
        return DataLoader(self.mnist_val, batch_size=32)

    def test_dataloader(self):
        return DataLoader(self.mnist_test, batch_size=32)
Note: setup 需要一个参数 stage。 它用于分离 trainer.fit 和 trainer.test 的 setup 逻辑。
LightningDataModule API
定义一个 DataModule 定义 5 个 方法:
- prepare_data (how to download(), tokenize, etc…)
- setup (how to split, etc…)
- train_dataloader
- val_dataloader(s)
- test_dataloader(s)
prepare_data
使用此方法可以执行可能写入磁盘的操作,或者在分布式设置中只需要从单个进程完成的操作。
- download
- tokenize
- etc…
class MNISTDataModule(pl.LightningDataModule):
    def prepare_data(self):
        # download
        MNIST(os.getcwd(), train=True, download=True, transform=transforms.ToTensor())
        MNIST(os.getcwd(), train=False, download=True, transform=transforms.ToTensor())
Warning: prepare_data 从一个单线程调用 (比如 GPU 0)。 不要用它取设置状态 (self.x = y)。
setup
还有一些你可能想要在每个GPU上执行的数据操作。使用 setup 来做这样的事情:
- count number of classes
- build vocabulary
- perform train/val/test splits
- apply transforms (defined explicitly in your datamodule or assigned in init)
- etc…
import pytorch_lightning as pl


class MNISTDataModule(pl.LightningDataModule):

    def setup(self, stage: Optional[str] = None):

        # Assign Train/val split(s) for use in Dataloaders
        if stage == 'fit' or stage is None:
            mnist_full = MNIST(
                self.data_dir,
                train=True,
                download=True,
                transform=self.transform
            )
            self.mnist_train, self.mnist_val = random_split(mnist_full, [55000, 5000])
            self.dims = self.mnist_train[0][0].shape

        # Assign Test split(s) for use in Dataloaders
        if stage == 'test' or stage is None:
            self.mnist_test = MNIST(
                self.data_dir,
                train=False,
                download=True,
                transform=self.transform
            )
            self.dims = getattr(self, 'dims', self.mnist_test[0][0].shape)
setup 在每个进程上调用。 在这里设置状态是ok的。
Note: teardown 可以用来清理状态。它也会从每个进程中调用。
train_dataloader
使用此方法生成train dataloader。通常你在 setup 中包装你定义的数据集
import pytorch_lightning as pl


class MNISTDataModule(pl.LightningDataModule):
    def train_dataloader(self):
        return DataLoader(self.mnist_train, batch_size=64)
val_dataloader
使用此方法生成val dataloader。通常你在 setup 中包装你定义的数据集
import pytorch_lightning as pl


class MNISTDataModule(pl.LightningDataModule):
    def val_dataloader(self):
        return DataLoader(self.mnist_val, batch_size=64)
test_dataloader
使用此方法生成test dataloader。通常你在 setup 中包装你定义的数据集
import pytorch_lightning as pl


class MNISTDataModule(pl.LightningDataModule):
    def test_dataloader(self):
        return DataLoader(self.mnist_test, batch_size=64)
transfer_batch_to_device
重写以定义如何将 任意batch 移动到 device。
class MNISTDataModule(LightningDataModule):
    def transfer_batch_to_device(self, batch, device):
        x = batch['x']
        x = CustomDataWrapper(x)
        batch['x'] = x.to(device)
        return batch
Note: 这个 hook 只在单个GPU训练和DDP上运行(no data-parallel)
on_before_batch_transfer
在将 batch 转移到 device 之前,重写可对其更改或应用数据增强。
class MNISTDataModule(LightningDataModule):
    def on_before_batch_transfer(self, batch, dataloader_idx):
        batch['x'] = transforms(batch['x'])
        return batch
Warning: 目前dataloader idx总是返回0,将来会更新以支持真实的 idx。
Note: 这个 hook 只在单个GPU训练和DDP上运行(no data-parallel)
on_after_batch_transfer
在batch 被转移到 device 后,重写可对其更改或应用数据增强。
class MNISTDataModule(LightningDataModule):
    def on_after_batch_transfer(self, batch, dataloader_idx):
        batch['x'] = gpu_transforms(batch['x'])
        return batch
Warning: 目前dataloader idx总是返回0,将来会更新以支持真实的 idx。
Note: 这个 hook 只在单个GPU训练和DDP上运行(no data-parallel)。 这个 hook 在使用CPU设备的时候也会被调用,所以在这里增加数据增强 和 在 on_before_batch_transfer 里 意味着做同样的事情
Note: 为了将数据与 transforms 分离,您可以通过 __init__ 参数化它们。
class MNISTDataModule(pl.LightningDataModule):
    def __init__(self, train_transforms, val_transforms, test_transforms):
        super().__init__()
        self.train_transforms = train_transforms
        self.val_transforms = val_transforms
        self.test_transforms = test_transforms
Using a DataModule
推荐使用 DataModule 的方式是:
dm = MNISTDataModule()
model = Model()
trainer.fit(model, dm)

trainer.test(datamodule=dm)
如果需要来自数据集的信息来构建模型,则手动运行prepare data和setup (Lightning仍然确保该方法在正确的设备上运行)。
dm = MNISTDataModule()
dm.prepare_data()
dm.setup(stage='fit')

model = Model(num_classes=dm.num_classes, width=dm.width, vocab=dm.vocab)
trainer.fit(model, dm)

dm.setup(stage='test')
trainer.test(datamodule=dm)
Datamodules without Lightning
当然,你也可以在普通的 PyTorch 代码中使用 DataModules。
# download, etc...
dm = MNISTDataModule()
dm.prepare_data()

# splits/transforms
dm.setup(stage='fit')

# use data
for batch in dm.train_dataloader():
    ...
for batch in dm.val_dataloader():
    ...

dm.teardown(stage='fit')

# lazy load test data
dm.setup(stage='test')
for batch in dm.test_dataloader():
    ...

dm.teardown(stage='test')
但是总的来说,DataModules 通过允许在统一的结构中指定数据集的所有细节来鼓励可重复性
Tutorials
Step-by-step walk-through
The research
Model
lightning module 拥有所有核心研究成分:
- The model
- The optimizers
- The train/ val/ test steps
让我们先从模型开始。在这种情况下,我们将设计一个三层的神经网络。
import torch
from torch.nn import functional as F
from torch import nn
from pytorch_lightning.core.lightning import LightningModule

class LitMNIST(LightningModule):

  def __init__(self):
    super().__init__()

    # mnist images are (1, 28, 28) (channels, width, height)
    self.layer_1 = nn.Linear(28 * 28, 128)
    self.layer_2 = nn.Linear(128, 256)
    self.layer_3 = nn.Linear(256, 10)

  def forward(self, x):
    batch_size, channels, width, height = x.size()

    # (b, 1, 28, 28) -> (b, 1*28*28)
    x = x.view(batch_size, -1)
    x = self.layer_1(x)
    x = F.relu(x)
    x = self.layer_2(x)
    x = F.relu(x)
    x = self.layer_3(x)

    x = F.log_softmax(x, dim=1)
    return x
注意 lightning module 而不是 torch.nn.Module。 LightningModule等价于纯PyTorch Module,只是它增加了一些功能。但是,您可以像使用PyTorch Module一样使用它。
net = LitMNIST()
x = torch.randn(1, 1, 28, 28)
out = net(x)
输出:
torch.Size([1, 10])
现在我们添加包含所有训练循环逻辑的训练步骤:
class LitMNIST(LightningModule):

    def training_step(self, batch, batch_idx):
        x, y = batch
        logits = self(x)
        loss = F.nll_loss(logits, y)
        return loss
Data
Lightning 在纯 dataloader 上操作。 这里是用于加载 MNIST 的 PyTorch 代码。
from torch.utils.data import DataLoader, random_split
from torchvision.datasets import MNIST
import os
from torchvision import datasets, transforms

# transforms
# prepare transforms standard to MNIST
transform=transforms.Compose([transforms.ToTensor(),
                              transforms.Normalize((0.1307,), (0.3081,))])

# data
mnist_train = MNIST(os.getcwd(), train=True, download=True, transform=transform)
mnist_train = DataLoader(mnist_train, batch_size=64)
你可以用三种方式使用数据加载器:
1> Pass DataLoaders to .fit()
将 dataloaders 送到 .fit() 函数
model = LitMNIST()
trainer = Trainer()
trainer.fit(model, mnist_train)
2> LightningModule DataLoaders
对于快速研究原型,将模型与数据加载器链接起来可能更容易。
class LitMNIST(pl.LightningModule):

    def train_dataloader(self):
        # transforms
        # prepare transforms standard to MNIST
        transform=transforms.Compose([transforms.ToTensor(),
                                      transforms.Normalize((0.1307,), (0.3081,))])
        # data
        mnist_train = MNIST(os.getcwd(), train=True, download=True, transform=transform)
        return DataLoader(mnist_train, batch_size=64)

    def val_dataloader(self):
        transforms = ...
        mnist_val = ...
        return DataLoader(mnist_val, batch_size=64)

    def test_dataloader(self):
        transforms = ...
        mnist_test = ...
        return DataLoader(mnist_test, batch_size=64)
数据加载器已经在模型中,不需要再使用 .fit()
model = LitMNIST()
trainer = Trainer()
trainer.fit(model)
3> DataModules(recommended)
定义 free-floating 数据加载器, splits, download instructions等等可能变得混乱。 在这种情况下, 最好将数据集的完整定义分组到 DataModule, 它包含:
- Download instructions
- Processing instructions
- Split instructions
- Train dataloader
- Val dataloader(s)
- Test dataloader(s)
class MyDataModule(LightningDataModule):

    def __init__(self):
        super().__init__()
        self.train_dims = None
        self.vocab_size = 0

    def prepare_data(self):
        # called only on 1 GPU
        download_dataset()
        tokenize()
        build_vocab()

    def setup(self, stage: Optional[str] = None):
        # called on every GPU
        vocab = load_vocab()
        self.vocab_size = len(vocab)

        self.train, self.val, self.test = load_datasets()
        self.train_dims = self.train.next_batch.size()

    def train_dataloader(self):
        transforms = ...
        return DataLoader(self.train, batch_size=64)

    def val_dataloader(self):
        transforms = ...
        return DataLoader(self.val, batch_size=64)

    def test_dataloader(self):
        transforms = ...
        return DataLoader(self.test, batch_size=64)
使用 DataModules 可以更容易地共享完整数据集定义。
# use an MNIST dataset
mnist_dm = MNISTDatamodule()
model = LitModel(num_classes=mnist_dm.num_classes)
trainer.fit(model, mnist_dm)

# or other datasets with the same model
imagenet_dm = ImagenetDatamodule()
model = LitModel(num_classes=imagenet_dm.num_classes)
trainer.fit(model, imagenet_dm)
Note: prepare_data() 在分布式训练中(自动)只调用一个GPU。
Note:setup()在每个GPU上调用(自动)
Models defined by data
当您的模型需要了解数据时,最好在将数据传递给模型之前处理数据。
# init dm AND call the processing manually
dm = ImagenetDataModule()
dm.prepare_data()
dm.setup()

model = LitModel(out_features=dm.num_classes, img_width=dm.img_width, img_height=dm.img_height)
trainer.fit(model, dm)
- 使用prepare data()下载和处理数据集。
- 使用setup()进行分割,并构建模型内部构件
使用DataModule的另一种选择是将models模块的初始化延迟到LightningModule的 setup 方法,如下所示:
class LitMNIST(LightningModule):

    def __init__(self):
        self.l1 = None

    def prepare_data(self):
        download_data()
        tokenize()

    def setup(self, stage: Optional[str] = None):
        # step is either 'fit', 'validate', 'test', or 'predict'. 90% of the time not relevant
        data = load_data()
        num_classes = data.classes
        self.l1 = nn.Linear(..., num_classes)
Optimizer
接下来,我们选择使用什么优化器来训练我们的系统。在PyTorch中,我们这样做:
from torch.optim import Adam
optimizer = Adam(LitMNIST().parameters(), lr=1e-3)
在Lightning中,我们也这样做,但在configure optimizers()方法下进行组织。
class LitMNIST(LightningModule):

    def configure_optimizers(self):
        return Adam(self.parameters(), lr=1e-3)
Note: LightningModule本身有参数,所以传入self.parameters()
但是,如果有多个优化器,请使用对应的参数
class LitMNIST(LightningModule):

    def configure_optimizers(self):
        return Adam(self.generator(), lr=1e-3), Adam(self.discriminator(), lr=1e-3)
Training step
training step是在训练循环中发生的事情。
for epoch in epochs:
    for batch in data:
        # TRAINING STEP
        # ....
        # TRAINING STEP
        optimizer.zero_grad()
        loss.backward()
        optimizer.step()
在 MNIST 中, 我们这样做:
for epoch in epochs:
    for batch in data:
        # ------ TRAINING STEP START ------
        x, y = batch
        logits = model(x)
        loss = F.nll_loss(logits, y)
        # ------ TRAINING STEP END ------

        optimizer.zero_grad()
        loss.backward()
        optimizer.step()
在Lightning中,训练步骤中的所有内容都在 LightningModule 中的 training_step() 函数下进行组织。
class LitMNIST(LightningModule):

    def training_step(self, batch, batch_idx):
        x, y = batch
        logits = self(x)
        loss = F.nll_loss(logits, y)
        return loss
同样,这是相同的PyTorch代码,只是它是由LightningModule组织的。这个代码没有限制,这意味着它可以像一个完整的 seq-2-seq, RL loop, GAN 等… 一样复杂。
The engineering
Training
到目前为止,我们在pure PyTorch中定义了4个关键成分,但使用LightningModule组织了代码。
- Model.
- Training data.
- Optimizer.
- What happens in the training loop.
为了清晰起见,我们回忆一下完整的LightningModule现在看起来是这样的。
class LitMNIST(LightningModule):
    def __init__(self):
        super().__init__()
        self.layer_1 = nn.Linear(28 * 28, 128)
        self.layer_2 = nn.Linear(128, 256)
        self.layer_3 = nn.Linear(256, 10)

    def forward(self, x):
        batch_size, channels, width, height = x.size()
        x = x.view(batch_size, -1)
        x = self.layer_1(x)
        x = F.relu(x)
        x = self.layer_2(x)
        x = F.relu(x)
        x = self.layer_3(x)
        x = F.log_softmax(x, dim=1)
        return x

    def training_step(self, batch, batch_idx):
        x, y = batch
        logits = self(x)
        loss = F.nll_loss(logits, y)
        return loss
同样,这是相同的PyTorch代码,只是它是由LightningModule组织的。
Logging
使用我们最喜欢的logger Tensorboard 记录, 使用 log() 方法, 它可以在 LightningModule 的任意方法中调用。
def training_step(self, batch, batch_idx):
    self.log('my_metric', x)
log() 有以下几个设置:
- on_step(在训练的每个step记录metric)
- on_epoch(在epoch结束时自动累积并记录日志)
- prog_bar(记录进度条)
- logger(像Tensorboard一样的日志到记录器)
根据日志的调用位置,Lightning会自动为您确定正确的模式。当然,您可以通过手动设置 flags 来覆盖默认行为。
Note:设置为epoch=True将在整个培训时间内累积您的日志值。
def training_step(self, batch, batch_idx):
    self.log('my_loss', loss, on_step=True, on_epoch=True, prog_bar=True, logger=True)
您还可以直接使用logger的任何方法。
def training_step(self, batch, batch_idx):
    tensorboard = self.logger.experiment
    tensorboard.any_summary_writer_method_you_want())
一旦你的训练开始,你可以通过使用你最喜欢的 logger 或启动 Tensorboard 日志查看日志
tensorboard --logdir ./lightning_logs
这会自动生成 tensorboard 日志 (或者你选择的logger)
但您也可以使用我们支持的任何其他记录器。
Train on CPU
from pytorch_lightning import Trainer

model = LitMNIST()
trainer = Trainer()
trainer.fit(model, train_loader)
您应该看到以下 weights summary 和 progress bar:

Train on GPU
但美妙之处在于你用trainer flag 所能做到的所有神奇之处。例如,在GPU上运行这个模型
model = LitMNIST()
trainer = Trainer(gpus=1)
trainer.fit(model, train_loader)

Train on Multi-GPU
或者你也可以在多个gpu上训练。
model = LitMNIST()
trainer = Trainer(gpus=8)
trainer.fit(model, train_loader)
或多个节点
# (32 GPUs)
model = LitMNIST()
trainer = Trainer(gpus=8, num_nodes=4, accelerator='ddp')
trainer.fit(model, train_loader)
详情参见: 分布式计算手册
Hyperparameters
Lightning拥有与命令行ArgumentParser无缝交互的程序,并与您选择的超参数优化框架配合得很好。
ArgumentParser
Lightning的设计是为了增强Python内置ArgumentParser的很多功能
from argparse import ArgumentParser
parser = ArgumentParser()
parser.add_argument('--layer_1_dim', type=int, default=128)
args = parser.parse_args()
这允许你像这样调用你的程序
python trainer.py --layer_1_dim 64
Argparser Best Practices
最好的做法是把你的 arguments 分为三个部分。
- Trainer args (gpus, num_nodes, etc…)
- Model specific arguments (layer_dim, num_layers, learning_rate, etc…)
- Program arguments (data_path, cluster_email, etc…)
我们可以这样做。首先,在LightningModule中,定义特定于该模块的参数。请记住,数据分割或数据路径也可能特定于某个模块(例如:如果你的项目有一个在Imagenet上训练的模型,另一个在CIFAR-10上训练)
class LitModel(LightningModule):

    @staticmethod
    def add_model_specific_args(parent_parser):
        parser = parent_parser.add_argument_group("LitModel")
        parser.add_argument('--encoder_layers', type=int, default=12)
        parser.add_argument('--data_path', type=str, default='/some/path')
        return parent_parser
现在在你的 main trainer 文件, 添加 Trainer 参数, program 参数, 和 model 参数
# ----------------
# trainer_main.py
# ----------------
from argparse import ArgumentParser
parser = ArgumentParser()

# add PROGRAM level args
parser.add_argument('--conda_env', type=str, default='some_name')
parser.add_argument('--notification_email', type=str, default='will@email.com')

# add model specific args
parser = LitModel.add_model_specific_args(parser)

# add all the available trainer options to argparse
# ie: now --gpus --num_nodes ... --fast_dev_run all work in the cli
parser = Trainer.add_argparse_args(parser)

args = parser.parse_args()
现在你可以调用你的程序像这样运行:
python trainer_main.py --gpus 2 --num_nodes 2 --conda_env 'my_env' --encoder_layers 12
最后,确保像这样开始训练:
# init the trainer like this
trainer = Trainer.from_argparse_args(args, early_stopping_callback=...)

# NOT like this
trainer = Trainer(gpus=hparams.gpus, ...)

# init the model with Namespace directly
model = LitModel(args)

# or init the model with all the key-value pairs
dict_args = vars(args)
model = LitModel(**dict_args)
LightningModule hyperparameters
我们经常训练一个模型的多个版本。您可能会分享这个模型,或者几个月后再回到这个模型,这时了解这个模型是如何训练的就非常有用了(即:什么学习速率,神经网络等)。
Lightning有几种方法可以将这些信息保存在检查点和yaml文件中。这里的目标是提高可读性和再现性。
1> 第一种方法是要求lightning为您将 __init__ 中的所有值保存到 checkpoint。 这也使得这些值可以通过self.hparams获得。
class LitMNIST(LightningModule):

    def __init__(self, layer_1_dim=128, learning_rate=1e-2, **kwargs):
        super().__init__()
        # call this to save (layer_1_dim=128, learning_rate=1e-4) to the checkpoint
        self.save_hyperparameters()

        # equivalent
        self.save_hyperparameters('layer_1_dim', 'learning_rate')

        # Now possible to access layer_1_dim from hparams
        self.hparams.layer_1_dim
2> 有时候你的init可能有你不想保存的对象或其他参数。那样的话,就选几个吧
class LitMNIST(LightningModule):

    def __init__(self, loss_fx, generator_network, layer_1_dim=128 **kwargs):
        super().__init__()
        self.layer_1_dim = layer_1_dim
        self.loss_fx = loss_fx

        # call this to save (layer_1_dim=128) to the checkpoint
        self.save_hyperparameters('layer_1_dim')

# to load specify the other args
model = LitMNIST.load_from_checkpoint(PATH, loss_fx=torch.nn.SomeOtherLoss, generator_network=MyGenerator())
3> 赋值给 self.hparams. 所有赋值给 self.hparams 将会自动保存
# using a argparse.Namespace
class LitMNIST(LightningModule):
    def __init__(self, hparams, *args, **kwargs):
        super().__init__()
        self.hparams = hparams
        self.layer_1 = nn.Linear(28 * 28, self.hparams.layer_1_dim)
        self.layer_2 = nn.Linear(self.hparams.layer_1_dim, self.hparams.layer_2_dim)
        self.layer_3 = nn.Linear(self.hparams.layer_2_dim, 10)
    def train_dataloader(self):
        return DataLoader(mnist_train, batch_size=self.hparams.batch_size)
4> 还可以将dict或Namespace等完整对象保存到 checkpoint。
# using a argparse.Namespace
class LitMNIST(LightningModule):

    def __init__(self, conf, *args, **kwargs):
        super().__init__()
        self.save_hyperparameters(conf)

        self.layer_1 = nn.Linear(28 * 28, self.hparams.layer_1_dim)
        self.layer_2 = nn.Linear(self.hparams.layer_1_dim, self.hparams.layer_2_dim)
        self.layer_3 = nn.Linear(self.hparams.layer_2_dim, 10)

conf = OmegaConf.create(...)
model = LitMNIST(conf)

# Now possible to access any stored variables from hparams
model.hparams.anything
Trainer args
回顾一下,将所有可能的训练器标记添加到argparser中,并以这种方式初始化 Trainer
parser = ArgumentParser()
parser = Trainer.add_argparse_args(parser)
hparams = parser.parse_args()

trainer = Trainer.from_argparse_args(hparams)

# or if you need to pass in callbacks
trainer = Trainer.from_argparse_args(hparams, checkpoint_callback=..., callbacks=[...])
Multiple Lightning Modules
我们经常有多个 Lightning 模块,每个模块都有不同的参数。LightningModule让您为每个定义参数,而不是污染main.py文件。
class LitMNIST(LightningModule):

    def __init__(self, layer_1_dim, **kwargs):
        super().__init__()
        self.layer_1 = nn.Linear(28 * 28, layer_1_dim)

    @staticmethod
    def add_model_specific_args(parent_parser):
        parser = parent_parser.add_argument_group("LitMNIST")
        parser.add_argument('--layer_1_dim', type=int, default=128)
        return parent_parser
class GoodGAN(LightningModule):

    def __init__(self, encoder_layers, **kwargs):
        super().__init__()
        self.encoder = Encoder(layers=encoder_layers)

    @staticmethod
    def add_model_specific_args(parent_parser):
        parser = parent_parser.add_argument_group("GoodGAN")
        parser.add_argument('--encoder_layers', type=int, default=12)
        return parent_parser
现在,我们在 main.py 里可以允许每个模型注入它需要的参数
def main(args):
    dict_args = vars(args)

    # pick model
    if args.model_name == 'gan':
        model = GoodGAN(**dict_args)
    elif args.model_name == 'mnist':
        model = LitMNIST(**dict_args)

    trainer = Trainer.from_argparse_args(args)
    trainer.fit(model)

if __name__ == '__main__':
    parser = ArgumentParser()
    parser = Trainer.add_argparse_args(parser)

    # figure out which model to use
    parser.add_argument('--model_name', type=str, default='gan', help='gan or mnist')

    # THIS LINE IS KEY TO PULL THE MODEL NAME
    temp_args, _ = parser.parse_known_args()

    # let the model add what it wants
    if temp_args.model_name == 'gan':
        parser = GoodGAN.add_model_specific_args(parser)
    elif temp_args.model_name == 'mnist':
        parser = LitMNIST.add_model_specific_args(parser)

    args = parser.parse_args()

    # train
    main(args)
现在我们可以使用命令行接口训练MNIST或GAN
$ python main.py --model_name gan --encoder_layers 24
$ python main.py --model_name mnist --layer_1_dim 128
Validating
在大多数情况下,当数据验证分割的性能达到最小值时,我们停止训练模型。
就像 training_step, 我们可以定义一个 validation_step 来检查我们关心的任何指标,生成样本,或者向我们的日志中添加更多的内容。
def validation_step(self, batch, batch_idx):
    loss = MSE_loss(...)
    self.log('val_loss', loss)
现在我们也可以带验证循环训练。
from pytorch_lightning import Trainer

model = LitMNIST()
trainer = Trainer(tpu_cores=8)
trainer.fit(model, train_loader, val_loader)
你可能已经注意到 Validation sanity check 被记录。 这是因为 Lightning 在开始训练之前运行两个batch的 validation。 这是一种单元测试,以确保如果在验证循环中出现错误,您不需要等待完整的epoch来发现。
Note: Lightning 禁用梯度, 将模型置成eval模式, 并且做任何用于validation的事情。
Val loop under the hood
在 hood 下, Lightning 作了如下事情:
model = Model()
model.train()
torch.set_grad_enabled(True)

for epoch in epochs:
    for batch in data:
        # ...
        # train

    # validate
    model.eval()
    torch.set_grad_enabled(False)

    outputs = []
    for batch in val_data:
        x, y = batch                        # validation_step
        y_hat = model(x)                    # validation_step
        loss = loss(y_hat, x)               # validation_step
        outputs.append({'val_loss': loss})  # validation_step

    total_loss = outputs.mean()             # validation_epoch_end
Optional methods
如果您仍然需要精细的控制,那么为循环定义其他的方法。
def validation_step(self, batch, batch_idx):
    preds = ...
    return preds

def validation_epoch_end(self, val_step_outputs):
    for pred in val_step_outputs:
        # do something with all the predictions from each validation_step
Testing
一旦我们的研究完成,我们即将发布或部署一个模型,我们通常想弄清楚它如何在现实世界中推广。为此,我们使用了一个数据分割来进行测试。
就像 validation loop 一样,我们定义了一个 test loop
class LitMNIST(LightningModule):
    def test_step(self, batch, batch_idx):
        x, y = batch
        logits = self(x)
        loss = F.nll_loss(logits, y)
        self.log('test_loss', loss)
为了确保测试集不会被无意中使用,Lightning有一个单独的API来运行测试。当你在训练你的模型时调用 .test() 。
from pytorch_lightning import Trainer

model = LitMNIST()
trainer = Trainer(tpu_cores=8)
trainer.fit(model)

# run test set
result = trainer.test()
print(result)
输出:
--------------------------------------------------------------
TEST RESULTS
{'test_loss': 1.1703}
--------------------------------------------------------------
您还可以从保存的lightning模型运行测试
model = LitMNIST.load_from_checkpoint(PATH)
trainer = Trainer(tpu_cores=8)
trainer.test(model)
Note: Lightning 禁用梯度, 将模型置于eval模式, 并且做任何用于训练的事情。
Warning: .test() 在 TPUs 上还不稳定。
Predicting
同样,LightningModule与PyTorch模块完全相同。这意味着您可以加载它并使用它进行预测。
model = LitMNIST.load_from_checkpoint(PATH)
x = torch.randn(1, 1, 28, 28)
out = model(x)
从表面上看,forward 和 training_step 是相似的。一般来说,我们要确保我们想让模型做的是在forward 中发生的事。 而 training_step 则从内部调用 forward。
class MNISTClassifier(LightningModule):

    def forward(self, x):
        batch_size, channels, width, height = x.size()
        x = x.view(batch_size, -1)
        x = self.layer_1(x)
        x = F.relu(x)
        x = self.layer_2(x)
        x = F.relu(x)
        x = self.layer_3(x)
        x = F.log_softmax(x, dim=1)
        return x

    def training_step(self, batch, batch_idx):
        x, y = batch
        logits = self(x)
        loss = F.nll_loss(logits, y)
        return loss
model = MNISTClassifier()
x = mnist_image()
logits = model(x)
在这种情况下,我们设置了这个 LightningModel 来预测logits。但我们也可以用它来预测特征图:
class MNISTRepresentator(LightningModule):

    def forward(self, x):
        batch_size, channels, width, height = x.size()
        x = x.view(batch_size, -1)
        x = self.layer_1(x)
        x1 = F.relu(x)
        x = self.layer_2(x1)
        x2 = F.relu(x)
        x3 = self.layer_3(x2)
        return [x, x1, x2, x3]

    def training_step(self, batch, batch_idx):
        x, y = batch
        out, l1_feats, l2_feats, l3_feats = self(x)
        logits = F.log_softmax(out, dim=1)
        ce_loss = F.nll_loss(logits, y)
        loss = perceptual_loss(l1_feats, l2_feats, l3_feats) + ce_loss
        return loss
model = MNISTRepresentator.load_from_checkpoint(PATH)
x = mnist_image()
feature_maps = model(x)
或者我们有一个模型,我们用它来做生成
class LitMNISTDreamer(LightningModule):

    def forward(self, z):
        imgs = self.decoder(z)
        return imgs

    def training_step(self, batch, batch_idx):
        x, y = batch
        representation = self.encoder(x)
        imgs = self(representation)

        loss = perceptual_loss(imgs, x)
        return loss
model = LitMNISTDreamer.load_from_checkpoint(PATH)
z = sample_noise()
generated_imgs = model(z)
为了进行大规模推理,可以使用 trainer.predict, 它使用 LightningModule 中的 predict_step 函数 。默认情况下,LightningModule predict_step 调用 forward,但它可以被重写以添加任何处理逻辑。
class LitMNISTDreamer(LightningModule):

    def forward(self, z):
        imgs = self.decoder(z)
        return imgs

    def predict_step(self, batch, batch_idx: int , dataloader_idx: int = None):
        return self(batch)


model = LitMNISTDreamer()
trainer.predict(model, datamodule)
你如何划分 forward ,training_step 和 predict 取决于你想如何使用这个模型进行预测。但是,我们建议 forward 仅包含你的模型的tensor操作, training_step 使用 logging, metrics 和 loss计算 封装 forward 逻辑, 并且 predict 使用 preprocess, postprocess 函数 封装 forward。
The nonessentials
Extensibility
虽然 lightning 让一切都变得超级简单,但它并不牺牲任何灵活性或控制。 lightning 提供多种管理训练状态的方法。
Training overrides
training、validation和testing循环的任何部分都可以修改。 例如,如果您想执行自己的反向传播,则可以重写默认实现。
def backward(self, use_amp, loss, optimizer):
    loss.backward()
使用你自己的
class LitMNIST(LightningModule):

    def backward(self, use_amp, loss, optimizer, optimizer_idx):
        # do a custom way of backward
        loss.backward(retain_graph=True)
training的每个部分都可以通过这种方式进行配置。参见 LightningModule 的完整列表。
Callbacks
添加任意功能的另一种方法是为您可能关心的 hooks 添加自定义回调:
from pytorch_lightning.callbacks import Callback

class MyPrintingCallback(Callback):

    def on_init_start(self, trainer):
        print('Starting to init trainer!')

    def on_init_end(self, trainer):
        print('Trainer is init now')

    def on_train_end(self, trainer, pl_module):
        print('do something when training ends')
然后将 callbacks 传给 trainer
trainer = Trainer(callbacks=[MyPrintingCallback()])
参见 callbacks 的 12+ hooks 的完整列表。
Child Modules
研究项目倾向于对同一数据集测试不同的方法。这在Lightning中 使用 继承 是很容易做到的。
例如,假设我们现在想训练一个自动编码器来作为MNIST图像的特征提取器。我们正在从 LitMNIST-module 扩展我们的自动编码器,该模块已经定义了所有的数据加载。在自动编码器模型中唯一改变的是init、forward、training、validation和test步骤。
class Encoder(torch.nn.Module):
    pass

class Decoder(torch.nn.Module):
    pass

class AutoEncoder(LitMNIST):

    def __init__(self):
        super().__init__()
        self.encoder = Encoder()
        self.decoder = Decoder()
        self.metric = MSE()

    def forward(self, x):
        return self.encoder(x)

    def training_step(self, batch, batch_idx):
        x, _ = batch

        representation = self.encoder(x)
        x_hat = self.decoder(representation)

        loss = self.metric(x, x_hat)
        return loss

    def validation_step(self, batch, batch_idx):
        self._shared_eval(batch, batch_idx, 'val')

    def test_step(self, batch, batch_idx):
        self._shared_eval(batch, batch_idx, 'test')

    def _shared_eval(self, batch, batch_idx, prefix):
        x, _ = batch
        representation = self.encoder(x)
        x_hat = self.decoder(representation)

        loss = self.metric(x, x_hat)
        self.log(f'{prefix}_loss', loss)
我们可以用同样的训练器来训练它
autoencoder = AutoEncoder()
trainer = Trainer()
trainer.fit(autoencoder)
请记住,forward方法应该定义LightningModule的实际使用。在这种情况下,我们希望使用自动编码器来提取图像表示
some_images = torch.Tensor(32, 1, 28, 28)
representations = autoencoder(some_images)
Transfer Learning
Using Pretrained Models
有时我们想使用一个LightningModule作为一个预训练的模型。这是很容易实现的,因为LightningModule只是一个torch.nn.Module。
Note: 记住,LightningModule就是一个 torch.nn.Module,但有更多的功能。
让我们在一个单独的模型中使用自动编码器作为特征提取器。
class Encoder(torch.nn.Module):
    ...

class AutoEncoder(LightningModule):
    def __init__(self):
        self.encoder = Encoder()
        self.decoder = Decoder()

class CIFAR10Classifier(LightningModule):
    def __init__(self):
        # init the pretrained LightningModule
        self.feature_extractor = AutoEncoder.load_from_checkpoint(PATH)
        self.feature_extractor.freeze()

        # the autoencoder outputs a 100-dim representation and CIFAR-10 has 10 classes
        self.classifier = nn.Linear(100, 10)

    def forward(self, x):
        representations = self.feature_extractor(x)
        x = self.classifier(representations)
        ...
我们使用预训练好的自动编码器(LightningModule)进行迁移学习
Example: Imagenet (computer Vision)
import torchvision.models as models

class ImagenetTransferLearning(LightningModule):
    def __init__(self):
        super().__init__()

        # init a pretrained resnet
        backbone = models.resnet50(pretrained=True)
        num_filters = backbone.fc.in_features
        layers = list(backbone.children())[:-1]
        self.feature_extractor = nn.Sequential(*layers)

        # use the pretrained model to classify cifar-10 (10 image classes)
        num_target_classes = 10
        self.classifier = nn.Linear(num_filters, num_target_classes)

    def forward(self, x):
        self.feature_extractor.eval()
        with torch.no_grad():
            representations = self.feature_extractor(x).flatten(1)
        x = self.classifier(representations)
        ...
微调:
model = ImagenetTransferLearning()
trainer = Trainer()
trainer.fit(model)
然后用它来预测你感兴趣的数据
model = ImagenetTransferLearning.load_from_checkpoint(PATH)
model.freeze()

x = some_images_from_cifar10()
predictions = model(x)
我们在imagenet上使用预训练的模型,并在CIFAR-10上进行微调,以在CIFAR-10上进行预测。在非学术领域,我们会根据你的微小数据集进行微调,并根据你的数据集进行预测。
Example: BERT (NLP)
Lightning 是完全不关心用于迁移学习的是什么,只要它是一个 torch.nn.Module 子类。
这里是一个使用 Huggingface transformers 的模型。
class BertMNLIFinetuner(LightningModule):

    def __init__(self):
        super().__init__()

        self.bert = BertModel.from_pretrained('bert-base-cased', output_attentions=True)
        self.W = nn.Linear(bert.config.hidden_size, 3)
        self.num_classes = 3


    def forward(self, input_ids, attention_mask, token_type_ids):

        h, _, attn = self.bert(input_ids=input_ids,
                         attention_mask=attention_mask,
                         token_type_ids=token_type_ids)

        h_cls = h[:, 0]
        logits = self.W(h_cls)
        return logits, attn
Common Use Cases
16-BIT TRAINING
GPU 16-bit
16位精度可以将您的内存占用空间减少一半。 如果使用volta架构GPU,它也可以显着提高培训速度。
Note: 建议将PyTorch 1.6+用于16位
Native torch
使用PyTorch 1.6+时,Lightning使用native amp实现来支持16位。
# turn on 16-bit
trainer = Trainer(precision=16, gpus=1)
Apex 16-bit
如果您使用的是PyTorch的早期版本,则Lightning将使用Apex支持16位。
请按照以下说明安装Apex。 要使用16位精度,请执行以下两项操作:
- Install Apex
- Set the “precision” trainer flag.
$ git clone https://github.com/NVIDIA/apex
$ cd apex

# ------------------------
# OPTIONAL: on your cluster you might need to load CUDA 10 or 9
# depending on how you installed PyTorch

# see available modules
module avail

# load correct CUDA before install
module load cuda-10.0
# ------------------------

# make sure you've loaded a cuda version > 4.0 and < 7.0
module load gcc-6.1.0

$ pip install -v --no-cache-dir --global-option="--cpp_ext" --global-option="--cuda_ext" ./
Warning: NVIDIA Apex和DDP存在不稳定问题。 我们建议在PyTorch 1.6+中使用native 16位
Enable 16-bit
# turn on 16-bit
trainer = Trainer(amp_level='O2', precision=16)
如果您需要为您的特定用例配置apex init,或者希望使用不同的方式进行16位训练, 覆盖 pytorch_lightning.core.LightningModule.configure_apex()。
Early stopping
Stopping an epoch early
您可以通过重写 on_train_batch_start() 以在满足某些条件时返回-1来提前停止一个epoch。
如果您重复执行此操作,则对于您最初请求的每个epoch,都将停止整个运行。
Early stopping based on metric using the EarlyStopping Callback
EarlyStopping callback 可用于监视验证指标,并在未观察到任何改进时停止训练。
要使用它:
- Import EarlyStopping callback.
- Log the metric you want to monitor using log() method.
- Init the callback, and set monitor to the logged metric of your choice.
- Pass the EarlyStopping callback to the Trainer callbacks flag.
from pytorch_lightning.callbacks.early_stopping import EarlyStopping

def validation_step(...):
    self.log('val_loss', loss)

trainer = Trainer(callbacks=[EarlyStopping(monitor='val_loss')])
- 你可以通过改变它的参数来自定义回调行为。
early_stop_callback = EarlyStopping(
   monitor='val_accuracy',
   min_delta=0.00,
   patience=3,
   verbose=False,
   mode='max'
)
trainer = Trainer(callbacks=[early_stop_callback])
如果您需要在训练的不同部分中early stopping,子类EarlyStopping并更改其调用位置:
class MyEarlyStopping(EarlyStopping):

    def on_validation_end(self, trainer, pl_module):
        # override this to disable early stopping at the end of val loop
        pass

    def on_train_end(self, trainer, pl_module):
        # instead, do it at the end of training loop
        self._run_early_stopping_check(trainer, pl_module)
Note: EarlyStopping callback 在每个验证epoch的末尾运行,在默认配置下,它在每个训练epoch之后发生。但是,可以通过在Trainer中设置各种参数(例如check_val_every_n_epoch和val_check_interval)来修改验证频率。必须注意的是,patience参数对没有改进的验证epochs数进行计数,而不是对训练epochs数进行计数。因此,在参数check_val_every_n_epoch = 10且 patience = 3的情况下,Trainer 将在停止之前执行至少40个训练 epochs。
Learning Rate Finder
对于训练深度神经网络,选择良好的学习率对于更好的性能和更快的收敛都是必不可少的。 甚至可以自动调整学习速度的优化器(例如Adam)也可以从更多的最佳选择中受益。
为了减少与选择良好的初始学习率有关的猜测量,可以使用学习率查找器。 如本文所述,学习速率查找器进行一个小的运行,在每次处理batch后,学习速率都会提高,并记录相应的loss。 这样的结果是一个lr与loss的关系图,可用作选择最佳初始lr的指南。
Warning: 目前,此功能仅适用于具有单个优化器的模型。 LR Finder对DDP的支持尚未实现,即将推出。
Using Lightning’s built-in LR finder
要启用学习速率查找器,您的 learning 模块需要具有learning_rate或lr属性。 然后,在训练器构建过程中设置Trainer(auto_lr_find = True),然后调用trainer.tune(model)运行LR查找器。建议的learning_rate将被写入控制台,并将自动设置为您的lightning模块,可以通过self.learning_rate或self.lr对其进行访问。
class LitModel(LightningModule):

    def __init__(self, learning_rate):
        self.learning_rate = learning_rate

    def configure_optimizers(self):
        return Adam(self.parameters(), lr=(self.lr or self.learning_rate))

model = LitModel()

# finds learning rate automatically
# sets hparams.lr or hparams.learning_rate to that learning rate
trainer = Trainer(auto_lr_find=True)

trainer.tune(model)
如果您的模型使用的是任意值而不是self.lr或self.learning_rate,则将该值设置为auto_lr_find:
model = LitModel()

# to set to your own hparams.my_value
trainer = Trainer(auto_lr_find='my_value')

trainer.tune(model)
如果要检查学习率查找器的结果,或者只是尝试使用算法的参数,则可以通过调用Trainer的lr_find方法来完成。 一个典型的例子:
model = MyModelClass(hparams)
trainer = Trainer()
# Run learning rate finder
lr_finder = trainer.tuner.lr_find(model)
# Results can be found in
lr_finder.results
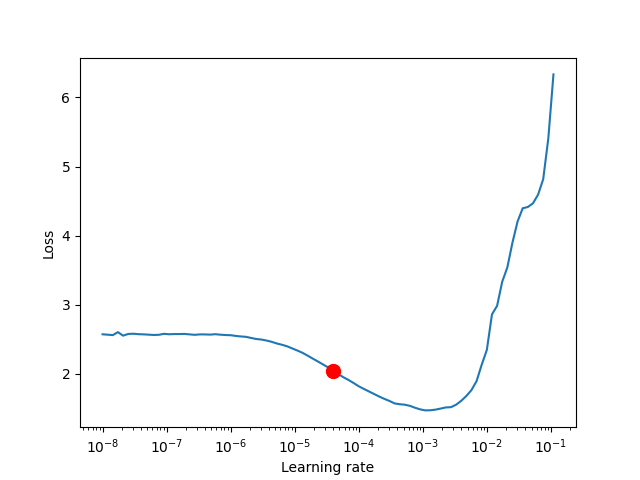
# Plot with
fig = lr_finder.plot(suggest=True)
fig.show()
# Pick point based on plot, or get suggestion
new_lr = lr_finder.suggestion()
# update hparams of the model
model.hparams.lr = new_lr
# Fit model
trainer.fit(model)
lr_finder.plot() 生成的图应类似于下图。 建议不要选择获得最低损失的学习率,而应选择最陡峭的向下斜率(红点)中间的值。 这是由 lr_finder.suggestion() 返回的点。
该算法的参数如下所示。
pytorch_lightning.tuner.lr_finder.lr_find(trainer, model, train_dataloader=None, val_dataloaders=None, min_lr=1e-08, max_lr=1, num_training=100, mode='exponential', early_stop_threshold=4.0, datamodule=None, update_attr=False)
lr_find 使用户能够进行良好初始学习率的范围测试,以减少在选择良好初始学习率时的猜测量。
参数:
- model (LightningModule) – 测试范围的模型
- train_dataloader (Optional[DataLoader]) – 一个有训练样本的 Pytorch DataLoader。 如果模型具有预定义的train_dataloader方法,则将跳过此方法。
- min_lr (float) – 调查的最小学习率
- max_lr (float) – 调查的最大学习率
- num_training (int) – 测试的学习率数量
- mode (str) – 每个 batch 后更新学习率的搜索策略
-
- ‘exponential’ (default): 会指数地提高学习速度。
-
- ‘linear’: 将线性地提高学习速度。
- early_stop_threshold (float) – 停止搜索的阈值。如果在任何时候的损失大于 early_stop_threshold * best_loss,则停止搜索。 要禁用,请设置为“None”。
- datamodule (Optional[LightningDataModule]) – 可选的LightningDataModule,用于保存训练和验证数据加载器。请注意,train_dataloader和val_dataloaders参数不能与此参数同时使用,否则将引发MisconfigurationException。
- update_attr (bool) – 是否更新学习速率属性。
Raises:
- MisconfigurationException – 如果auto_lr_find = True时没有覆盖model或model.hparams中的 learning rate/ lr,或者您使用了多个优化器。
例子:
# Setup model and trainer
model = MyModelClass(hparams)
trainer = pl.Trainer()

# Run lr finder
lr_finder = trainer.tuner.lr_find(model, ...)

# Inspect results
fig = lr_finder.plot(); fig.show()
suggested_lr = lr_finder.suggestion()

# Overwrite lr and create new model
hparams.lr = suggested_lr
model = MyModelClass(hparams)

# Ready to train with new learning rate
trainer.fit(model)
Saving and loading weights
Lightning 自动保存和加载 checkpoints。Checkpoints 捕获模型使用的所有参数。
Checkpointing 训练允许您在训练过程中断时恢复训练过程,对模型进行微调,或者使用预训练过的模型进行推理,而不必重新训练模型。
Checkpoint saving
Lightning checkpoint 拥有恢复 training session 所需的一切:
- 16-bit scaling factor (apex)
- Current epoch
- Global step
- Model state_dict
- State of all optimizers
- State of all learningRate schedulers
- State of all callbacks
- The hyperparameters used for that model if passed in as hparams (Argparse.Namespace)
Automatic saving
Lightning会自动将 checkpoint 保存在您当前的工作目录中,并带有您的上一个训练epoch的状态。 这样可以确保您可以在中断训练的情况下继续训练。
更改 checkpoint 路径:
# saves checkpoints to '/your/path/to/save/checkpoints' at every epoch end
trainer = Trainer(default_root_dir='/your/path/to/save/checkpoints')
您可以自定义 checkpointing 行为,以监视所有 training 或 validation steps 的质量。 例如,如果您要基于验证损失来更新 checkpoints,请执行以下操作:
- 计算您希望监视的任何 metric 或其他 quantity ,例如 validation loss。
- 使用 log() 方法记录 quantity ,并带有val_loss之类的key。
- 初始化 ModelCheckpoint callback,并将Monitor设置为quantity的key。
- 将callback传递给回调Trainer标志。
from pytorch_lightning.callbacks import ModelCheckpoint

class LitAutoEncoder(LightningModule):
    def validation_step(self, batch, batch_idx):
        x, y = batch
        y_hat = self.backbone(x)

        # 1. calculate loss
        loss = F.cross_entropy(y_hat, y)

        # 2. log `val_loss`
        self.log('val_loss', loss)

# 3. Init ModelCheckpoint callback, monitoring 'val_loss'
checkpoint_callback = ModelCheckpoint(monitor='val_loss')

# 4. Add your callback to the callbacks list
trainer = Trainer(callbacks=[checkpoint_callback])
您还可以控制更高级的选项,例如save_top_k,以保存最佳的k个模型,以及受监视 quantity 的模式(最小/最大值),save_weights_only或period来设置 checkpoints 之间的时间间隔,以免降低速度。
from pytorch_lightning.callbacks import ModelCheckpoint

class LitAutoEncoder(LightningModule):
    def validation_step(self, batch, batch_idx):
        x, y = batch
        y_hat = self.backbone(x)
        loss = F.cross_entropy(y_hat, y)
        self.log('val_loss', loss)

# saves a file like: my/path/sample-mnist-epoch=02-val_loss=0.32.ckpt
checkpoint_callback = ModelCheckpoint(
    monitor='val_loss',
    dirpath='my/path/',
    filename='sample-mnist-{epoch:02d}-{val_loss:.2f}',
    save_top_k=3,
    mode='min',
)

trainer = Trainer(callbacks=[checkpoint_callback])
您可以在训练后通过调用来检索 checkpoint
checkpoint_callback = ModelCheckpoint(dirpath='my/path/')
trainer = Trainer(callbacks=[checkpoint_callback])
trainer.fit(model)
checkpoint_callback.best_model_path
Disabling checkpoints
您可以通过传递来禁用 checkpointing
trainer = Trainer(checkpoint_callback=False)
Lightning checkpoint 还保存传入 LightningModule 初始化的参数 在 checkpoint 的 hyper_parameters 键下。
class MyLightningModule(LightningModule):

   def __init__(self, learning_rate, *args, **kwargs):
        super().__init__()
        self.save_hyperparameters()

# all init args were saved to the checkpoint
checkpoint = torch.load(CKPT_PATH)
print(checkpoint['hyper_parameters'])
# {'learning_rate': the_value}
Manual saving
您可以手动保存 checkpoints ,并从 checkpoints 状态恢复您的模型。
model = MyLightningModule(hparams)
trainer.fit(model)
trainer.save_checkpoint("example.ckpt")
new_model = MyModel.load_from_checkpoint(checkpoint_path="example.ckpt")
Manual saving with accelerators
Lightning还可以处理多个进程同时运行的加速器,比如DDP。例如,当使用DDP加速器时,我们的训练脚本同时在多个设备上运行。Lightning会自动确保模型只保存在主进程上,而其他进程不会干扰保存 checkpoints。如下所示, 这并不需要更改代码。
trainer = Trainer(accelerator="ddp")
model = MyLightningModule(hparams)
trainer.fit(model)
# Saves only on the main process
trainer.save_checkpoint("example.ckpt")
不使用 trainer.save_checkpo 可能会导致意外行为和潜在的死锁。使用其他保存函数 将导致所有设备试图保存 checkpoint。因此,我们强烈建议使用 trainer 的保存功能。如果无法避免使用自定义保存函数,我们建议使用rank_zero_only() 来确保只在主进程上进行保存。
Checkpoint loading
使用以下方法加载模型及其权重、偏差和超参数:
model = MyLightingModule.load_from_checkpoint(PATH)

print(model.learning_rate)
# prints the learning_rate you used in this checkpoint

model.eval()
y_hat = model(x)
但是,如果您不想使用保存在 checkpoint 中的值,则在这里传入您自己的值
class LitModel(LightningModule):

    def __init__(self, in_dim, out_dim):
        super().__init__()
        self.save_hyperparameters()
        self.

		l1 = nn.Linear(self.hparams.in_dim, self.hparams.out_dim)
您可以像这样恢复模型
# if you train and save the model like this it will use these values when loading
# the weights. But you can overwrite this
LitModel(in_dim=32, out_dim=10)

# uses in_dim=32, out_dim=10
model = LitModel.load_from_checkpoint(PATH)

# uses in_dim=128, out_dim=10
model = LitModel.load_from_checkpoint(PATH, in_dim=128, out_dim=10)
LightningModule.load_from_checkpoint(checkpoint_path, map_location=None, hparams_file=None, strict=True, **kwargs)
从 checkpoint 加载模型的主要方法。当Lightning保存 checkpoint 时,它将 传递给 __init__ 的参数 存储在 checkpoint 的 hyper_parameters 下。
任何通过 *args 和 **kwargs指定的参数都将覆盖存储在 hyper_parameters 中的参数。
参数:
- checkpoint_path (Union[str, IO]) – checkpoint 的 路径。这也可以是一个URL,或类似文件的对象
- map_location (Union[Dict[str, str], str, device, int, Callable, None]) – 如果你的 checkpoint 保存了一个GPU模型,你现在加载到cpu或不同数量的GPU,使用这个来映射到新的设置。它的行为和 torch.load() 一样。
- hparams_file (Optional[str]) – 一个.yaml文件的可选路径,该文件具有本例中所示的层次结构。 你很可能不需要这个,因为 lightning 总是会把 hyperparameters 保存到 checkpoint。但是,如果您的 checkpoint 权重没有保存hyperparameters,可以使用这个方法传入一个带有您想要使用的hparams的.yaml文件。这些将被转换成一个字典,并传递到您的LightningModule中使用。如果您的模型的hparams参数是名称空间,并且.yaml文件具有层次结构,那么您需要重构您的模型,将hparams视为dict。
drop_prob: 0.2 dataloader: batch_size: 32 - strict (bool) – 是否严格强制 checkpoint_path 中的 keys 与 module 的 state dict 返回的key匹配。默认为True。
- kwargs – 初始化模型所需的任何额外关键字参数。也可以用来覆盖保存的超参数值。
返回:
- 加载了权重和超参数的LightningModule(如果可用)。
例子:
# load weights without mapping ...
MyLightningModule.load_from_checkpoint('path/to/checkpoint.ckpt')

# or load weights mapping all weights from GPU 1 to GPU 0 ...
map_location = {'cuda:1':'cuda:0'}
MyLightningModule.load_from_checkpoint(
    'path/to/checkpoint.ckpt',
    map_location=map_location
)

# or load weights and hyperparameters from separate files.
MyLightningModule.load_from_checkpoint(
    'path/to/checkpoint.ckpt',
    hparams_file='/path/to/hparams_file.yaml'
)

# override some of the params with new values
MyLightningModule.load_from_checkpoint(
    PATH,
    num_layers=128,
    pretrained_ckpt_path: NEW_PATH,
)

# predict
pretrained_model.eval()
pretrained_model.freeze()
y_hat = pretrained_model(x)
Restoring Training State
如果你不只是想进行加载权重训练,而是要恢复全部训练,那么就做下面的步骤
model = LitModel()
trainer = Trainer(resume_from_checkpoint='some/path/to/my_checkpoint.ckpt')

# automatically restores model, epoch, step, LR schedulers, apex, etc...
trainer.fit(model)
EMA
from copy import deepcopy
from typing import Optional, Union, Dict, Any

import pytorch_lightning as pl
import torch
from overrides import overrides
from pytorch_lightning.utilities import rank_zero_only


class EMA(pl.Callback):
    """Implements EMA (exponential moving average) to any kind of model.
    EMA weights will be used during validation and stored separately from original model weights.

    How to use EMA:
        - Sometimes, last EMA checkpoint isn't the best as EMA weights metrics can show long oscillations in time. See
          https://github.com/rwightman/pytorch-image-models/issues/102
        - Batch Norm layers and likely any other type of norm layers doesn't need to be updated at the end. See
          discussions in: https://github.com/rwightman/pytorch-image-models/issues/106#issuecomment-609461088 and
          https://github.com/rwightman/pytorch-image-models/issues/224
        - For object detection, SWA usually works better. See   https://github.com/timgaripov/swa/issues/16

    Implementation detail:
        - See EMA in Pytorch Lightning: https://github.com/PyTorchLightning/pytorch-lightning/issues/10914
        - When multi gpu, we broadcast ema weights and the original weights in order to only hold 1 copy in memory.
          This is specially relevant when storing EMA weights on CPU + pinned memory as pinned memory is a limited
          resource. In addition, we want to avoid duplicated operations in ranks != 0 to reduce jitter and improve
          performance.
    """
    def __init__(self, decay: float = 0.9999, ema_device: Optional[Union[torch.device, str]] = None, pin_memory=True):
        super().__init__()
        self.decay = decay
        self.ema_device: str = f"{ema_device}" if ema_device else None  # perform ema on different device from the model
        self.ema_pin_memory = pin_memory if torch.cuda.is_available() else False  # Only works if CUDA is available
        self.ema_state_dict: Dict[str, torch.Tensor] = {}
        self.original_state_dict = {}
        self._ema_state_dict_ready = False

    @staticmethod
    def get_state_dict(pl_module: pl.LightningModule):
        """Returns state dictionary from pl_module. Override if you want filter some parameters and/or buffers out.
        For example, in pl_module has metrics, you don't want to return their parameters.

        code:
            # Only consider modules that can be seen by optimizers. Lightning modules can have others nn.Module attached
            # like losses, metrics, etc.
            patterns_to_ignore = ("metrics1", "metrics2")
            return dict(filter(lambda i: i[0].startswith(patterns), pl_module.state_dict().items()))
        """
        return pl_module.state_dict()

    @overrides
    def on_train_start(self, trainer: "pl.Trainer", pl_module: pl.LightningModule) -> None:
        # Only keep track of EMA weights in rank zero.
        if not self._ema_state_dict_ready and pl_module.global_rank == 0:
            self.ema_state_dict = deepcopy(self.get_state_dict(pl_module))
            if self.ema_device:
                self.ema_state_dict = {k: tensor.to(device=self.ema_device) for k, tensor in self.ema_state_dict.items()}

            if self.ema_device == "cpu" and self.ema_pin_memory:
                self.ema_state_dict = {k: tensor.pin_memory() for k, tensor in self.ema_state_dict.items()}

        self._ema_state_dict_ready = True

    @rank_zero_only
    def on_train_batch_end(self, trainer: "pl.Trainer", pl_module: pl.LightningModule, *args, **kwargs) -> None:
        # Update EMA weights
        with torch.no_grad():
            for key, value in self.get_state_dict(pl_module).items():
                ema_value = self.ema_state_dict[key]
                ema_value.copy_(self.decay * ema_value + (1. - self.decay) * value, non_blocking=True)

    @overrides
    def on_validation_start(self, trainer: pl.Trainer, pl_module: pl.LightningModule) -> None:
        if not self._ema_state_dict_ready:
            return  # Skip Lightning sanity validation check if no ema weights has been loaded from a checkpoint.

        self.original_state_dict = deepcopy(self.get_state_dict(pl_module))
        ema_state_dict = pl_module.trainer.training_type_plugin.broadcast(self.ema_state_dict, 0)
        self.ema_state_dict = ema_state_dict
        assert self.ema_state_dict.keys() == self.original_state_dict.keys(), \
            f"There are some keys missing in the ema static dictionary broadcasted. " \
            f"They are: {self.original_state_dict.keys() - self.ema_state_dict.keys()}"
        pl_module.load_state_dict(self.ema_state_dict, strict=False)

        if pl_module.global_rank > 0:
            # Remove ema state dict from the memory. In rank 0, it could be in ram pinned memory.
            self.ema_state_dict = {}

    @overrides
    def on_validation_end(self, trainer: "pl.Trainer", pl_module: "pl.LightningModule") -> None:
        if not self._ema_state_dict_ready:
            return  # Skip Lightning sanity validation check if no ema weights has been loaded from a checkpoint.

        # Replace EMA weights with training weights
        pl_module.load_state_dict(self.original_state_dict, strict=False)

    @overrides
    def on_save_checkpoint(
        self, trainer: "pl.Trainer", pl_module: "pl.LightningModule", checkpoint: Dict[str, Any]
    ) -> dict:
        return {"ema_state_dict": self.ema_state_dict, "_ema_state_dict_ready": self._ema_state_dict_ready}

    @overrides
    def on_load_checkpoint(
        self, trainer: "pl.Trainer", pl_module: "pl.LightningModule", callback_state: Dict[str, Any]
    ) -> None:
        self._ema_state_dict_ready = callback_state["_ema_state_dict_ready"]
        self.ema_state_dict = callback_state["ema_state_dict"]
Manual optimize
先在 ightningModule 的 __init__ 中设置 self.automatic_optimization=False
手动调用以下函数:
self.optimizers()得到优化器optimizer.zero_grad()清楚之前训练的梯度self.manual_backward(loss)代替loss.backward()optimizer.step()更新模型参数
下面是一个简单的例子:
from pytorch_lightning import LightningModule


class MyModel(LightningModule):
    def __init__(self):
        super().__init__()
        # Important: This property activates manual optimization.
        self.automatic_optimization = False

    def training_step(self, batch, batch_idx):
        opt = self.optimizers()
        opt.zero_grad()
        loss = self.compute_loss(batch)
        self.manual_backward(loss)
        opt.step()
WeightedRandomSampler
train_label = self.label[self.label['fold']!=self.hparams.fold]
        train_label["category"] = train_label["category_id"].map(lambda x: category_id_to_lv2id(f"{x:0>4}"))
        labels_unique, counts = np.unique(train_label['category'], return_counts=True)
        class_weights = [sum(counts) / c for c in counts]
        example_weights = [class_weights[e] for e in train_label["category"]]
        sampler = WeightedRandomSampler(example_weights, len(train_label['category']))
        sampler = DistributedSamplerWrapper(sampler,
                                            shuffle=True,
                                            num_replicas=get_world_size(),
                                            rank=get_rank())
DistributedSamplerWrapper
from typing import Optional
from torch.utils.data import DistributedSampler, Dataset, Sampler
from operator import itemgetter

class DatasetFromSampler(Dataset):
    """Dataset to create indexes from `Sampler`.
    Args:
        sampler: PyTorch sampler
    """

    def __init__(self, sampler: Sampler):
        """Initialisation for DatasetFromSampler."""
        self.sampler = sampler
        self.sampler_list = None

    def __getitem__(self, index: int):
        """Gets element of the dataset.
        Args:
            index: index of the element in the dataset
        Returns:
            Single element by index
        """
        if self.sampler_list is None:
            self.sampler_list = list(self.sampler)
        return self.sampler_list[index]

    def __len__(self) -> int:
        """
        Returns:
            int: length of the dataset
        """
        return len(self.sampler)

class DistributedSamplerWrapper(DistributedSampler):
    """
    Wrapper over `Sampler` for distributed training.
    Allows you to use any sampler in distributed mode.
    It is especially useful in conjunction with
    `torch.nn.parallel.DistributedDataParallel`. In such case, each
    process can pass a DistributedSamplerWrapper instance as a DataLoader
    sampler, and load a subset of subsampled data of the original dataset
    that is exclusive to it.
    .. note::
        Sampler is assumed to be of constant size.
    """

    def __init__(
        self,
        sampler,
        num_replicas: Optional[int] = None,
        rank: Optional[int] = None,
        shuffle: bool = True,
    ):
        """
        Args:
            sampler: Sampler used for subsampling
            num_replicas (int, optional): Number of processes participating in
              distributed training
            rank (int, optional): Rank of the current process
              within ``num_replicas``
            shuffle (bool, optional): If true (default),
              sampler will shuffle the indices
        """
        super(DistributedSamplerWrapper, self).__init__(
            DatasetFromSampler(sampler),
            num_replicas=num_replicas,
            rank=rank,
            shuffle=shuffle,
        )
        self.sampler = sampler

    def __iter__(self):
        """@TODO: Docs. Contribution is welcome."""
        self.dataset = DatasetFromSampler(self.sampler)
        indexes_of_indexes = super().__iter__()
        subsampler_indexes = self.dataset
        return iter(itemgetter(*indexes_of_indexes)(subsampler_indexes))
communication
# Taken from Detectron 2, licensed under Apache 2.0.
# https://github.com/facebookresearch/detectron2/blob/989f52d67d05445ccd030d8f13d6cc53e297fb91/detectron2/utils/comm.py
# Changes:
# - removed half of the functions
# - init_distributed()
# - `reduce` and `all_reduce` for various datatypes
# - `shared_random_seed` uses `torch.distributed.broadcast` instead of `all_gather` from Detectron2.

import os
import functools

import torch
import numpy as np


def get_rank() -> int:
    """
    Get rank of the process, even when torch.distributed is not initialized.
    Returns
    -------
    int
    """
    if not torch.distributed.is_available():
        return 0
    if not torch.distributed.is_initialized():
        return 0

    return torch.distributed.get_rank()


def get_local_rank() -> int:
    """
    Get rank of the process, even when torch.distributed is not initialized.
    Returns
    -------
    int
    """
    if not torch.distributed.is_available():
        return 0
    if not torch.distributed.is_initialized():
        return 0

    return int(os.environ['LOCAL_RANK'])


def get_world_size() -> int:
    """
    Get number of compute device in the world, returns 1 in case multi device is not initialized.
    Returns
    -------
    int
    """
    if not torch.distributed.is_available():
        return 1
    if not torch.distributed.is_initialized():
        return 1
    return torch.distributed.get_world_size()


def get_backend_compatible_device():
    """Use device that is compatible with the backend (e.g. nccl does not support CPU tensors).
    Used when initializing placeholder tensors before performing communication operations.
    """
    return torch.device('cuda' if torch.distributed.get_backend() == 'nccl' else 'cpu')


def shared_random_seed() -> int:
    """
    All workers must call this function, otherwise it will deadlock.
    Returns
    -------
    A random number that is the same across all workers. If workers need a shared RNG,
    they can use this shared seed to create one.
    """
    # torch.Generator advises to use a high values as seed, hence 2**31
    # The seed is reproducible when torch seed is set with `torch.manual_seed()`
    seed = torch.randint(2**31, (1,))
    if torch.distributed.is_initialized():
        device = get_backend_compatible_device()
        seed = seed.to(device)
        torch.distributed.broadcast(seed, 0)
    return int(seed)


@functools.lru_cache()
def _get_global_gloo_group():
    """
    Return a process group based on gloo backend, containing all the ranks
    The result is cached.
    """
    if torch.distributed.get_backend() == "nccl":
        return torch.distributed.new_group(backend="gloo")
    return torch.distributed.group.WORLD


# ------------------ Gather -----------------------


def gather(input_data):
    # TODO: Assert for PyTorch version since `gather_object` present from 1.8.0
    if get_world_size() < 2:
        return input_data

    input_data = move_to(input_data, torch.device('cpu'))
    group = _get_global_gloo_group()

    if torch.distributed.get_rank(group=group) == 0:
        gather_list = [None for _ in range(get_world_size())]
        torch.distributed.gather_object(input_data, gather_list, dst=0, group=group)
        return gather_list
    else:
        torch.distributed.gather_object(input_data, dst=0, group=group)
        return input_data


# ------------ Reduce and All Reduce --------------


def reduce(input_data, average=False, all_reduce=False):
    """
    Interface function for performing reduce on any type of
    data [int, float, tensor, dict, list, tuple] by summing or
    averaging the value(s) using one of the methods:
    (1) rank 0 reduce (torch.distributed.reduce):
        communicates the sum or average of
        all processes to the process of rank 0 only
    (2) all reduce (torch.distributed.all_reduce)
        communicates the sum or average of
        all processes to each process
    Parameters:
        input_dict (int, float, tensor, dict, list, tuple) -- data for reduction
        average (bool) -- true if the results should be averaged
        all_reduce (bool) -- true if communicating the reduced value to all processes,
                             otherwise process of rank 0 only
    Returns the sum or average of the input data from across processes.
    """
    if get_world_size() < 2:
        return input_data

    device = get_backend_compatible_device()
    with torch.no_grad():
        if isinstance(input_data, torch.Tensor):
            reduced_data = reduce_tensor(input_data, average, all_reduce, device)

        elif isinstance(input_data, dict):
            reduced_data = reduce_dict(input_data, average, all_reduce, device)

        elif isinstance(input_data, (list, tuple)):
            reduced_data = reduce_list_tuple(input_data, average, all_reduce, device)

        elif isinstance(input_data, (float, int)):
            reduced_data = reduce_int_float(input_data, average, all_reduce, device)

        else:
            data_type = str(type(input_data))
            raise NotImplementedError(f"Reduction on data type `{data_type}` is not implemented.")
    return reduced_data


def reduce_tensor(tensor, average, all_reduce, device):
    """Reduce a tensor"""
    tensor = tensor.clone().to(device)
    if all_reduce:
        torch.distributed.all_reduce(tensor)
    else:
        torch.distributed.reduce(tensor, dst=0)

    if average and (get_rank() == 0 or all_reduce):
        tensor /= get_world_size()
    return tensor


def reduce_int_float(input_value, average, all_reduce, device):
    """Reduce an integer or float by converting it to tensor,
    performing reduction and, finally, casting it back to the initial type.
    """
    data_type = type(input_value)  # save the original data type
    tensor = torch.Tensor([input_value])  # convert to tensor
    tensor = reduce_tensor(tensor, average, all_reduce, device)
    reduced_value = data_type(tensor.item())  # cast back to int or float
    return reduced_value


def reduce_dict(input_dict, average, all_reduce, device):
    """ Reduce a dict by extracting all of its values into a tensor and communicating it.
    Returns a dict with the same fields as input_dict, after reduction. If its values were
    int or float, they are converted to tensors.
    """
    names = []
    values = []
    for k in input_dict.keys():
        names.append(k)
        value = input_dict[k]
        # if float or integer and not tensor, convert to tensor
        if is_not_tensor(value):
            if is_float_or_int(value):
                value = torch.Tensor([value])
            elif is_numpy_scalar(value):
                value = torch.Tensor([value.item()])
            else:
                raise NotImplementedError("Dictionary reduction supported only if its values \
                                           are tensors, numpy scalars floats or integers.")
        values.append(value)
    values = torch.stack(values, dim=0).to(device)  # convert the list of tensors to a single tensor

    if all_reduce:
        torch.distributed.all_reduce(values)
    else:
        torch.distributed.reduce(values, dst=0)

    if average and (get_rank() == 0 or all_reduce):
        values /= get_world_size()

    reduced_dict = {k: v for k, v in zip(names, values)}
    return reduced_dict


def reduce_list_tuple(input_data, average, all_reduce, device):
    """ Reduce a list or tuple whose elements are either tensors, floats or integers.
    Returns reduced list/tuple with its elements as tensors.
    """
    data_type = type(input_data)  # save the original data type
    # convert tuple/list values to tensors if they are floats or integers
    for i in range(len(input_data)):
        value = input_data[i]
        if is_not_tensor(value):
            if is_float_or_int(value):
                input_data[i] = torch.Tensor([value])
            elif is_numpy_scalar(value):
                input_data[i] = torch.Tensor([value.item()])
            else:
                raise NotImplementedError("List/tuple reduction supported only if"
                                          " its values are tensors, floats or integers.")
    # Convert list/tuple of tensors to a single tensor
    values = torch.stack(input_data, dim=0).to(device)

    if all_reduce:
        torch.distributed.all_reduce(values)
    else:
        torch.distributed.reduce(values, dst=0)

    if average and (get_rank() == 0 or all_reduce):
        values /= get_world_size()

    # Cast it back to tuple or list
    reduced_sequence = data_type(values)
    return reduced_sequence


# ------------------ Helpers -----------------------


def move_to(obj, device):
    """Move any combination of list or dict containing tensors to the specific device."""
    if not isinstance(obj, (torch.Tensor, dict, list)):
        return obj
    elif torch.is_tensor(obj):
        return obj.to(device)
    elif isinstance(obj, dict):
        res = {}
        for k, v in obj.items():
            res[k] = move_to(v, device)
        return res
    elif isinstance(obj, list):
        res = []
        for v in obj:
            res.append(move_to(v, device))
        return res


def is_not_tensor(x):
    return not isinstance(x, torch.Tensor)


def is_float_or_int(x):
    return isinstance(x, (float, int))


def is_numpy_scalar(x):
    return np.isscalar(x)
TorchMetric
torchmetrics.Accuracy()
torchmetrics.Accuracy(threshold=0.5, top_k=None, subset_accuracy=False, compute_on_step=True, dist_sync_on_step=False, process_group=None, dist_sync_fn=None)
计算准确率:
\[Accuracy = \frac{1}{N} \sum_{i}^N 1(y_i = \hat y_i)\]其中 $y$ 是目标值的tensor, $\hat y$ 是预测值的tensor。
对于 多类 和 多维 多类 的概率预测, 参数 top_k
mport torch
import torchmetrics

# initialize metric
metric = torchmetrics.Accuracy()

n_batches = 10
for i in range(n_batches):
    # simulate a classification problem
    preds = torch.randn(10, 5).softmax(dim=-1)
    target = torch.randint(5, (10,))
    # metric on current batch
    acc = metric(preds, target)
    print(f"Accuracy on batch {i}: {acc}")

# metric on all batches using custom accumulation
acc = metric.compute()
print(f"Accuracy on all data: {acc}")