论文部分
论文的主要在三个方面对GAN进行了改进:
1)使用了all convolutional net,用卷积层替换了池化层, 对生成器使用fractional-strided convolutions,对判决器使用strided convolutions。
2)取消了全连接层。
3)使用了BatchNorm标准化
在训练生成器和判决器的时候使用了不同的激活函数:
1)对于生成器,除了输出层使用了Tanh激活函数外,其余层全部使用ReLU函数激活
2)对于判决器,则全部使用了LeakyReLU激活函数
论文的内容主要就在讲自己实验的改进,实验的细节,和实验结果的对比。未对原理做过多陈述。
实现部分(代码I)
引入相关包
1
2
3
4
5
6
7
8
9
10
11
12
13
14
15
16
17
18
19
20
21
22
23
24
25
from __future__ import print_function
%matplotlib inline
import argparse
import os
import random
import torch
import torch.nn as nn
import torch.nn.parallel
import torch.backends.cudnn as cudnn
import torch.optim as optim
import torch.utils.data
import torchvision.datasets as dset
import torchvision.transforms as transforms
import torchvision.utils as vutils
import numpy as np
import matplotlib.pyplot as plt
import matplotlib.animation as animation
from IPython.display import HTML

# Set random seed for reproducibility
manualSeed = 999
#manualSeed = random.randint(1, 10000) # use if you want new results
print("Random Seed: ", manualSeed)
random.seed(manualSeed)
torch.manual_seed(manualSeed)
引入相关包以及撒种子
初始化参数
1
2
3
4
5
6
7
8
9
10
11
12
13
14
15
16
17
18
19
20
21
22
23
24
25
26
27
28
29
30
31
32
33
34
35
# 数据根目录
dataroot = "data/"

# dataloader的进程数
workers = 2

# 训练时的batch_size
batch_size = 128

# 训练时图像的尺寸,所有图像都会被拉到这个尺寸
image_size = 64

# 训练图像的通道数
nc = 3

# 隐向量的大小,也就是噪声z,也就是生成器的输入
nz = 100

# 生成器的特征映射大小
ngf = 64

# 判决器的特征映射大小
ndf = 64

# 训练epotch的次数
num_epochs = 5

# 优化器的学习率
lr = 0.0002

# Adam优化器的超参数
beta1 = 0.5

# 可用GPU的数量
ngpu = 1
加载数据集
1
2
3
4
5
6
7
8
9
10
11
12
13
14
15
16
17
18
19
20
dataset = dset.ImageFolder(root=dataroot,
				transform=transforms.Compose([
				transforms.Resize(image_size),
				transforms.CenterCrop(image_size),
				transforms.ToTensor(),
				transforms.Normalize((0.5, 0.5, 0.5), (0.5, 0.5, 0.5)),
			   ]))
# Create the dataloader
dataloader = torch.utils.data.DataLoader(dataset, batch_size=batch_size,
                                         shuffle=True, num_workers=workers)

# Decide which device we want to run on
device = torch.device("cuda:0" if (torch.cuda.is_available() and ngpu > 0) else "cpu")

# Plot some training images
real_batch = next(iter(dataloader))
plt.figure(figsize=(8,8))
plt.axis("off")
plt.title("Training Images")
plt.imshow(np.transpose(vutils.make_grid(real_batch[0].to(device)[:64], padding=2, normalize=True).cpu(),(1,2,0)))
real_batch返回一个含有两个tensor的list,第一个tensor的维度是(128, 3, 64, 64), 第二个tensor的维度是(128).
因为返回的是两个batch,batch_size为64,所以返回的是128张图。
torchvision.utils.make_grid(tensor, nrow=8, padding=2, normalize=False, range=None, scale_each=False)
normalize=True ,会将图片的像素值归一化处理
如果 range=(min, max), min和max是数字,那么min,max用来规范化image
scale_each=True ,每个图片独立规范化,而不是根据所有图片的像素最大最小值来规范化
使用make_grid画出一个把前64张图画出一个8x8的表。
Dataloader的运行机制: Dataloader从Data根目录下的文件夹下读取图片,返回一个具有两个tensor元素的list,第一个tensor里存储着一个batch提取出来的数据集,第二个tensor对应的是label,也就是从哪个文件夹下读取出来的。
权重初始化
1
2
3
4
5
6
7
def weights_init(m):
    classname = m.__class__.__name__
    if classname.find('Conv') != -1:
        nn.init.normal_(m.weight.data, 0.0, 0.02)
    elif classname.find('BatchNorm') != -1:
        nn.init.normal_(m.weight.data, 1.0, 0.02)
        nn.init.constant_(m.bias.data, 0)
单层网络初始化
在创建model后直接调用torch.nn.init里的初始化函数
1
2
3
layer1 = torch.nn.Linear(10,20)
torch.nn.init.xavier_uniform_(layer1.weight)
torch.nn.init.constant_(layer1.bias, 0)
torch.nn.init.xavier_normal(tensor, gain=1)
根据Glorot, X.和Bengio, Y. 于2010年在“Understanding the difficulty of training deep feedforward neural networks”中描述的方法,用一个正态分布生成值,填充输入的张量或变量。结果张量中的值采样自均值为0,标准差为gain * sqrt(2/(fan_in + fan_out))的正态分布。也被称为Glorot initialisation.
torch.nn.init.kaiming_uniform(tensor, a=0, mode=’fan_in’)
根据He, K等人于2015年在“Delving deep into rectifiers: Surpassing human-level performance on ImageNet classification”中描述的方法,用一个均匀分布生成值,填充输入的张量或变量。结果张量中的值采样自U(-bound, bound),其中bound = sqrt(2/((1 + a^2) * fan_in)) * sqrt(3)。也被称为He initialisation.
torch.nn.init.constant(tensor, val)
用val的值填充输入的张量或变量
torch.nn.init.normal(tensor, mean=0, std=1)
从给定均值和标准差的正态分布N(mean, std)中生成值,填充输入的张量或变量
多层网络初始化
使用torch.nn.Module.apply.
apply(fn): apply在Module的实现

将函数fn递归的运用在每个子模块上,这些子模块由self.children()返回
具体步骤是:
- 定义weight_init函数,并在weight_init中通过判断模块的类型来进行不同的参数初始化定义类型。
- model=Net(…) 创建网络结构
- model.apply(weight_init),将weight_init初始化方式应用到submodels上
生成器
1
2
3
4
5
6
7
8
9
10
11
12
13
14
15
16
17
18
19
20
21
22
23
24
25
26
27
28
29
30
31
32
33
34
35
36
37
38
39
40
41
42
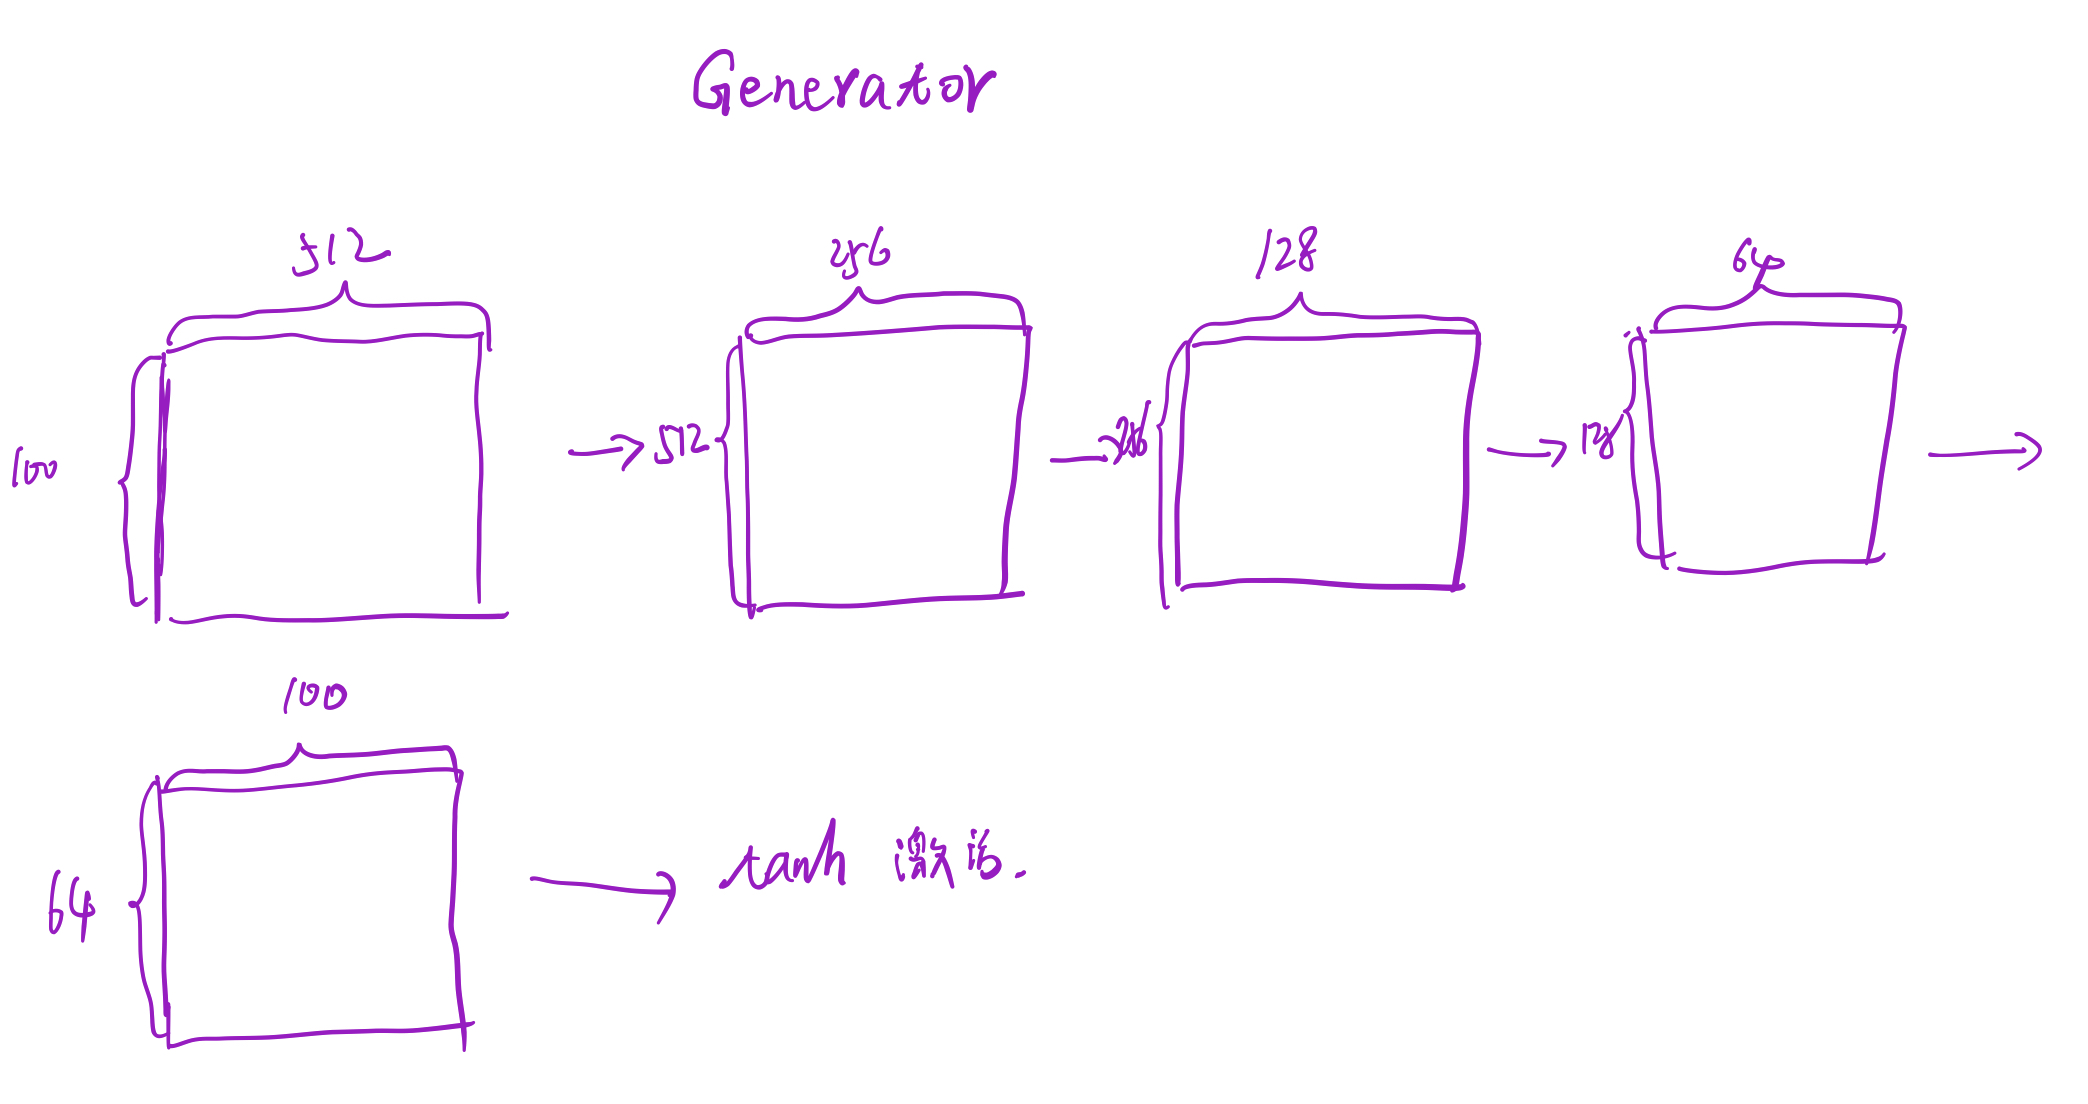
class Generator(nn.Module):
def __init__(self, ngpu):
super(Generator, self).__init__()
self.ngpu = ngpu
self.main = nn.Sequential(
# input is Z, going into a convolution
nn.ConvTranspose2d( nz, ngf * 8, 4, 1, 0, bias=False),
nn.BatchNorm2d(ngf * 8),
nn.ReLU(True),
# state size. (ngf*8) x 4 x 4
nn.ConvTranspose2d(ngf * 8, ngf * 4, 4, 2, 1, bias=False),
nn.BatchNorm2d(ngf * 4),
nn.ReLU(True),
# state size. (ngf*4) x 8 x 8
nn.ConvTranspose2d( ngf * 4, ngf * 2, 4, 2, 1, bias=False),
nn.BatchNorm2d(ngf * 2),
nn.ReLU(True),
# state size. (ngf*2) x 16 x 16
nn.ConvTranspose2d( ngf * 2, ngf, 4, 2, 1, bias=False),
nn.BatchNorm2d(ngf),
nn.ReLU(True),
# state size. (ngf) x 32 x 32
nn.ConvTranspose2d( ngf, nc, 4, 2, 1, bias=False),
nn.Tanh()
# state size. (nc) x 64 x 64
)
def forward(self, input):
return self.main(input)
netG = Generator(ngpu).to(device)
# Handle multi-gpu if desired
if (device.type == 'cuda') and (ngpu > 1):
netG = nn.DataParallel(netG, list(range(ngpu)))
# Apply the weights_init function to randomly initialize all weights
# to mean=0, stdev=0.2.
netG.apply(weights_init)
# Print the model
print(netG)
回忆以下参数含义: nz:隐向量的大小,也就是噪声z, 这里是100 ngf:生成器特征映射的大小,这里是64
class torch.nn.ConvTranspose2d(in_channels, out_channels, kernel_size, stride=1, padding=0, output_padding=0, groups=1, bias=True, dilation=1)
转置卷积或反卷积 利用指定大小的二维转置卷积核对输入的多通道二维输入信号进行转置卷积(当然此卷积也是互相关操作,cross-correlation)操作的模块。
判决器
1
2
3
4
5
6
7
8
9
10
11
12
13
14
15
16
17
18
19
20
21
22
23
24
25
26
27
28
29
30
31
32
33
34
35
36
37
38
39
40
class Discriminator(nn.Module):
    def __init__(self, ngpu):
        super(Discriminator, self).__init__()
        self.ngpu = ngpu
        self.main = nn.Sequential(
            # input is (nc) x 64 x 64
            nn.Conv2d(nc, ndf, 4, 2, 1, bias=False),
            nn.LeakyReLU(0.2, inplace=True),
            # state size. (ndf) x 32 x 32
            nn.Conv2d(ndf, ndf * 2, 4, 2, 1, bias=False),
            nn.BatchNorm2d(ndf * 2),
            nn.LeakyReLU(0.2, inplace=True),
            # state size. (ndf*2) x 16 x 16
            nn.Conv2d(ndf * 2, ndf * 4, 4, 2, 1, bias=False),
            nn.BatchNorm2d(ndf * 4),
            nn.LeakyReLU(0.2, inplace=True),
            # state size. (ndf*4) x 8 x 8
            nn.Conv2d(ndf * 4, ndf * 8, 4, 2, 1, bias=False),
            nn.BatchNorm2d(ndf * 8),
            nn.LeakyReLU(0.2, inplace=True),
            # state size. (ndf*8) x 4 x 4
            nn.Conv2d(ndf * 8, 1, 4, 1, 0, bias=False),
            nn.Sigmoid()
        )

    def forward(self, input):
        return self.main(input)

netD = Discriminator(ngpu).to(device)

# Handle multi-gpu if desired
if (device.type == 'cuda') and (ngpu > 1):
    netD = nn.DataParallel(netD, list(range(ngpu)))

# Apply the weights_init function to randomly initialize all weights
#  to mean=0, stdev=0.2.
netD.apply(weights_init)

# Print the model
print(netD)
nc:输入图片的通道数, 这里是3 ndf:判决器特征映射的大小,这里是64
输入输出过程:3 $\rightarrow$ 64 $\rightarrow$ 128 $\rightarrow$ 256 $\rightarrow$ 512 $\rightarrow$ 1, 然后经过sigmoid的激活,二分类。
损失函数及优化器
1
2
3
4
5
6
7
8
9
10
11
12
13
criterion = nn.BCELoss()

# Create batch of latent vectors that we will use to visualize
#  the progression of the generator
fixed_noise = torch.randn(64, nz, 1, 1, device=device)

# Establish convention for real and fake labels during training
real_label = 1
fake_label = 0

# Setup Adam optimizers for both G and D
optimizerD = optim.Adam(netD.parameters(), lr=lr, betas=(beta1, 0.999))
optimizerG = optim.Adam(netG.parameters(), lr=lr, betas=(beta1, 0.999))
损失函数使用交叉熵损失 优化器使用Adam优化
训练
1
2
3
4
5
6
7
8
9
10
11
12
13
14
15
16
17
18
19
20
21
22
23
24
25
26
27
28
29
30
31
32
33
34
35
36
37
38
39
40
41
42
43
44
45
46
47
48
49
50
51
52
53
54
55
56
57
58
59
60
61
62
63
64
65
66
67
68
69
70
71
72
73
74
75
76
77
78
79
80
81
82
# Training Loop

# Lists to keep track of progress
img_list = []
G_losses = []
D_losses = []
iters = 0

print("Starting Training Loop...")
# For each epoch
for epoch in range(num_epochs):
    # 从Dataloader加载数据,
    for i, data in enumerate(dataloader, 0):

        ############################
        # (1) Update D network: maximize log(D(x)) + log(1 - D(G(z)))
        ###########################
        ## Train with all-real batch
        netD.zero_grad()
        # 将batch数据放入
        real_cpu = data[0].to(device)
        b_size = real_cpu.size(0)
		# full参数:大小,输入
        label = torch.full((b_size,), real_label, device=device)
        # 拉成一维前向传播
        output = netD(real_cpu).view(-1)
        # 计算loss
        errD_real = criterion(output, label)
        # 计算梯度,反向传播
        errD_real.backward()
        D_x = output.mean().item()

        ## Train with all-fake batch
        # Generate batch of latent vectors
        noise = torch.randn(b_size, nz, 1, 1, device=device)
        # 生成器生成假图片
        fake = netG(noise)
        label.fill_(fake_label)
        # 用判决器来判断生成的图像
        output = netD(fake.detach()).view(-1)
        # 计算判决器的loss
        errD_fake = criterion(output, label)
        # 判决器反向传播
        errD_fake.backward()
        D_G_z1 = output.mean().item()
        # 判决器和生成器的loss相加
        errD = errD_real + errD_fake
        # 更新判决器
        optimizerD.step()

        ############################
        # (2) Update G network: maximize log(D(G(z)))
        ###########################
        netG.zero_grad()
        label.fill_(real_label)  # fake labels are real for generator cost
        # 因为已经更新过判决器D了,现在再进行一次前向传播
        output = netD(fake).view(-1)
        # 计算生成器的loss
        errG = criterion(output, label)
        # 反向传播计算梯度
        errG.backward()
        D_G_z2 = output.mean().item()
        # 更新生成器
        optimizerG.step()

        # Output training stats
        if i % 50 == 0:
            print('[%d/%d][%d/%d]\tLoss_D: %.4f\tLoss_G: %.4f\tD(x): %.4f\tD(G(z)): %.4f / %.4f'
                  % (epoch, num_epochs, i, len(dataloader),
                     errD.item(), errG.item(), D_x, D_G_z1, D_G_z2))

        # Save Losses for plotting later
        G_losses.append(errG.item())
        D_losses.append(errD.item())

        # Check how the generator is doing by saving G's output on fixed_noise
        if (iters % 500 == 0) or ((epoch == num_epochs-1) and (i == len(dataloader)-1)):
            with torch.no_grad():
                fake = netG(fixed_noise).detach().cpu()
            img_list.append(vutils.make_grid(fake, padding=2, normalize=True))

        iters += 1
enumerate(sequence, [start=0])
- sequence – 一个序列、迭代器或其他支持迭代对象。
- start – 下标起始位置
1
2
3
4
5
6
7
>>>seq = ['one', 'two', 'three']
>>> for i, element in enumerate(seq):
...     print i, element
...
0 one
1 two
2 three
i为迭代次数,data为返回内容
torch.full(size, fill_value, out=None, dtype=None, layout=torch.strided, device=None, requires_grad=False) → Tensor
实验结果
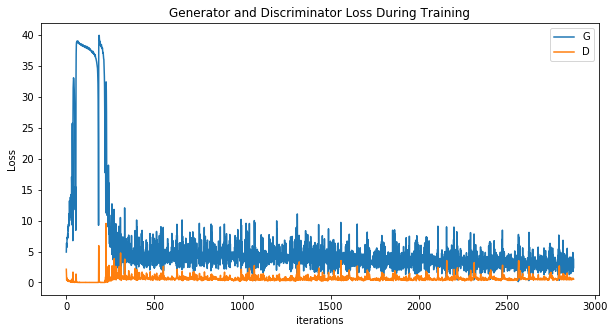
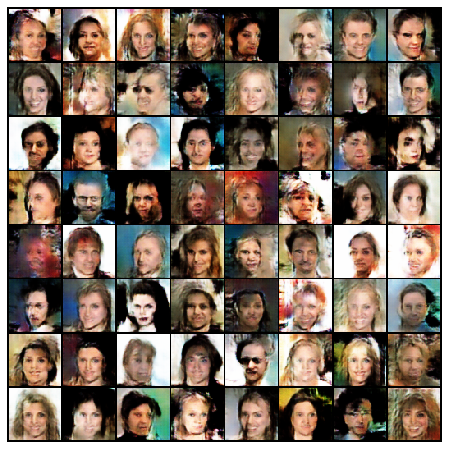

这仅仅在我的MX250上跑了5个epoch,训练更多的话有更好的效果
实现部分(代码II)
引入相关包
1
2
3
4
5
6
7
8
9
10
11
12
13
14
15
import argparse
import os
import numpy as np
import math

import torchvision.transforms as transforms
from torchvision.utils import save_image

from torch.utils.data import DataLoader
from torchvision import datasets
from torch.autograd import Variable

import torch.nn as nn
import torch.nn.functional as F
import torch
相关参数初始化
1
2
3
4
5
6
7
8
9
10
11
12
13
14
15
16
17
18
19
20
21
22
23
parser = argparse.ArgumentParser()
parser.add_argument("--n_epochs", type=int, default=200, help="number of epochs of training")
parser.add_argument("--batch_size", type=int, default=64, help="size of the batches")
parser.add_argument("--lr", type=float, default=0.0002, help="adam: learning rate")
parser.add_argument("--b1", type=float, default=0.5, help="adam: decay of first order momentum of gradient")
parser.add_argument("--b2", type=float, default=0.999, help="adam: decay of first order momentum of gradient")
parser.add_argument("--n_cpu", type=int, default=8, help="number of cpu threads to use during batch generation")
parser.add_argument("--latent_dim", type=int, default=100, help="dimensionality of the latent space")
parser.add_argument("--img_size", type=int, default=32, help="size of each image dimension")
parser.add_argument("--channels", type=int, default=3, help="number of image channels")
parser.add_argument("--sample_interval", type=int, default=400, help="interval between image sampling")
opt = parser.parse_known_args()[0]
print(opt)

cuda = True if torch.cuda.is_available() else False

def weights_init_normal(m):
    classname = m.__class__.__name__
    if classname.find("Conv") != -1:
        torch.nn.init.normal_(m.weight.data, 0.0, 0.02)
    elif classname.find("BatchNorm2d") != -1:
        torch.nn.init.normal_(m.weight.data, 1.0, 0.02)
        torch.nn.init.constant_(m.bias.data, 0.0)
生成器
1
2
3
4
5
6
7
8
9
10
11
12
13
14
15
16
17
18
19
20
21
22
23
24
25
26
27
28
29
class Generator(nn.Module):
    def __init__(self):
        super(Generator, self).__init__()

        self.init_size = opt.img_size // 4
        # 第一层是为了把的噪声(batch_size, 100)
        # 拉到 (batch_size, 128, img_size, img_size)
        self.l1 = nn.Sequential(nn.Linear(opt.latent_dim, 128 * self.init_size ** 2))

        self.conv_blocks = nn.Sequential(
            nn.BatchNorm2d(128),
            nn.Upsample(scale_factor=2),
            nn.Conv2d(128, 128, 3, stride=1, padding=1),
            nn.BatchNorm2d(128, 0.8),
            nn.LeakyReLU(0.2, inplace=True),
            nn.Upsample(scale_factor=2),
            nn.Conv2d(128, 64, 3, stride=1, padding=1),
            nn.BatchNorm2d(64, 0.8),
            nn.LeakyReLU(0.2, inplace=True),
            nn.Conv2d(64, opt.channels, 3, stride=1, padding=1),
            nn.Tanh(),
        )

    def forward(self, z):
        out = self.l1(z)
        out = out.view(out.shape[0], 128, self.init_size, self.init_size)
        img = self.conv_blocks(out)
        return img
这里第一层是个线性层,为了将shape为(batch_size, 100)的噪声拉成(batch_size, 128, img_size, img_size)
class torch.nn.Upsample(size=None, scale_factor=None, mode=’nearest’, align_corners=None)
input:(batch_size, channels, Height, Width) output: (batch_size, channels, Height * scale_factor , Width * scale_factor)
class torch.nn.ConvTranspose2d(in_channels, out_channels, kernel_size, stride=1, padding=0, output_padding=0, groups=1, bias=True, dilation=1)
input: (batch_size, channels, Height~in~, Width~in~) output: (batch_size, channels, Height~in~, Width~in~)
\[H_{out} = (H_{in}-1)\times stride[0] - 2 \times padding[0] + kenel\_size[0] + output\_padding[0]\] \[W_{out} = (W_{in}-1)\times stride[1] - 2 \times padding[1] + kenel\_size[1] + output\_padding[1]\]所以Upsample加上Conv2d实现效果相当于ConvTranspose2d。
判决器
1
2
3
4
5
6
7
8
9
10
11
12
13
14
15
16
17
18
19
20
21
22
23
24
25
26
27
class Discriminator(nn.Module):
    def __init__(self):
        super(Discriminator, self).__init__()

        def discriminator_block(in_filters, out_filters, bn=True):
            block = [nn.Conv2d(in_filters, out_filters, 3, 2, 1), nn.LeakyReLU(0.2, inplace=True), nn.Dropout2d(0.25)]
            if bn:
                block.append(nn.BatchNorm2d(out_filters, 0.8))
            return block

        self.model = nn.Sequential(
            *discriminator_block(opt.channels, 16, bn=False),
            *discriminator_block(16, 32),
            *discriminator_block(32, 64),
            *discriminator_block(64, 128),
        )

        # The height and width of downsampled image
        ds_size = opt.img_size // 2 ** 4
        self.adv_layer = nn.Sequential(nn.Linear(128 * ds_size ** 2, 1), nn.Sigmoid())

    def forward(self, img):
        out = self.model(img)
        out = out.view(out.shape[0], -1)
        validity = self.adv_layer(out)

        return validity
卷积之后加上BatchNorm使得训练更稳定,代码I经常Collapse。
在卷积层后加上一层全连接层拉成一维,增加了训练的参数。
损失函数及优化器
1
2
3
4
5
6
7
8
9
10
11
12
13
14
15
16
17
18
19
20
21
22
23
24
25
26
27
28
29
30
31
32
33
# Loss function
adversarial_loss = torch.nn.BCELoss()

# Initialize generator and discriminator
generator = Generator()
discriminator = Discriminator()

if cuda:
    generator.cuda()
    discriminator.cuda()
    adversarial_loss.cuda()

# Initialize weights
generator.apply(weights_init_normal)
discriminator.apply(weights_init_normal)

# Configure data loader
dataloader = torch.utils.data.DataLoader(
    datasets.ImageFolder(
        "./data/",
        transform=transforms.Compose(
            [transforms.Resize(opt.img_size), transforms.ToTensor(), transforms.Normalize([0.5], [0.5])]
        ),
    ),
    batch_size=opt.batch_size,
    shuffle=True,
)

# Optimizers
optimizer_G = torch.optim.Adam(generator.parameters(), lr=opt.lr, betas=(opt.b1, opt.b2))
optimizer_D = torch.optim.Adam(discriminator.parameters(), lr=opt.lr, betas=(opt.b1, opt.b2))

Tensor = torch.cuda.FloatTensor if cuda else torch.FloatTensor
训练
1
2
3
4
5
6
7
8
9
10
11
12
13
14
15
16
17
18
19
20
21
22
23
24
25
26
27
28
29
30
31
32
33
34
35
36
37
38
39
40
41
42
43
44
45
46
47
48
49
50
51
52
53
54
55
# ----------
#  Training
# ----------

for epoch in range(opt.n_epochs):
    for i, (imgs, _) in enumerate(dataloader):

        # Adversarial ground truths
        valid = Variable(Tensor(imgs.shape[0], 1).fill_(1.0), requires_grad=False)
        fake = Variable(Tensor(imgs.shape[0], 1).fill_(0.0), requires_grad=False)

        # Configure input
        real_imgs = Variable(imgs.type(Tensor))
        real_imgs = real_imgs.resize_(imgs.shape[0], opt.channels, opt.img_size,  opt.img_size)

        # -----------------
        #  Train Generator
        # -----------------

        optimizer_G.zero_grad()

        # Sample noise as generator input
        z = Variable(Tensor(np.random.normal(0, 1, (imgs.shape[0], opt.latent_dim))))

        # Generate a batch of images
        gen_imgs = generator(z)

        # Loss measures generator's ability to fool the discriminator
        g_loss = adversarial_loss(discriminator(gen_imgs), valid)

        g_loss.backward()
        optimizer_G.step()

        # ---------------------
        #  Train Discriminator
        # ---------------------

        optimizer_D.zero_grad()

        # Measure discriminator's ability to classify real from generated samples
        real_loss = adversarial_loss(discriminator(real_imgs), valid)
        fake_loss = adversarial_loss(discriminator(gen_imgs.detach()), fake)
        d_loss = (real_loss + fake_loss) / 2

        d_loss.backward()
        optimizer_D.step()

        print(
            "[Epoch %d/%d] [Batch %d/%d] [D loss: %f] [G loss: %f]"
            % (epoch, opt.n_epochs, i, len(dataloader), d_loss.item(), g_loss.item())
        )

        batches_done = epoch * len(dataloader) + i
        if batches_done % opt.sample_interval == 0:
            save_image(gen_imgs.data[:25], "images/%d.png" % batches_done, nrow=5, normalize=True)
实验结果
8000张人脸,500的epotch, 128的batch_size效果
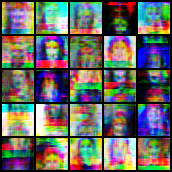
笔者在用DCGAN训练celeba数据集时,遇到G_loss不断上升的问题。
在卷积层后加上BatchNorm层后,效果变好。
总结
DCGAN相较于GAN的网络结构主要将线性层改成了卷积层,整体思路还是不变的。
Reference
- Radford A, Metz L, Chintala S. Unsupervised representation learning with deep convolutional generative adversarial networks[J]. arXiv preprint arXiv:1511.06434, 2015.
- 数据集下载
- pytorch系列10 — 如何自定义参数初始化方式 ,apply()
- 一文搞懂深度网络初始化(Xavier and Kaiming initialization)
- 深度学习中Xavier初始化
- PyTorch-GAN/implementations/dcgan